Objectives
Create a new version of pacemaker using the play framework and deploy this to a cloud provided. Perform some simple tests on the local and hosted version
Install Play
Download and install the latest version of the Play Framework (currently 2.2.1)
This will involve simply unzipping the archive, and placing the unzipped folder on the path.
NB: Please check your version of play! Play 2.1 (the earlier release) has a slightly different layout - so if you have this version please upgrade.
play new pacemakerplay
       _
 _ __ | | __ _ _  _
| '_ \| |/ _' | || |
|  __/|_|\____|\__ /
|_|            |__/

play 2.2.1 built with Scala 2.10.2 (running Java 1.7.0_40), http://www.playframework.com

The new application will be created in /Users/edeleastar/repos/modules/agile/pacemaker/pacemaker-1.0/pacemakerplay

What is the application name? [pacemakerplay]
>

Which template do you want to use for this new application?

  1             - Create a simple Scala application
  2             - Create a simple Java application

> 2
OK, application pacemakerplay is created.

Have fun!
- select 'Simple Java application'
Back in the console, change into the new project folder (pacemakerplay) and run the play command:
cd pacemakerplay
play
this will respond with something like this:
...
       _
 _ __ | | __ _ _  _
| '_ \| |/ _' | || |
|  __/|_|\____|\__ /
|_|            |__/

play 2.2.1 built with Scala 2.10.2 (running Java 1.7.0_40), http://www.playframework.com

> Type "help play" or "license" for more information.
> Type "exit" or use Ctrl+D to leave this console.

[pacemakerplay] $
eclipse
[info] About to create Eclipse project files for your project(s).
[info] Updating {file:/Users/edeleastar/repos/modules/agile/pacemaker/pacemaker-1.0/pacemakerplay/}pacemakerplay...
[info] Resolving org.fusesource.jansi#jansi;1.4 ...
[info] Done updating.
[info] Compiling 4 Scala sources and 2 Java sources to /Users/edeleastar/repos/modules/agile/pacemaker/pacemaker-1.0/pacemakerplay/target/scala-2.10/classes...
[info] Successfully created Eclipse project files for project(s):
[info] pacemakerplay
[pacemakerplay] $
Import this project into eclipse - it should look something like this:
In the play console, enter
run
which should display:
--- (Running the application from SBT, auto-reloading is enabled) ---

[info] play - Listening for HTTP on /0:0:0:0:0:0:0:0:9000

(Server started, use Ctrl+D to stop and go back to the console...)
Browse to :
It should display a standard greeting page.
User Model
Create a new package in app called 'models'. Introduce this class into this package:
package models;

import java.util.List;

import javax.persistence.*;
import play.db.ebean.*;

import com.google.common.base.Objects;

@SuppressWarnings("serial")
@Entity
@Table(name="my_user")
public class User extends Model
{
  @Id
  @GeneratedValue
  public Long   id;
  public String firstname;
  public String lastname;
  public String email;
  public String password;

  public User()
  {
  }

  public User(String firstname, String lastname, String email, String password)
  {
    this.firstname = firstname;
    this.lastname  = lastname;
    this.email     = email;
    this.password  = password;
  }

  public void update (User user)
  {
    this.firstname = user.firstname;
    this.lastname  = user.lastname;
    this.email     = user.email;
    this.password  = user.password;
  }

  public String toString()
  {
    return Objects.toStringHelper(this)
        .add("Id", id)
        .add("Firstname", firstname)
        .add("Lastname", lastname)
        .add("Email", email)
        .add("Passwrod", password).toString();
  }

  @Override
  public boolean equals(final Object obj)
  {
    if (obj instanceof User)
    {
      final User other = (User) obj;
      return Objects.equal(firstname, other.firstname)
          && Objects.equal(lastname, other.lastname)
          && Objects.equal(email, other.email);
    }
    else
    {
      return false;
    }
  }

  public static User findByEmail(String email)
  {
    return  User.find.where().eq("email", email).findUnique();
  }

  public static User findById(Long id)
  {
    return find.where().eq("id", id).findUnique();
  }

  public static List<User> findAll()
  {
    return find.all();
  }

  public static void deleteAll()
  {
    for (User user: User.findAll())
    {
      user.delete();
    }
  }

  public static Model.Finder<String, User> find = new Model.Finder<String, User>(String.class, User.class);
}
Parsers
Open build.sbt in the project, and add on a requirement for a new libary (flexjson)
name := "pacemakerplay"

version := "1.0-SNAPSHOT"

libraryDependencies ++= Seq(
  javaJdbc,
  javaEbean,
  cache,
  "net.sf.flexjson" % "flexjson" % "3.1"
)

play.Project.playJavaSettings
Note the ',' appended to previous line (as in 'cache,').
Back in the play console terminate the project by pressing `control-D' and enter the following two commands:
reload
eclipse
.. and refresh the project in eclipse.
Now create a new package called 'parsers' and bring in this class:
package parsers;

import models.User;
import flexjson.JSONDeserializer;
import flexjson.JSONSerializer;

public class JsonParser
{
  private static JSONSerializer  userSerializer     = new JSONSerializer();

  public static User renderUser(String json)
  {
    return new JSONDeserializer<User>().deserialize(json, User.class);
  }

  public static String renderUser(Object obj)
  {
    return userSerializer.serialize(obj);
  }
}
Compile the project again by typing 'compile' in the play console (stop it using Ctrl-D if it is running). The project should be without error, run it in the console again and browse to:
The same greeting page should be displayed.
Controller
There is already a package called 'controllers'. Create a new class in this package:
package controllers;

import static parsers.JsonParser.*;
import play.mvc.*;

import java.util.*;

import models.*;

public class PacemakerAPI extends Controller
{

  public static Result  users()
  {
    List<User> users = User.findAll();
    return ok(renderUser(users));
  }

  public static Result user(Long id)
  {
    User user = User.findById(id);
    return user==null? notFound() : ok(renderUser(user));
  }

  public static Result createUser()
  {
    User user = renderUser(request().body().asJson().toString());
    user.save();
    return ok(renderUser(user));
  }

  public static Result deleteUser(Long id)
  {
    Result result = notFound();
    User user = User.findById(id);
    if (user != null)
    {
      user.delete();
      result = ok();
    }
    return result;
  }

  public static Result deleteAllUsers()
  {
    User.deleteAll();
    return ok();
  }

  public static Result updateUser(Long id)
  {
    Result result = notFound();
    User user = User.findById(id);
    if (user != null)
    {
      User updatedUser = renderUser(request().body().asJson().toString());
      user.update(updatedUser);
      user.save();
      result = ok(renderUser(user));
    }
    return result;
  }
}
The project should continue to be without errors.
Routes
Open the file conf/routes in eclipse, and introduce the following entries (immediately below 'GET /')
GET     /api/users                            controllers.PacemakerAPI.users()
DELETE  /api/users                            controllers.PacemakerAPI.deleteAllUsers()
POST    /api/users                            controllers.PacemakerAPI.createUser()

GET    /api/users/:id                         controllers.PacemakerAPI.user(id: Long)
DELETE /api/users/:id                         controllers.PacemakerAPI.deleteUser(id: Long)
PUT    /api/users/:id                         controllers.PacemakerAPI.updateUser(id: Long)
Now open conf/application.conf and uncomment the following lines:
db.default.driver=org.h2.Driver
db.default.url="jdbc:h2:mem:play"
db.default.user=sa
db.default.password=""

ebean.default="models.*"
... and enter the following:
applyEvolutions.default=true
Back in the play console, terminate the project if is already running (Control-D), and enter the following commands in the play console:
reload
compile
h2-browser
run
Then browse to:
It should show the welcome page.
The h2-console window should also be open on a log in screen:
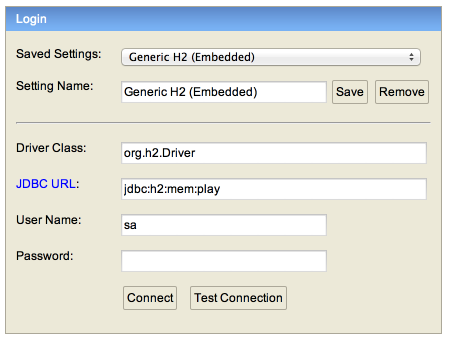
Make sure your connection parameters match the ones above:
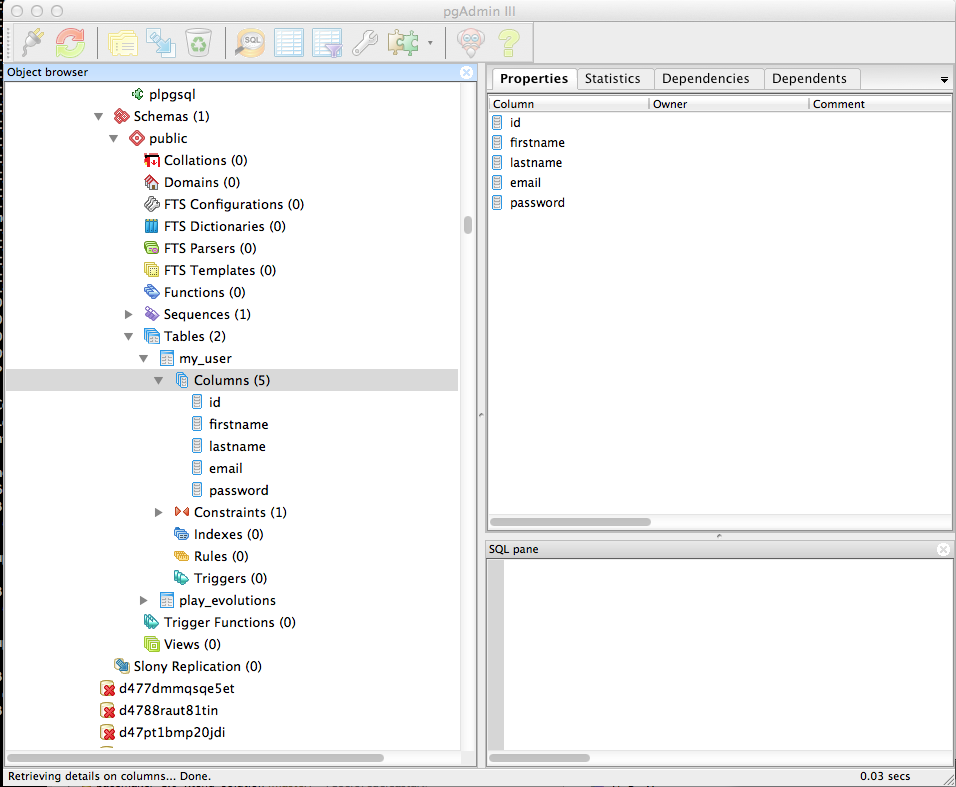
Press "Connect" - you should be able to browse the database - containing the table 'MY_USER':

If your project is not compiling for some reason, this is an archive of the completed project here.
Testing
Make sure the app is running, and browse to :
Viewing the page source, you should see:
[]
Also, if using chrome, keep an eye on the actual http traffic (via Tools menu ->Developers Tools):
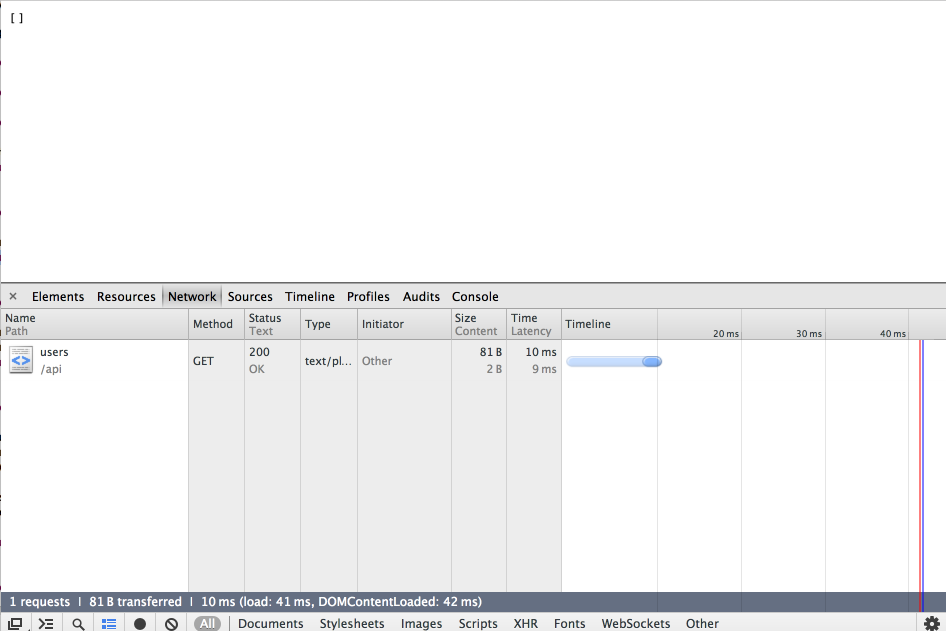
Try browsing to this url:
The browser will be blank, however, the developer tools should display the actual response:

This reveals a '404' not found error.
More comprehensive tools for testing http interfaces are available. Search for the Chrome 'Postman REST Client' - and install as a chrome app on your workstation. Using Postman, experiment with the two links we tested above:
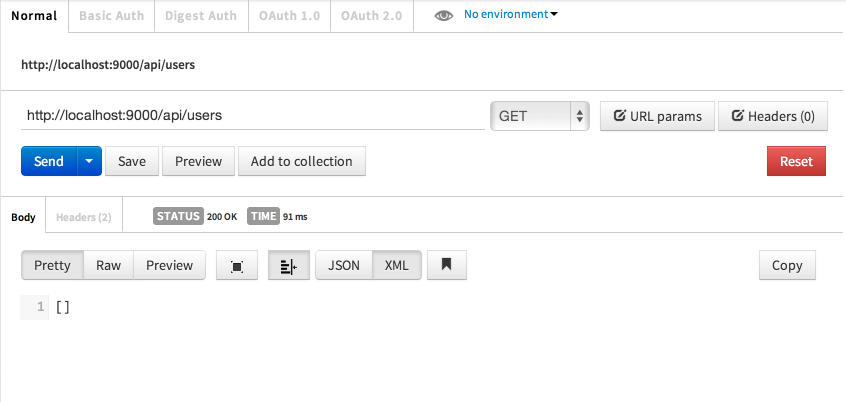
Now try to replicate the request as shown below (note the `Headers' Content-Type set to 'application/json':
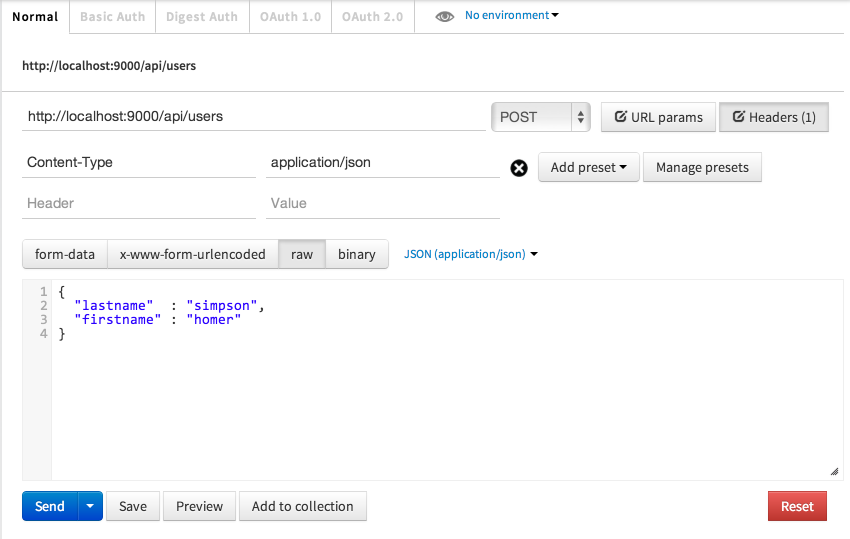
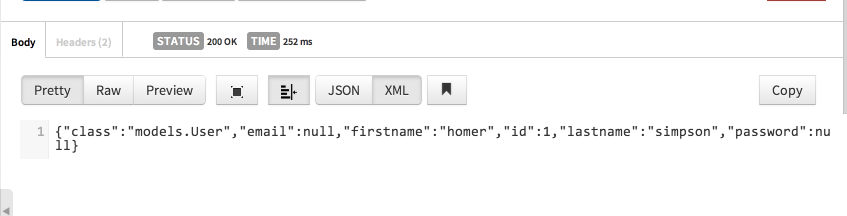
When you press 'Send' you may see this response:
No try this request again:
In the above interchange, we have use the REST interface to create a User, and then subsequently get the user (by the id 1).
Create a few more users and verify that you can get them. See if you can also do the following:
- Delete (via a DELETE) request
- Update (via a PUT) request.
Also, examine the database via the h2-console, and see if you can verify if the 'my_users' table is being updated.
Deployment
Create a free account on heroku:
From this site, Install git + heroku toolbelt (these may be combined into a single install by heroku).
You will need to set up shared ssh keys at this stage in order to communicate correctly with heroku:
In our project, we need to change the database driver to 'postgress'. Open build.sbt and add a new dependency:
name := "pacemakerplay"

version := "1.0-SNAPSHOT"

libraryDependencies ++= Seq(
  javaJdbc,
  javaEbean,
  cache,
  "net.sf.flexjson" % "flexjson" % "3.1",
  "postgresql" % "postgresql" % "9.1-901-1.jdbc4"
)

play.Project.playJavaSettings
(Note the ',' on the proceeding line again)
Test these changes by running 'reload' and 'compile' in the play console.
Before we can deploy the app, we need to indicate that we wish to use the database deployed on Heroku, and not the embedded database we have for test purposes locally. Open conf/application.conf again, and make the following adjustments:
db.default.driver=org.postgresql.Driver
db.default.url=${DATABASE_URL}

#db.default.driver=org.h2.Driver
#db.default.url="jdbc:h2:mem:play"
#db.default.user=sa
#db.default.password=""
That is, we comment out the local settings, and bring in a driver for postgress + indicate the database connection string is to come from the environment variable on heroku.
Save these changes now and open the shell in the pacemakerplay folder, and enter the following commands:
$ git init
$ git add .
$ git commit -m "init"
$ heroku create
Assuming your ssh keys have been set up correctly, this will create an application on heroku - keep track of the url it generates for the app ('http://polar-basin-1694.herokuapp.com` below)
Creating polar-basin-1694... done, stack is cedar
http://polar-basin-1694.herokuapp.com/ | git@heroku.com:polar-basin-1694.git
Git remote heroku added
Now deploy your app:
git push heroku master
Counting objects: 44, done.
Delta compression using up to 8 threads.
Compressing objects: 100% (34/34), done.
Writing objects: 100% (44/44), 39.76 KiB | 0 bytes/s, done.
Total 44 (delta 4), reused 0 (delta 0)

-----> Play 2.x - Java app detected
-----> Installing OpenJDK 1.6...done
-----> Building app with sbt
-----> Running: sbt clean compile stage
       Getting org.scala-sbt sbt 0.13.0 ...
      ...
      ...
      ...
[info] Done packaging.
       [success] Total time: 7 s, completed Oct 30, 2013 8:55:55 AM
-----> Dropping ivy cache from the slug
-----> Dropping project boot dir from the slug
-----> Dropping compilation artifacts from the slug
-----> Discovering process types
       Procfile declares types -> web

-----> Compiled slug size: 84.4MB
-----> Launching... done, v6
       http://polar-basin-1694.herokuapp.com deployed to Heroku

To git@heroku.com:polar-basin-1694.git
 * [new branch]      master -> master
This may take some time, but eventually your app should be successfully deployed.
Now try these commands from within the project folder:
heroku ps
heroku logs
heroku open
The last command should open your app in a browser. Experiment with some of the urls we used in the last step. Also, use Postman to create some users like we did with the local version.
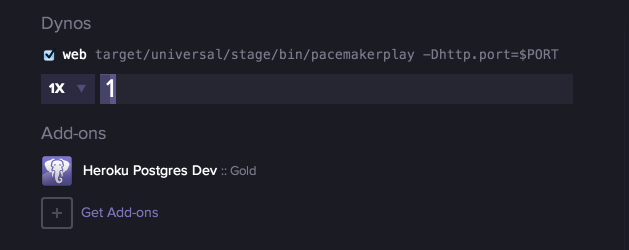
Also, visit the heroku dashboard:
... and explore the various settings for your app. Play close attention to the database 'Add on'. Have a look at this and its settings.
The databases are also listed independently here:
Test
The h2 browser is not usable on the heroku infrastructure (is it postgress after all), so we should switch to postgress
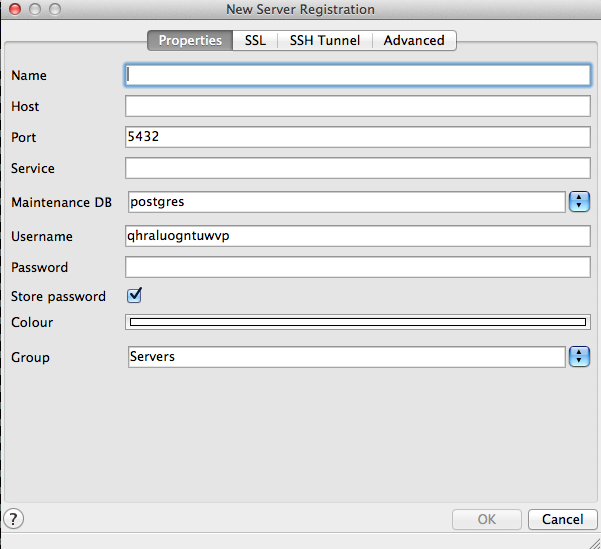
Install a suitable version of pgadmin for your system:
The following guide should enable you to connect the admin tool directly to your database
Your database should be listed here:
The following screenshots might give you a guide as to how to connect to the database using settings extracted from above.
It can be difficult to locate your database - but it is in there somewhere:

Connecting Local App to Remote Database
Our local application and our remote version are configured to use different databases. These configurations are visible in application.conf:
db.default.driver=org.postgresql.Driver
db.default.url=${DATABASE_URL}

#db.default.driver=org.h2.Driver
#db.default.url="jdbc:h2:mem:play"
#db.default.user=sa
#db.default.password=""
In the above it is configured for remote (heroku) database. In order to run locally (play run from the shell), comment out the first two entries and comment in the remaining four:
#db.default.driver=org.postgresql.Driver
#db.default.url=${DATABASE_URL}

db.default.driver=org.h2.Driver
db.default.url="jdbc:h2:mem:play"
db.default.user=sa
db.default.password=""
It will be useful to try an alternative combination - run the application locally, but have it use the heroku hosted database. This can be particularly important where there are significant differences in database SQL dialects. Here is how to do it.
- Locate the JDBC connection string for your database on heroku. This found by navigating to your app on heroku:
- select the postgress database
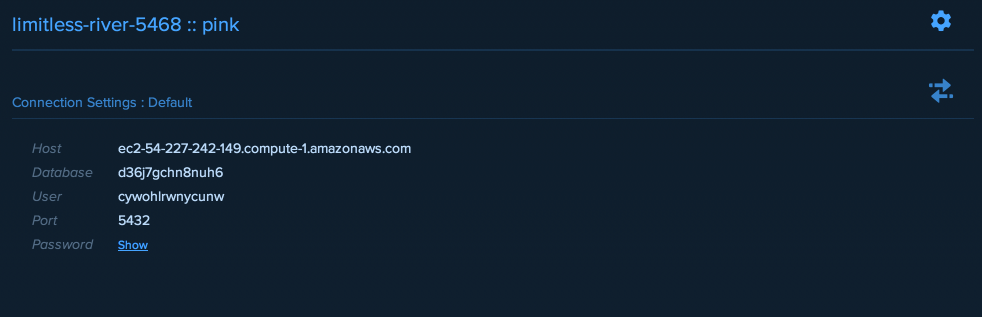
- on the right locate the JDBC connection string:
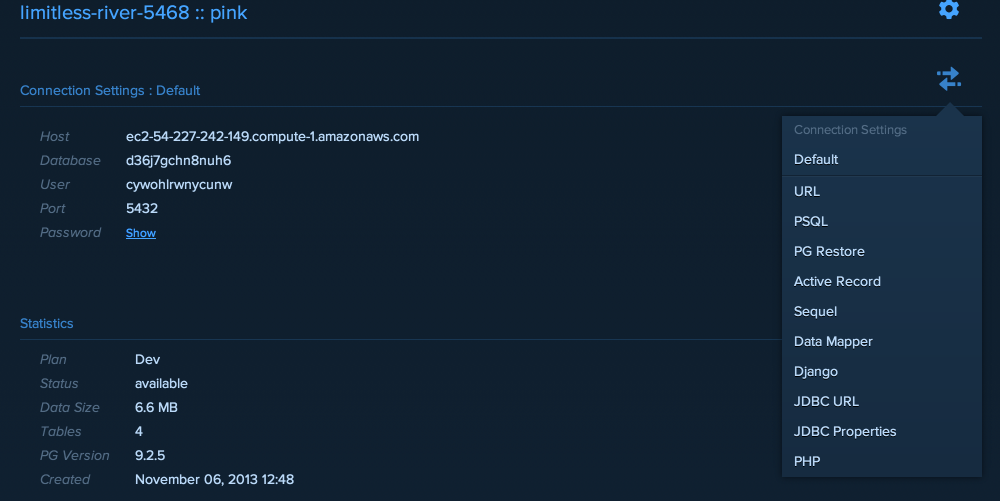
- this should reveal the string:

- Copy this, and place it in your application.conf as your default url - something like this:
db.default.driver=org.postgresql.Driver
db.default.url="jdbc:postgresql://ec2-54-227-242-149.compute-1.amazonaws.com:5432/d36j7gchn8nuh6?user=cywohlrwnycunw&password=X2-VqariG0cbludR74bVWqRzQK&ssl=true"
#db.default.url=${DATABASE_URL}

#db.default.driver=org.h2.Driver
#db.default.url="jdbc:h2:mem:play"
#db.default.user=sa
#db.default.password=""
- The connection string will need one more fragment before it can work - append the following directly to the end of the string (immediately after the '=true':
&sslfactory=org.postgresql.ssl.NonValidatingFactory
Now, restart the local app, it should be using the postgress database on Heroku (it will be a litte slower relfecting this). The technique above is disussed in detail here:
Exercises
Archive of the project so far (withoout heroku settings):
Exercise 1: Activities:
Consider introducing the Activity model from our console pacemaker app.
Do not establish a relationship between user and activities yet, just consider how the model can be introduced and a simple API for accessing it (based on this lab) deployed and tested.
Exercise 2: Heroku Commands
Open another shell in your pacemaker folder. Experiment with the heroku logs command:
heroku logs -t
which will let you monitor the remote app.
Also, explore these commands
heroku pg:info
and
heroku pg:reset
The last command provides a way of resetting (deleting) the schema for the database. See if you can use the command to delete the database, and then re-deploy the application.