Objectives
In this version of MyRent, we introduce a range of UI Widgits to evolve the UX into something more useful. These widgits will be 'active', meaning that the host Activity will be intercepting and responding to events the user may generate when interacting with the application.
Preview
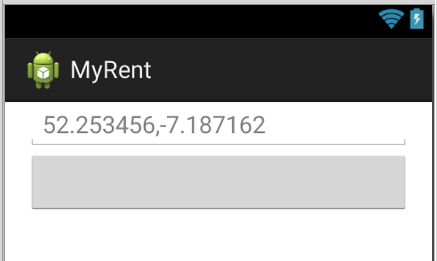
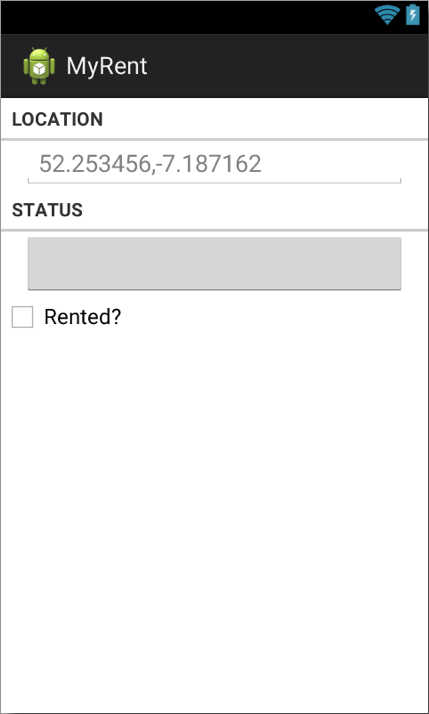
At the end of this topic our goal is to have a screen looking something like this:
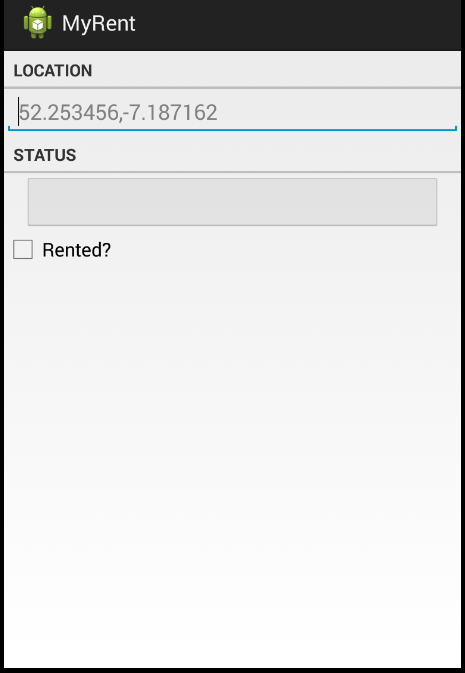
We will have added:
- Section titles (LOCATION & STATUS)
- Button indicating the residence registration date
- Checkbox: a tick indicating the residence rented.
In the previous step we introduced a listener for the geolocation input (the latitude-longitude string).
In this step we shall:
- Add functionality to the Residence model, namely:
- A Date field to indicate when the residence was registered with the MyRent app.
- This shall be instantiated in the Residence constructor.
- A boolean to indicate the rented status of the residence, that is whether or not the residence has a tenant.
- We shall introduce a method to return a suitably formatted version of the Date object in the form of a string.
- This shall be used as the button label in the STATUS section.
- Setters and getters for the rented boolean.
- A Date field to indicate when the residence was registered with the MyRent app.
- In MyRentFragment.onCreate add:
- A listener to capture any change to the rented checkbox status in the UI.
- Maintain the Residence.rented state up-to-date with any such changes.
- A method to write the residence registration date to the date button in the UI.
- A listener to capture any change to the rented checkbox status in the UI.
Restructure MyRent
Before we start to expand the project, we need to perform some rearranging so it can be extended in an orderly manner.
This is our current application workspace (ignore the 'V00' in the project name):

.. and this is a version we would like to move to (ignore the 'V01' in the project name):
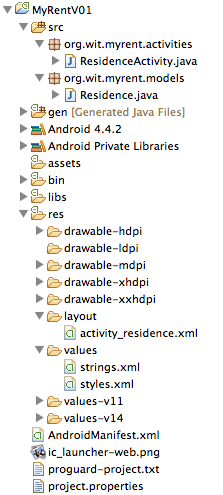
This will require you to rename the two classes + the layout (use the Refactor->Rename menu). You will also need to create e new packages called:
- org.wit.myrent.activities
- org.wit.myrent.models
and make sure the classes are relocated (using drag/drop) to these packages.
Layout
The previous iteration has one UI control, an EditText.
This iteration shall introduce:
- 2 section labels (LOCATION & STATUS).
- A button that will have a label representing the residence registration date and that will be added at runtime.
- A checkbox which when ticked indicates that the residence has a tenant.
Button
Open factivity_residence.xml.
A number of different approaches are available to change the layout.
- Here we shall use a both the graphical display, XML and the outline view.
In graphical display mode drag a Button onto the MyRent canvas as shown in Figure 1.

Observe the red rectangle with the number 1 inside located at the top right of the MyRent screen.
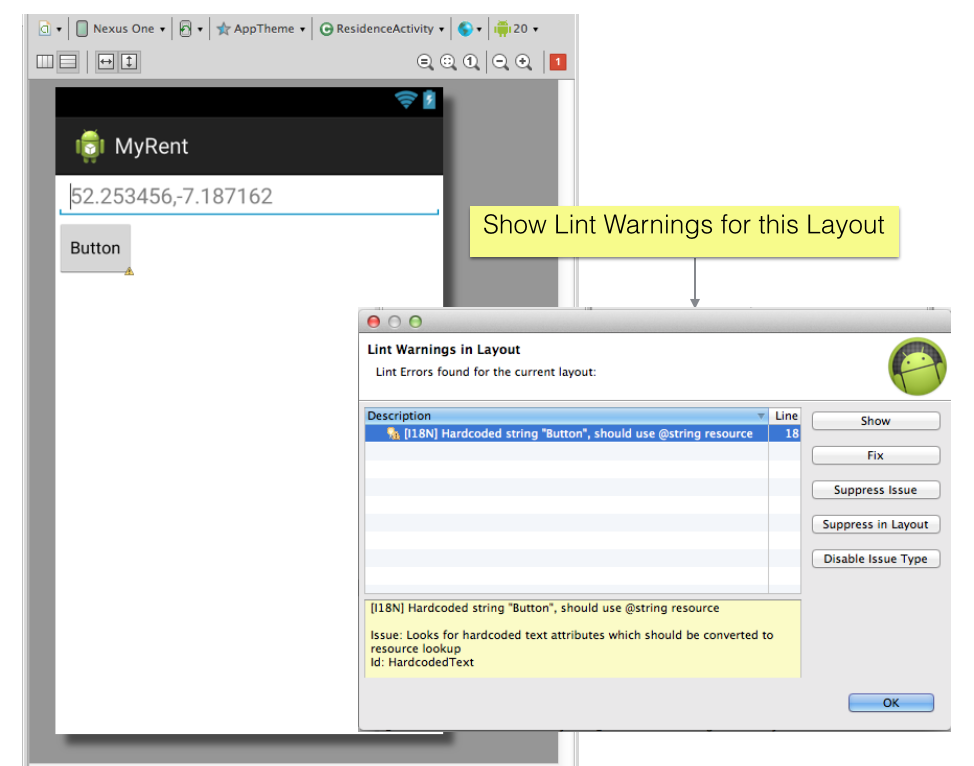
- Hover the cursor over this and note the tooltip : Show Lint Warnings for this Layout.
-
Double click on the rectangle.
-
A window Lint Warnings in Layout opens with a description of the warning.
- In this case the warning is:
- Hardcodedd string "Button" should use @string resource.
- This is telling us to replace hard-coded strings such as the button label and also the button id which is button1 by default.
- We are offered a number of choices in the Lint Warnings in Layout window:
- Show
- Fix
- Suppress Issue
- Suppress in Layout
- Disable Issue Type.
- Select Show: this causes fragment_myrent.xml to open.
- Close the Lint window.
- Make 2 changes to the xml:
- change the id from button1 to registration_date
- delete the text Button and by doing so set the default label to an empty string, in effect.
- the refactored Button element follows:
- In this case the warning is:
      <Button
          android:id="@+id/registration_date"
          android:layout_width="wrap_content"
          android:layout_height="wrap_content"
          android:text="Button" />
Observe the auto-generated line:
<?xml version="1.0" encoding="utf-8"?>
This is not required in the Android development target range we have chosen (API levels 16 - 19) and may, optionally, be omitted in all xml files (despite being auto-generated).
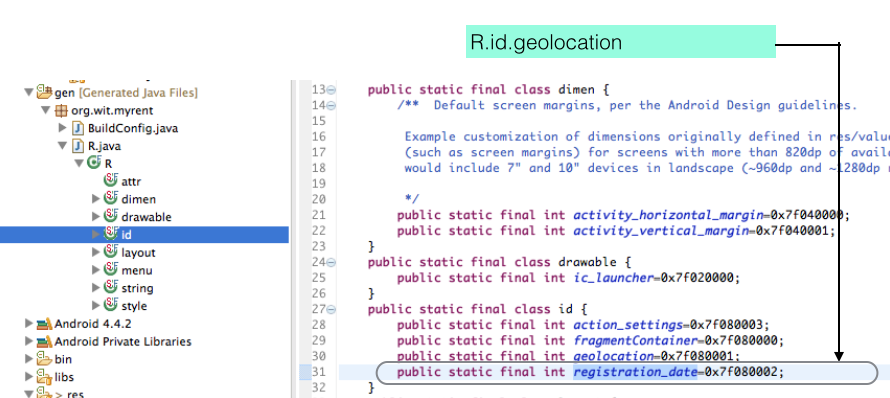
Notice also that a button id has now been generated in the R.java file:
We shall now make some changes to size and position the button:
- Add left and right margins
        android:layout_marginLeft="16dp"
        android:layout_marginRight="16dp"
- Change the layout width to match the parent
android:layout_width="match_parent"
Here is the refactored Button code:
    <Button android:id="@+id/registration_date"
        android:layout_width="match_parent"
        android:layout_height="wrap_content"
        android:layout_marginLeft="16dp"
        android:layout_marginRight="16dp"
        />
When you have made these changes, switch to Graphical Layout. You should be presented with that shown in Figure 4:
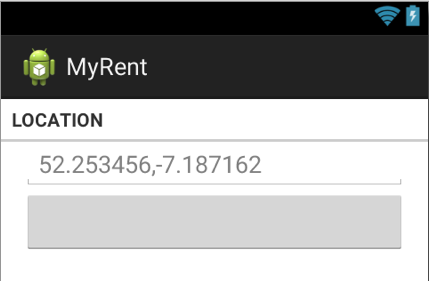
Next we shall add a section label and divider immediately before the geolocation node.
- Use the graphical editor and drag a TextView element into position.
- Then inspect the code in the xml editor.
- Change the width to match parent.
- Change the default android:text to @string/location.
- Style the TextView with a list separator.
- Use R.attr.listSeparatorTextViewStyle
- In res/values/string.xml add a resource for location as follows here:
<string name="location">Location</string>
Here is the completed xml node for the location label:
    <!-- LOCATION -->
    <TextView
         android:layout_width="match_parent"
         android:layout_height="wrap_content"
         android:text="@string/location"
         style="?android:listSeparatorTextViewStyle"/>
Implement these modifications and inspect the result in the Graphical Layout. You should be presented with that shown in Figure 5:
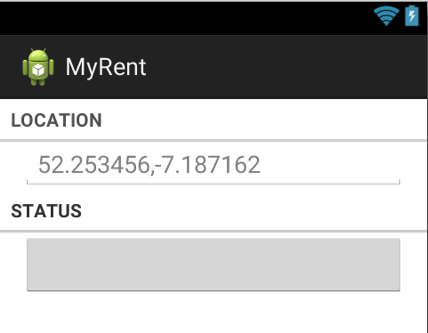
Finally, in this step, add a section label for status.
Here is the xml:
    <!-- STATUS -->
    <TextView
        android:layout_width="match_parent"
        android:layout_height="wrap_content"
        android:text="@string/status"
        style="?android:listSeparatorTextViewStyle"
        />
Add the referenced string resource status in res/values/strings.xml:
<string name="status">Status</string>
The result is shown in Figure 6.
We shall continue with the development of the layout in the following steps.
Add Widgets
We shall now complete remaining work on the layout using the Graphical Layout and the Outline panel.
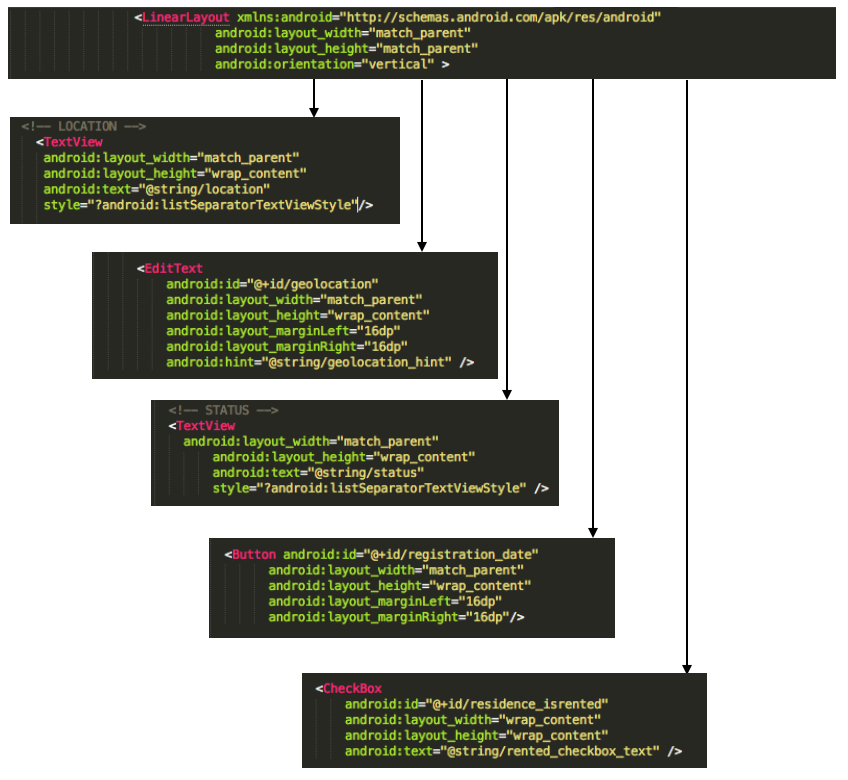
Here is the the layout at this stage of development.
<LinearLayout xmlns:android="http://schemas.android.com/apk/res/android"
    android:layout_width="match_parent"
    android:layout_height="match_parent"
    android:orientation="vertical" >

    <!-- LOCATION -->

    <TextView
        style="?android:listSeparatorTextViewStyle"
        android:layout_width="match_parent"
        android:layout_height="wrap_content"
        android:text="@string/location" />

    <LinearLayout
        android:layout_width="match_parent"
        android:layout_height="wrap_content"
        android:baselineAligned="false"
        android:orientation="horizontal" >

        <!-- Geolocation (GPS Coords) -->

        <EditText
            android:id="@+id/geolocation"
            android:layout_width="match_parent"
            android:layout_height="wrap_content"
            android:hint="@string/geolocation_hint" >

            <requestFocus />
        </EditText>

    </LinearLayout>

    <!-- STATUS -->

    <TextView
        style="?android:listSeparatorTextViewStyle"
        android:layout_width="match_parent"
        android:layout_height="wrap_content"
        android:text="@string/status" />

    <Button android:id="@+id/registration_date"
        android:layout_width="match_parent"
        android:layout_height="wrap_content"
        android:layout_marginLeft="16dp"
        android:layout_marginRight="16dp"
        />

</LinearLayout>
It remains only to add the checkbox.
With the Graphical Layout open, drag a CheckBox from the Form Widgets folder and drop directly underneath the registration_date button in the Outline panel.
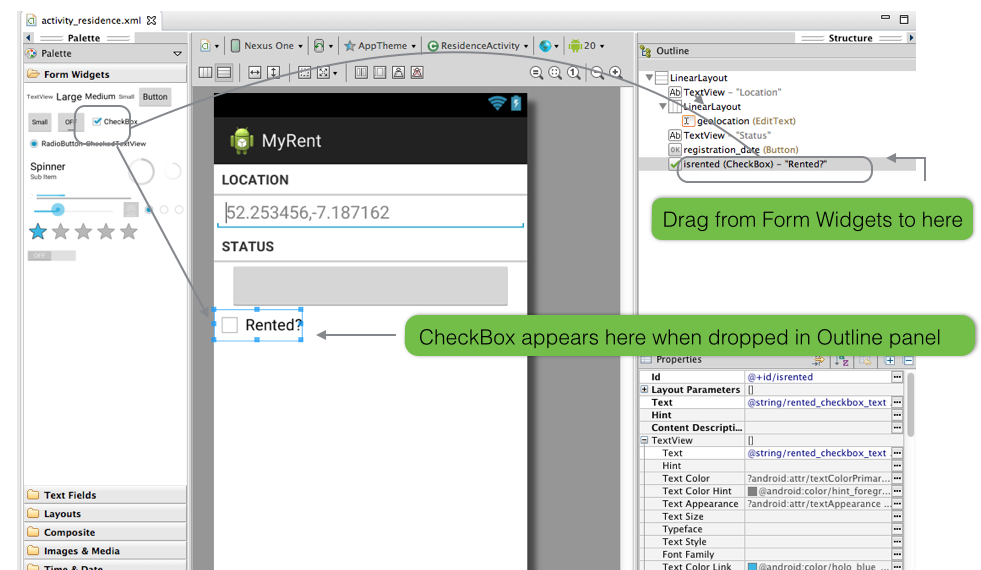
Observe that the CheckBox has been assigned a default id, checkBox1. We shall change this now.
- Double click on the checkBox1 in the Outline panel.
- This opens the XML editor and simultaneously shows the CheckBox element highlighted. See Figure 3.
- Change the +id from checkBox1 to residence_isrented.
- This id will be auto-generated and located in the R file as we have seen earlier.
- Change the android:text from the hard-wired CheckBox to a reference to a string:
- @string/rented_checkbox_text
- Add a corresponding string resource in res/values/strings.xml:
- <string name="rented_checkbox_text">Rented?</string>
 This concludes the layout design and implementation in this step.
- Result to date shown in Figure 4:
The hierarchical arrangement of the layout is shown here in Figure 5.
- Notice that the LinearLayout orientation is vertical thus creating a stack of xml nodes comprising the various UI widgets.
Activity & Model Updates
Residence
Replace your Residence class with the following:
package org.wit.myrent.models;

import java.text.DateFormat;
import java.util.Date;
import java.util.UUID;

public class Residence
{
  public UUID id;

  public String  geolocation;
  public Date    date;
  public boolean rented;

  public Residence()
  {
    id = UUID.randomUUID();
    this.date = new Date();
  }

  public String getDateString()
  {
    return "Registered: " + DateFormat.getDateTimeInstance().format(date);
  }
}
Note that we have made the fields public for convenience. Also, we have introduced a new date and rented fields into the model.
ResidenceActivity
Introduce 2 new fields to access the new widgets we have just introduced:
  private CheckBox rented;
  private Button   dateButton;
and on OnCreate, we need to initialize these:
    dateButton  = (Button)   findViewById(R.id.registration_date);
    rented      = (CheckBox) findViewById(R.id.isrented);
Furthmore, we are going to disable the date button when the activity is created:
dateButton .setEnabled(false);
Run the app now, and verify that the activity launches without incident.
We would now like to engage the checkbox rented. First, implement the OnCheckedChangeListener interface:
public class ResidenceActivity extends Activity implements TextWatcher, OnCheckedChangeListener
{
This will require the following import:
import android.widget.CompoundButton.OnCheckedChangeListener;
and this is the implementation:
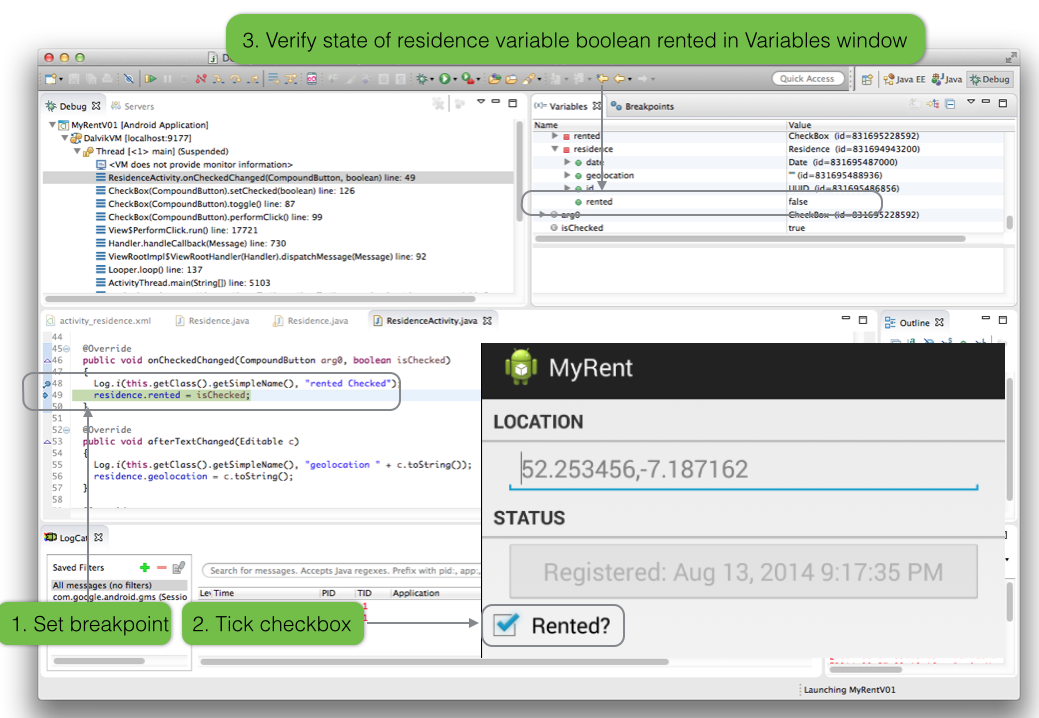
  @Override
  public void onCheckedChanged(CompoundButton arg0, boolean isChecked)
  {
    Log.i(this.getClass().getSimpleName(), "rented Checked");
    residence.rented = isChecked;
  }
This completes the class. Here is the complete code to this stage:
package org.wit.myrent.activities;

import org.wit.myrent.R;
import org.wit.myrent.models.Residence;

import android.app.Activity;
import android.os.Bundle;
import android.text.Editable;
import android.text.TextWatcher;
import android.util.Log;
import android.widget.Button;
import android.widget.CheckBox;
import android.widget.CompoundButton;
import android.widget.EditText;
import android.widget.CompoundButton.OnCheckedChangeListener;

public class ResidenceActivity extends Activity implements TextWatcher, OnCheckedChangeListener
{
  private EditText geolocation;
  private CheckBox rented;
  private Button   dateButton;

  private Residence residence;

  @Override
  public void onCreate(Bundle savedInstanceState)
  {
    super.onCreate(savedInstanceState);
    setContentView(R.layout.activity_residence);

    geolocation = (EditText) findViewById(R.id.geolocation);
    dateButton  = (Button)   findViewById(R.id.registration_date);
    rented      = (CheckBox) findViewById(R.id.isrented);

    residence = new Residence();

    geolocation.addTextChangedListener(this);
    geolocation.setText(residence.geolocation);
    dateButton .setEnabled(false);
    rented     .setChecked(residence.rented);
    rented     .setOnCheckedChangeListener(this);
  }

  @Override
  public void onCheckedChanged(CompoundButton arg0, boolean isChecked)
  {
    Log.i(this.getClass().getSimpleName(), "rented Checked");
    residence.rented = isChecked;
  }

  @Override
  public void afterTextChanged(Editable c)
  {
    Log.i(this.getClass().getSimpleName(), "geolocation " + c.toString());
    residence.geolocation = c.toString();
  }

  @Override
  public void beforeTextChanged(CharSequence arg0, int arg1, int arg2, int arg3)
  {
  }

  @Override
  public void onTextChanged(CharSequence arg0, int arg1, int arg2, int arg3)
  {
  }
}
Test
Run the app and check that the date string is correctly represented on the date button: see Figure 1.
Run the app and use the debugger to ensure data is being transmitted to and from the Residence object.
- Launch MyRent
- Add new input data to the geolocation input control and note down the values
- Place a breakpoint in Residence in the setGeolocation method
- Change the input data in the UI
- The program will halt at the breakpoint
- Study the Residence instance variable values in the Variables view.
Repeat for the checkbox as illustrated in Figure 3.
Summary
Here is what we have achieved in this topic:
- Explored various ways of modifying layout working with the Graphical Layout editor, the XML editor and the Outline view.
-
Added widgets to the layout
- Section labels and dividers
- A button to display the date the property was registered
- A checkbox to indicate whether or not the residence is rented.
-
Added a listener in the controller to detected changes in the UI checkbox state and transmit any state changes to the model Residence object
-
Added a date field to the model and intialized this at the time a residence object created which represents the registration date of the property with the MyRent app.
-
Described how to conduct a simple test using the debugger to verify that the listeners operate correctly and that UI data transmission takes place successfully in both directions between model and UI.