ListView
Our current version of MyRent (V01) only permits a single Residence to be entered. In this lab we seek to manage a list of residences. To do this we need to extend the model in include a new class - 'Portfolio' - to manage all our residences. We will also need a new Activity - ResidenceListActivity - to display the full portfolio of residences.
Objectives
This lab will significantly extend the MyRent app to include a new ListView where all residences can be inspected:
Clicking on any residence will take the user to the appropriate residence detail view:

The Project will take on a different shape, which some interesting new classes and approaches:

Model
When introducing new features, it is often useful to start with the model.
- We would like to incorporate a collection of Residence instances as opposed to just a single Residence as previously.
- We will create a new model class called Portfolio for this purpose. Create this class now in the models package.
Portfolio
package org.wit.myrent.models;


import java.util.ArrayList;
import java.util.UUID;

import android.util.Log;

public class Portfolio
{
  public  ArrayList<Residence>  residences;

  public Portfolio()
  {
    residences = new ArrayList<Residence>();
    this.generateTestData();
  }

  public void addResidence(Residence residence)
  {
    residences.add(residence);
  }

  public Residence getResidence(UUID id)
  {
    Log.i(this.getClass().getSimpleName(), "UUID parameter id: "+ id);

    for (Residence res : residences)
    {
      if(id.equals(res.id))
      {
        return res;
      }
    }
    return null;
  }

  private void generateTestData()
  {
    for(int i = 0; i < 100; i += 1)
    {
      Residence r = new Residence();
      r.geolocation = (52.253456 + i) % 90 +  ", " + (-7.187162 - i) % 180 + "";
      if(i%2 == 0)
      {
        r.rented = true;
      }
      else
      {
        r.rented = false;
      }
      residences.add(r);
    }
  }
}
Notice that, for test purposes, we are populating residences list with a random set of Residence objects.
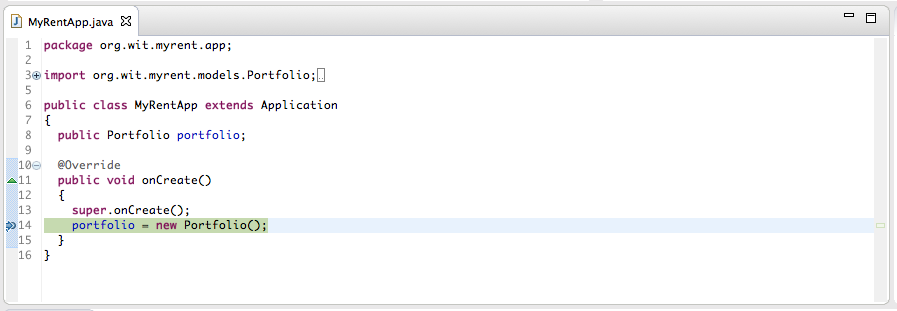
Application
To manage the list of residences, we use an Application object.
- This is an object created when the application is launched, and we are guaranteed that there will only ever be one of them.
- This is extremely useful - and we would use it to create the single Portfolio object, which in turn contains the list of residences our app is managing.
Create a package called 'org.wit.myrent.app' and introduce the following class:
package org.wit.myrent.app;

import org.wit.myrent.models.Portfolio;
import android.app.Application;

public class MyRentApp extends Application
{
  public Portfolio portfolio;

  @Override
  public void onCreate()
  {
    super.onCreate();
    portfolio = new Portfolio();
  }
}
We will not create MyRentApp object, it will be created for us by the operating system (OS).
- However, we do need to let the OS know that we have introduced an application object which is to be created.
- This is done in the manifest file AndroidManifest.XML.
Adjust it now as follows:
  <application
    android:name=".app.MyRentApp"
    android:allowBackup="true"
    android:icon="@drawable/ic_launcher"
    android:label="@string/app_name"
    android:theme="@style/AppTheme" >
Notice the new entry here:
android:name=".app.MyRentApp"
Run the app now, and place a breakpoint in the onCreate method. If the app stops at this point, then you have successfully introduced an application object.
Layouts
We need two new layout resource in order to build the list view:
- activity_residencelist.xml
- list_item_residence.xml
activity_residencelist represents full activity, containing a single ListView widget:

list_item_residence will represent an individual list item:
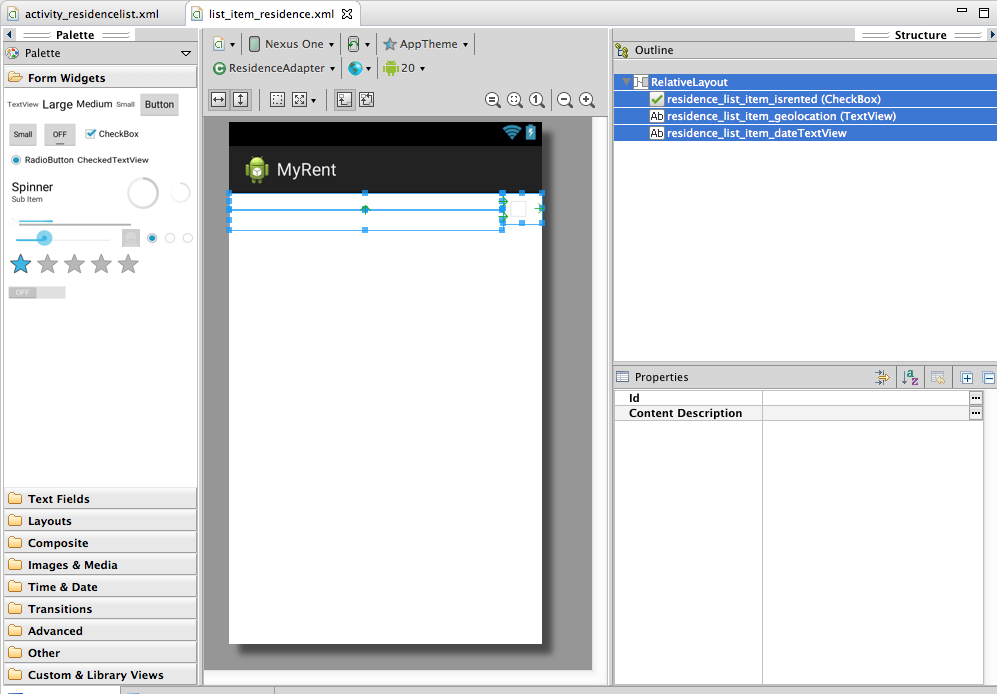
The screen shots above should give you enough clues to create these resources. They will be added to the res/lagout folder in the project:

Here are the full xml files for reference purposes:
activity_residencelist.xml
<RelativeLayout xmlns:android="http://schemas.android.com/apk/res/android"
    xmlns:tools="http://schemas.android.com/tools"
    android:layout_width="match_parent"
    android:layout_height="match_parent">

    <ListView
        android:id="@+id/residenceList"
        android:layout_width="match_parent"
        android:layout_height="wrap_content" >
    </ListView>

</RelativeLayout>
list_item_residence.xml
<RelativeLayout xmlns:android="http://schemas.android.com/apk/res/android"
    android:layout_width="match_parent"
    android:layout_height="match_parent"
    android:orientation="vertical">

    <CheckBox
        android:id="@+id/residence_list_item_isrented"
        android:layout_width="wrap_content"
        android:layout_height="wrap_content"
        android:gravity="center"
        android:layout_alignParentRight="true"
        android:enabled="false"
        android:focusable="false"
        android:padding="4dp"
         />

    <TextView
        android:id="@+id/residence_list_item_geolocation"
        android:layout_width="match_parent"
        android:layout_height="wrap_content"
        android:layout_toLeftOf="@id/residence_list_item_isrented"
        android:textStyle="bold"
        android:paddingLeft="4dp"
        android:paddingRight="4dp"
        />

    <TextView
        android:id="@+id/residence_list_item_dateTextView"
        android:layout_width="match_parent"
        android:layout_height="wrap_content"
        android:layout_below="@id/residence_list_item_geolocation"
        android:layout_toLeftOf="@id/residence_list_item_isrented"
        android:paddingLeft="4dp"
        android:paddingRight="4dp"
        android:paddingTop="4dp"/>

</RelativeLayout>
ResidenceListActivity
We can now start to introduce the ResidenceListActivity class
ResidenceListActivity
package org.wit.myrent.activities;

import org.wit.myrent.R;
import org.wit.myrent.app.MyRentApp;
import org.wit.myrent.models.Portfolio;
import android.widget.ListView;
import android.app.Activity;
import android.os.Bundle;

public class ResidenceListActivity extends Activity
{
  private ListView listView;
  private Portfolio portfolio;

  @Override
  public void onCreate(Bundle savedInstanceState)
  {
    super.onCreate(savedInstanceState);
    setTitle(R.string.app_name);
    setContentView(R.layout.activity_residencelist);

    listView = (ListView) findViewById(R.id.residenceList);

    MyRentApp app = (MyRentApp) getApplication();
    portfolio = app.portfolio;
  }
}
This version does not do much. However, if it is to be started at all, we need to change the AndroidManifest.xml again, indicating that this is the 'Launch' activity for the app:
<manifest xmlns:android="http://schemas.android.com/apk/res/android"
  package="org.wit.myrent"
  android:versionCode="1"
  android:versionName="1.0" >

  <uses-sdk
    android:minSdkVersion="16"
    android:targetSdkVersion="19" />

  <application
    android:name=".app.MyRentApp"
    android:allowBackup="true"
    android:icon="@drawable/ic_launcher"
    android:label="@string/app_name"
    android:theme="@style/AppTheme" >

    <activity
      android:name=".activities.ResidenceListActivity"
      android:label="@string/app_name" >
      <intent-filter>
        <action android:name="android.intent.action.MAIN" />
        <category android:name="android.intent.category.LAUNCHER" />
      </intent-filter>
    </activity>

    <activity
      android:name=".activities.ResidenceActivity"
      android:label="@string/app_name" >
    </activity>

  </application>

</manifest>
Inspect the above closely, and note how our app now contains 2 activities, with ResidenceListActivity being the 'MAIN' one.
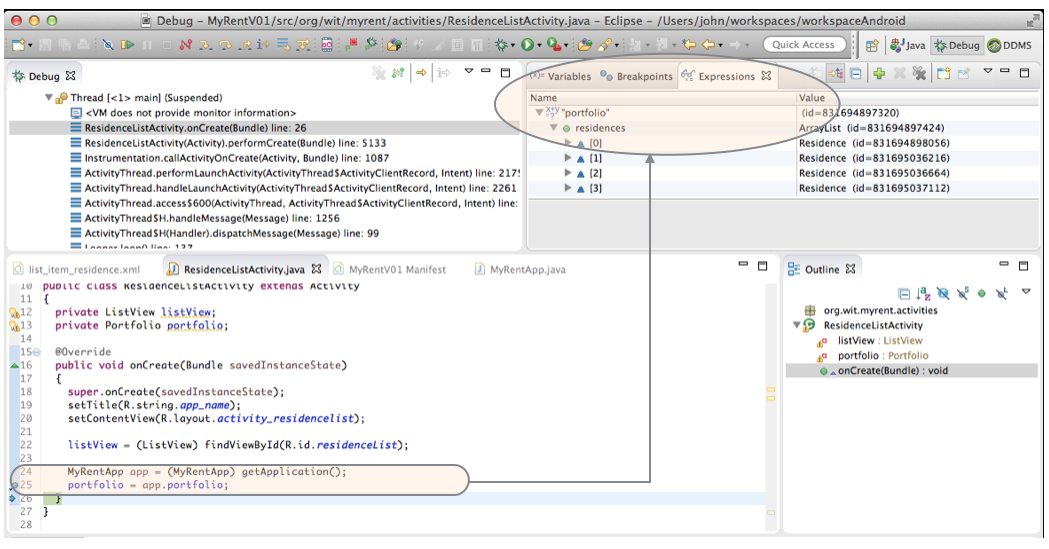
Run the app now and verify that it runs. Drop a breakpoint in the onCreate method above, and verify that the portfolio is properly initialised. Also notice that the listView is initialised.
Adapters
In order to update the list with the residence object contained in the portfolio, we need an Adapter.
- An Adapter is a special class we can append to the end of the existing ResidenceListActivity class (make sure it is outside the closing brace of ResidenceListActivity).
ResidenceAdapter:
class ResidenceAdapter extends ArrayAdapter<Residence>
{
  private Context context;

  public ResidenceAdapter(Context context, ArrayList<Residence> residences)
  {
    super(context, 0, residences);
    this.context = context;
  }

  @Override
  public View getView(int position, View convertView, ViewGroup parent)
  {
    LayoutInflater inflater = (LayoutInflater) context.getSystemService(Context.LAYOUT_INFLATER_SERVICE);
    if (convertView == null)
    {
      convertView = inflater.inflate(R.layout.list_item_residence, null);
    }
    Residence res = getItem(position);

    TextView geolocation = (TextView) convertView.findViewById(R.id.residence_list_item_geolocation);
    geolocation.setText(res.geolocation);

    TextView dateTextView = (TextView) convertView.findViewById(R.id.residence_list_item_dateTextView);
    dateTextView.setText(res.getDateString());

    CheckBox rentedCheckBox = (CheckBox) convertView.findViewById(R.id.residence_list_item_isrented);
    rentedCheckBox.setChecked(res.rented);

    return convertView;
  }
}
Introducing ResidenceAdapter requires the following additional import statements:
import android.content.Context;
import android.view.LayoutInflater;
import android.view.View;
import android.view.ViewGroup;
import android.widget.ArrayAdapter;
import android.widget.CheckBox;
import android.widget.TextView;
import java.util.ArrayList;
import org.wit.myrent.models.Residence;
This class, ResidenceAdapter, acts as a mediator between our model and the view elements. Use Eclipse autocorrect to import the appropriate library classes.
In order to incorporate it into ResidenceListActivity, first introduce a new field for it:
private ResidenceAdapter adapter;
and the, in order to trigger it, we need the following code at the very end of OnCreate in ResidenceListActivity:
    adapter = new ResidenceAdapter(this, portfolio.residences);
    listView.setAdapter(adapter);
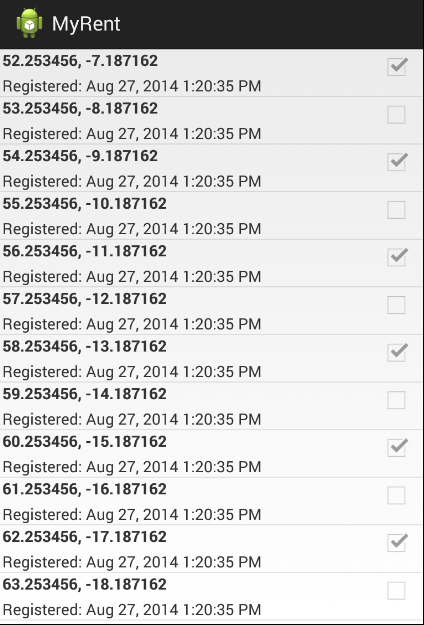
Run the app now - it should display the list of random residences:
This is the complete ResidenceListActivity class for references purposes:
package org.wit.myrent.activities;

import org.wit.myrent.R;
import org.wit.myrent.app.MyRentApp;
import org.wit.myrent.models.Portfolio;

import android.widget.ListView;
import android.app.Activity;
import android.os.Bundle;
import android.content.Context;
import android.view.LayoutInflater;
import android.view.View;
import android.view.ViewGroup;
import android.widget.ArrayAdapter;
import android.widget.CheckBox;
import android.widget.TextView;
import java.util.ArrayList;
import org.wit.myrent.models.Residence;

public class ResidenceListActivity extends Activity
{
  private ListView listView;
  private Portfolio portfolio;
  private ResidenceAdapter adapter;

  @Override
  public void onCreate(Bundle savedInstanceState)
  {
    super.onCreate(savedInstanceState);
    setTitle(R.string.app_name);
    setContentView(R.layout.activity_residencelist);

    listView = (ListView) findViewById(R.id.residenceList);

    MyRentApp app = (MyRentApp) getApplication();
    portfolio = app.portfolio;

    adapter = new ResidenceAdapter(this, portfolio.residences);
    listView.setAdapter(adapter);
  }
}

class ResidenceAdapter extends ArrayAdapter<Residence>
{
  private Context context;

  public ResidenceAdapter(Context context, ArrayList<Residence> residences)
  {
    super(context, 0, residences);
    this.context = context;
  }

  @Override
  public View getView(int position, View convertView, ViewGroup parent)
  {
    LayoutInflater inflater = (LayoutInflater) context.getSystemService(Context.LAYOUT_INFLATER_SERVICE);
    if (convertView == null)
    {
      convertView = inflater.inflate(R.layout.list_item_residence, null);
    }
    Residence res = getItem(position);

    TextView geolocation = (TextView) convertView.findViewById(R.id.residence_list_item_geolocation);
    geolocation.setText(res.geolocation);

    TextView dateTextView = (TextView) convertView.findViewById(R.id.residence_list_item_dateTextView);
    dateTextView.setText(res.getDateString());

    CheckBox rentedCheckBox = (CheckBox) convertView.findViewById(R.id.residence_list_item_isrented);
    rentedCheckBox.setChecked(res.rented);

    return convertView;
  }
}
Intents
Currently the application just displays the list, and we do not have any way of navigating form the list to individual residences. To bind them we will first have to listen for clicks on the list in ResidenceListActivity. This requires that we implement OnItemClickListener:
public class ResidenceListActivity extends Activity implements OnItemClickListener
You can try to let Eclipse help you here with the appropriate imports and default implementations:
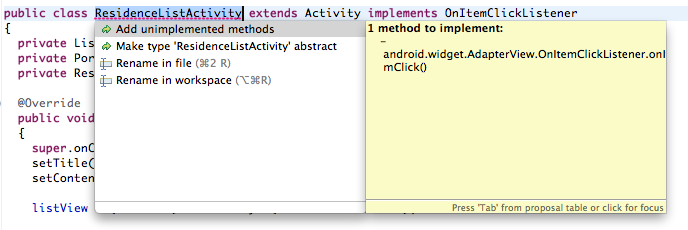
The above should generate this new listener method:
  @Override
  public void onItemClick(AdapterView<?> arg0, View arg1, int arg2, long arg3)
  {
    // TODO Auto-generated method stub

  }
Replace the above generated method with the following version (we have changed the argument names to more meaningful ones):
  @Override
  public void onItemClick(AdapterView<?> parent, View view, int position, long id)
  {
    Intent intent = new Intent(this, ResidenceActivity.class);
    startActivity(intent);
  }
Import the Intent class:
import android.content.Intent;
If the user clicks on an item, we should start our ResidenceActivity - the one we deisgned earlier. Try this now.
It doesnt work? This is because we didnt install the ResidenceListActivity object as a listener. Add this line to OnCreate:
listView.setOnItemClickListener(this);
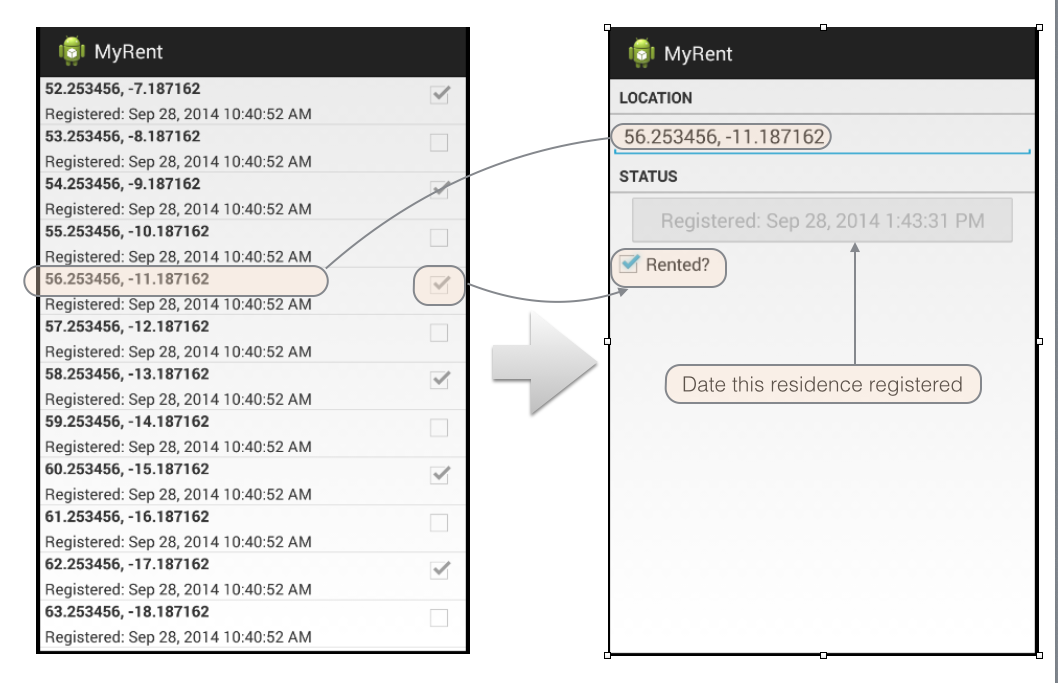
You should now be able to navigate from any list item to the detail view as shown in Figure 1.
- Note however that, for the moment, the detailed view rendered is always the first in the list irrespective of which list item is clicked.

This is the complete ResidenceListActivity at this stage:
package org.wit.myrent.activities;

import org.wit.myrent.R;
import org.wit.myrent.app.MyRentApp;
import org.wit.myrent.models.Portfolio;

import android.widget.ListView;
import android.app.Activity;
import android.os.Bundle;
import android.content.Context;
import android.content.Intent;
import android.view.LayoutInflater;
import android.view.View;
import android.view.ViewGroup;
import android.widget.AdapterView;
import android.widget.AdapterView.OnItemClickListener;
import android.widget.ArrayAdapter;
import android.widget.CheckBox;
import android.widget.TextView;

import java.util.ArrayList;

import org.wit.myrent.models.Residence;

public class ResidenceListActivity extends Activity implements OnItemClickListener
{
  private ListView listView;
  private Portfolio portfolio;
  private ResidenceAdapter adapter;

  @Override
  public void onCreate(Bundle savedInstanceState)
  {
    super.onCreate(savedInstanceState);
    setTitle(R.string.app_name);
    setContentView(R.layout.activity_residencelist);

    listView = (ListView) findViewById(R.id.residenceList);

    MyRentApp app = (MyRentApp) getApplication();
    portfolio = app.portfolio;

    adapter = new ResidenceAdapter(this, portfolio.residences);
    listView.setAdapter(adapter);
    listView.setOnItemClickListener(this);
  }

  @Override
  public void onItemClick(AdapterView<?> parent, View view, int position, long id)
  {
    Intent intent = new Intent(this, ResidenceActivity.class);
    startActivity(intent);
  }
}

class ResidenceAdapter extends ArrayAdapter<Residence>
{
  private Context context;

  public ResidenceAdapter(Context context, ArrayList<Residence> residences)
  {
    super(context, 0, residences);
    this.context = context;
  }

  @Override
  public View getView(int position, View convertView, ViewGroup parent)
  {
    LayoutInflater inflater = (LayoutInflater) context.getSystemService(Context.LAYOUT_INFLATER_SERVICE);
    if (convertView == null)
    {
      convertView = inflater.inflate(R.layout.list_item_residence, null);
    }
    Residence res = getItem(position);

    TextView geolocation = (TextView) convertView.findViewById(R.id.residence_list_item_geolocation);
    geolocation.setText(res.geolocation);

    TextView dateTextView = (TextView) convertView.findViewById(R.id.residence_list_item_dateTextView);
    dateTextView.setText(res.getDateString());

    CheckBox rentedCheckBox = (CheckBox) convertView.findViewById(R.id.residence_list_item_isrented);
    rentedCheckBox.setChecked(res.rented);

    return convertView;
  }
}
Activity Arguments
When ResidenceActivity is started, it doesnt seem to display anything useful - and certainly not the items in the list we started it from.
- We need to be able to pass information to ResidenceActivity, so it can display the correct Residence model object - that which we have selected in the list of residences.
- This will involve making changes in both ResidenceListActivity and ResidenceActivity.
ResidenceListActivity
  @Override
  public void onItemClick(AdapterView<?> parent, View view, int position, long id)
  {
    Residence residence = adapter.getItem(position);
    Intent intent = new Intent(this, ResidenceActivity.class);
    intent.putExtra("RESIDENCE_ID", residence.id);
    startActivity(intent);
  }
In the above. notice that:
- The argument residence.id in putExtra represents the residence the user clicked on (by position).
- We obtain this from the portfolio and then pass it to the intent as an extra data item.
ResidenceActivity
First introduce a new field:
private Portfolio portfolio;
Then, at the end of onCreate, initiualise this field:
    MyRentApp app = (MyRentApp) getApplication();
    portfolio = app.portfolio;
Add these imports:
import org.wit.myrent.models.Portfolio;
import org.wit.myrent.app.MyRentApp;
Now we can recover the ID passed to us via the intent:
UUID resId = (UUID) getIntent().getExtras().getSerializable("RESIDENCE_ID");
and get the Residence Object from the portfolio:
    UUID resId = (UUID) getIntent().getExtras().getSerializable("RESIDENCE_ID");
    residence = portfolio.getResidence(resId);
This is the complete four lines we add:
    MyRentApp app = (MyRentApp) getApplication();
    portfolio = app.portfolio;

    UUID resId = (UUID) getIntent().getExtras().getSerializable("RESIDENCE_ID");
    residence = portfolio.getResidence(resId);
Now all that remains is to send the residence data to the view widgets. We can write a special method for that:
  public void updateControls(Residence residence)
  {
    geolocation.setText(residence.geolocation);
    rented.setChecked(residence.rented);
    dateButton.setText(residence.getDateString());
  }
and call this method if we are sure we found a valid reference:
    if (residence != null)
    {
      updateControls(residence);
    }
Build and launch the app:
- We should now ne able to navigate and inspect the details of any Residence from the list as illustrated in Figure 1.
This is the complete new version of ResidenceActivity:
package org.wit.myrent.activities;


import java.util.UUID;

import org.wit.myrent.R;
import org.wit.myrent.app.MyRentApp;
import org.wit.myrent.models.Portfolio;
import org.wit.myrent.models.Residence;

import android.app.Activity;
import android.os.Bundle;
import android.text.Editable;
import android.text.TextWatcher;
import android.util.Log;
import android.widget.Button;
import android.widget.CheckBox;
import android.widget.CompoundButton;
import android.widget.EditText;
import android.widget.CompoundButton.OnCheckedChangeListener;

public class ResidenceActivity extends Activity implements TextWatcher, OnCheckedChangeListener
{
  private EditText geolocation;
  private CheckBox rented;
  private Button   dateButton;

  private Residence residence;
  private Portfolio portfolio;

  @Override
  public void onCreate(Bundle savedInstanceState)
  {
    super.onCreate(savedInstanceState);
    setContentView(R.layout.activity_residence);

    geolocation = (EditText) findViewById(R.id.geolocation);
    dateButton  = (Button)   findViewById(R.id.registration_date);
    rented      = (CheckBox) findViewById(R.id.isrented);

    residence = new Residence();

    geolocation.addTextChangedListener(this);
    geolocation.setText(residence.geolocation);
    dateButton .setEnabled(false);
    rented     .setChecked(residence.rented);
    rented     .setOnCheckedChangeListener(this);

    MyRentApp app = (MyRentApp) getApplication();
    portfolio = app.portfolio;

    UUID resId = (UUID) getIntent().getExtras().getSerializable("RESIDENCE_ID");
    residence = portfolio.getResidence(resId);
    if (residence != null)
    {
      updateControls(residence);
    }
  }

  public void updateControls(Residence residence)
  {
    geolocation.setText(residence.geolocation);
    rented.setChecked(residence.rented);
    dateButton.setText(residence.getDateString());
  }

  @Override
  public void onCheckedChanged(CompoundButton arg0, boolean isChecked)
  {
    Log.i(this.getClass().getSimpleName(), "rented Checked");
    residence.rented = isChecked;
  }

  @Override
  public void afterTextChanged(Editable c)
  {
    Log.i(this.getClass().getSimpleName(), "geolocation " + c.toString());
    residence.geolocation = c.toString();
  }

  @Override
  public void beforeTextChanged(CharSequence arg0, int arg1, int arg2, int arg3)
  {
  }

  @Override
  public void onTextChanged(CharSequence arg0, int arg1, int arg2, int arg3)
  {
  }
}
onResume
You might notice that any changes you make in Residence do not seem to be appearing on the list. i.e. if you check or uncheck the rented status, it remains unchanged in the list view.
We should fix this, as it is counter-intuitive.
Back in ResidenceListActivity, introduce a new method into the class (ensuring that you locate it within ResidenceListActivity and not ResidenceAdapter):
  @Override
  public void onResume()
  {
    super.onResume();
    adapter.notifyDataSetChanged();
  }
Run the app again now - and verify that changes made in the ResidenceActivity are reflected in the list.
- Can you explain what is happening?
This is the complete version if ResidenceListActivity at this stage:
package org.wit.myrent.activities;

import org.wit.myrent.R;
import org.wit.myrent.app.MyRentApp;
import org.wit.myrent.models.Portfolio;

import android.widget.ListView;
import android.app.Activity;
import android.os.Bundle;
import android.content.Context;
import android.content.Intent;
import android.view.LayoutInflater;
import android.view.View;
import android.view.ViewGroup;
import android.widget.AdapterView;
import android.widget.AdapterView.OnItemClickListener;
import android.widget.ArrayAdapter;
import android.widget.CheckBox;
import android.widget.TextView;

import java.util.ArrayList;

import org.wit.myrent.models.Residence;

public class ResidenceListActivity extends Activity implements OnItemClickListener
{
  private ListView listView;
  private Portfolio portfolio;
  private ResidenceAdapter adapter;

  @Override
  public void onCreate(Bundle savedInstanceState)
  {
    super.onCreate(savedInstanceState);
    setTitle(R.string.app_name);
    setContentView(R.layout.activity_residencelist);

    listView = (ListView) findViewById(R.id.residenceList);

    MyRentApp app = (MyRentApp) getApplication();
    portfolio = app.portfolio;

    adapter = new ResidenceAdapter(this, portfolio.residences);
    listView.setAdapter(adapter);
    listView.setOnItemClickListener(this);
  }

  @Override
  public void onItemClick(AdapterView<?> parent, View view, int position, long id)
  {
    Residence residence = adapter.getItem(position);
    Intent intent = new Intent(this, ResidenceActivity.class);
    intent.putExtra("RESIDENCE_ID", residence.id);
    startActivity(intent);
  }

  @Override
  public void onResume()
  {
    super.onResume();
    adapter.notifyDataSetChanged();
  }
}

class ResidenceAdapter extends ArrayAdapter<Residence>
{
  private Context context;

  public ResidenceAdapter(Context context, ArrayList<Residence> residences)
  {
    super(context, 0, residences);
    this.context = context;
  }

  @Override
  public View getView(int position, View convertView, ViewGroup parent)
  {
    LayoutInflater inflater = (LayoutInflater) context.getSystemService(Context.LAYOUT_INFLATER_SERVICE);
    if (convertView == null)
    {
      convertView = inflater.inflate(R.layout.list_item_residence, null);
    }
    Residence res = getItem(position);

    TextView geolocation = (TextView) convertView.findViewById(R.id.residence_list_item_geolocation);
    geolocation.setText(res.geolocation);

    TextView dateTextView = (TextView) convertView.findViewById(R.id.residence_list_item_dateTextView);
    dateTextView.setText(res.getDateString());

    CheckBox rentedCheckBox = (CheckBox) convertView.findViewById(R.id.residence_list_item_isrented);
    rentedCheckBox.setChecked(res.rented);

    return convertView;
  }
}
LogHelpers
Our final step will be to incorporate some helper classes, upon which we will build later. Create a new package called 'org.wit.android.helpers' - and introduce this class:
package org.wit.android.helpers;

import android.util.Log;

public class LogHelpers
{
  public static void info(Object parent, String message)
  {
    Log.i(parent.getClass().getSimpleName(), message);
  }
}
This class doesnt do much - but it might make is more inclined to use logging more frequently - as the class wraps up the log call into something easier to type.
So, for instance, in MyRentApp, import the above as follows:
import static org.wit.android.helpers.LogHelpers.info;
(the import syntax is slightly different, as we are importing a specific method)
Then, in onCreate we can have this:
  @Override
  public void onCreate()
  {
    super.onCreate();
    portfolio = new Portfolio();

    info(this, "RentControl app launched");
  }
You might consider introducing other log messages in the app now. THe advantage of logs is that you can quickly appreciate the health of various aspects of the app by looking at the logs.