Objectives
Explore the Unit test features of Play, writing some tests to verify the current behaviour of the User and Message classes. Use unit testing to implement a new feature - a simple Blog - into the app.
Spacebook-app Project
Download and import this project into your eclipse workspace in the usual way:
in particular, explore the views/components folder. This contains the various elements from which the spacebook application has been composed.
For the rest of this lab, rebase to using this solution, or you can continue using your own if it is reasonably up to date.
Simple Test Harness
You may have seen Junit testing for simple Java applications. There is an equivalent for the Play Framework. Unit testing is particularly important if you make any changes to the model, as it allows you to verify if the model is defined correctly.
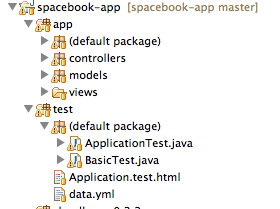
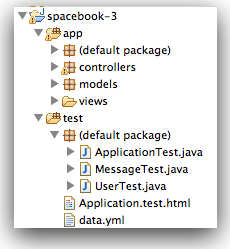
In eclipse, notice that you already have a 'test' folder, with some tests already in there:
Open the file 'BasicTest.java':
import org.junit.*;
import java.util.*;
import play.test.*;
import models.*;

public class BasicTest extends UnitTest
{
  @Test
  public void aVeryImportantThingToTest()
  {
    assertEquals(2, 1 + 1);
  }
}
Executing this is a little different from executing standard junit tests, and requires the following stages:
Stage 1: Run the spacebook app in 'test mode'
From the console, within the spacebook folder, run the app ass follows:
play test
This will respond as follows:
~        _            _
~  _ __ | | __ _ _  _| |
~ | '_ \| |/ _' | || |_|
~ |  __/|_|\____|\__ (_)
~ |_|            |__/
~
~ play! 1.2.5, http://www.playframework.org
~ framework ID is test
~
~ Running in test mode
~ Ctrl+C to stop
~
CompilerOracle: exclude jregex/Pretokenizer.next
Listening for transport dt_socket at address: 8000
08:31:32,518 INFO  ~ Starting /Users/edeleastar/repos/modules/app-dev-modelling-prj/spacebook-3
08:31:32,522 INFO  ~ Module cloudbees is available (/Users/edeleastar/repos/modules/app-dev-modelling-prj/spacebook-3/modules/cloudbees-0.2.2)
08:31:32,523 INFO  ~ Module crud is available (/Users/edeleastar/dev/play-1.2.5/modules/crud)
08:31:33,136 WARN  ~ You're running Play! in DEV mode
~
~ Go to http://localhost:9000/@tests to run the tests
~
08:31:33,242 INFO  ~ Listening for HTTP on port 9000 (Waiting a first request to start) ...
Stage 2: Browse to the 'test runner'
In chrome, bring up a browser are the following url:
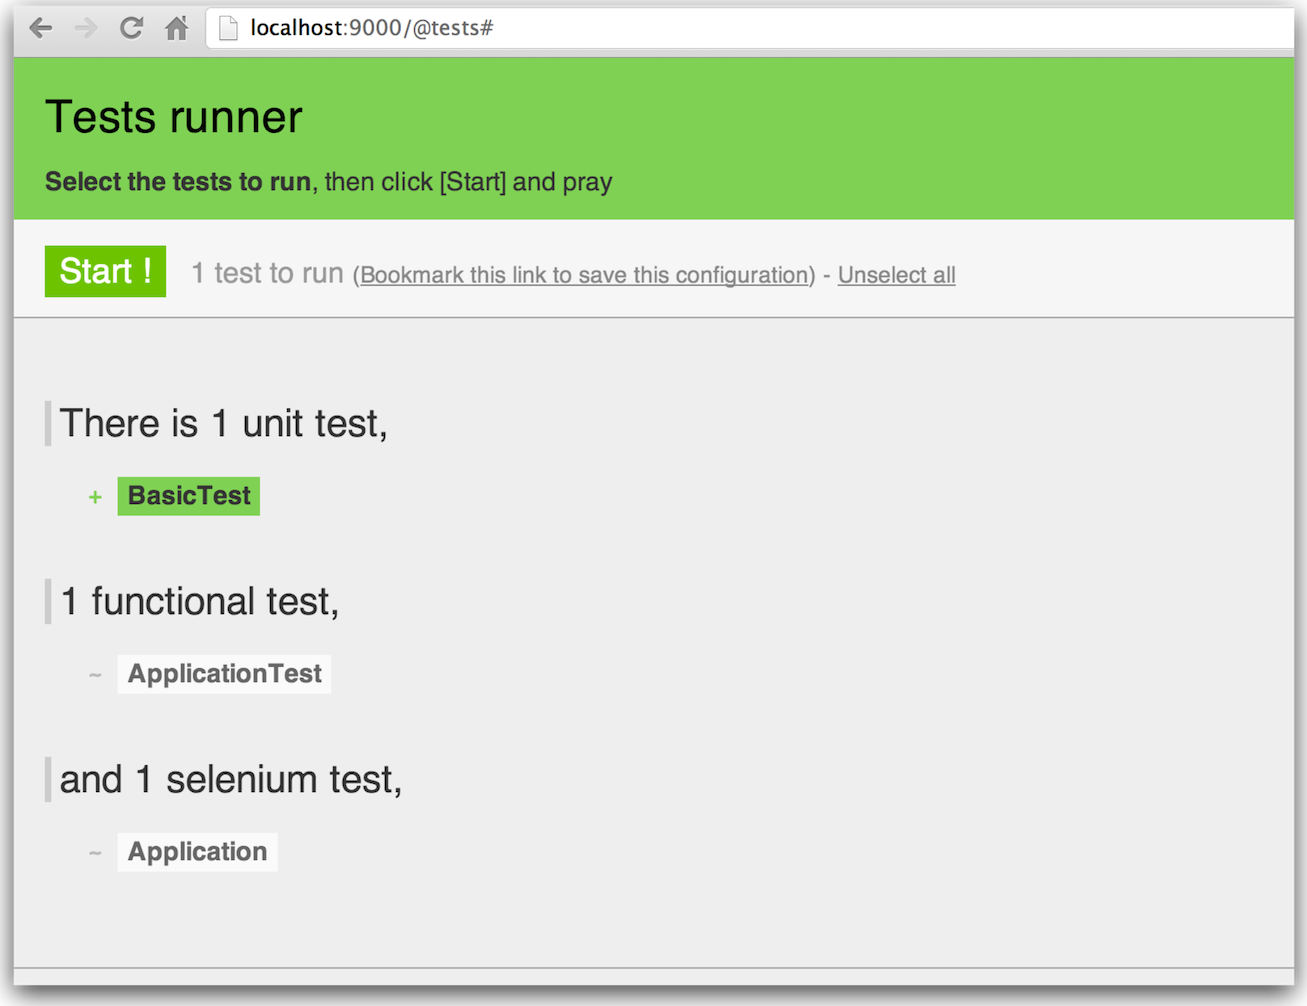
This should show this:

Be careful here - we only want to select the 'BasicTest' - so click once on it, and the page will look like this:

Stage 3: Run a successful Test
Now press 'Start' and note the changes in the page:
This has run the tests - but as the trivial test passed, then the page remained green.
Stage 4: Run a failing Test
Make a small change to the test such that it is guaranteed to fail:
  public void aVeryImportantThingToTest()
  {
    assertEquals(3, 1 + 1);
  }
Now run it again:
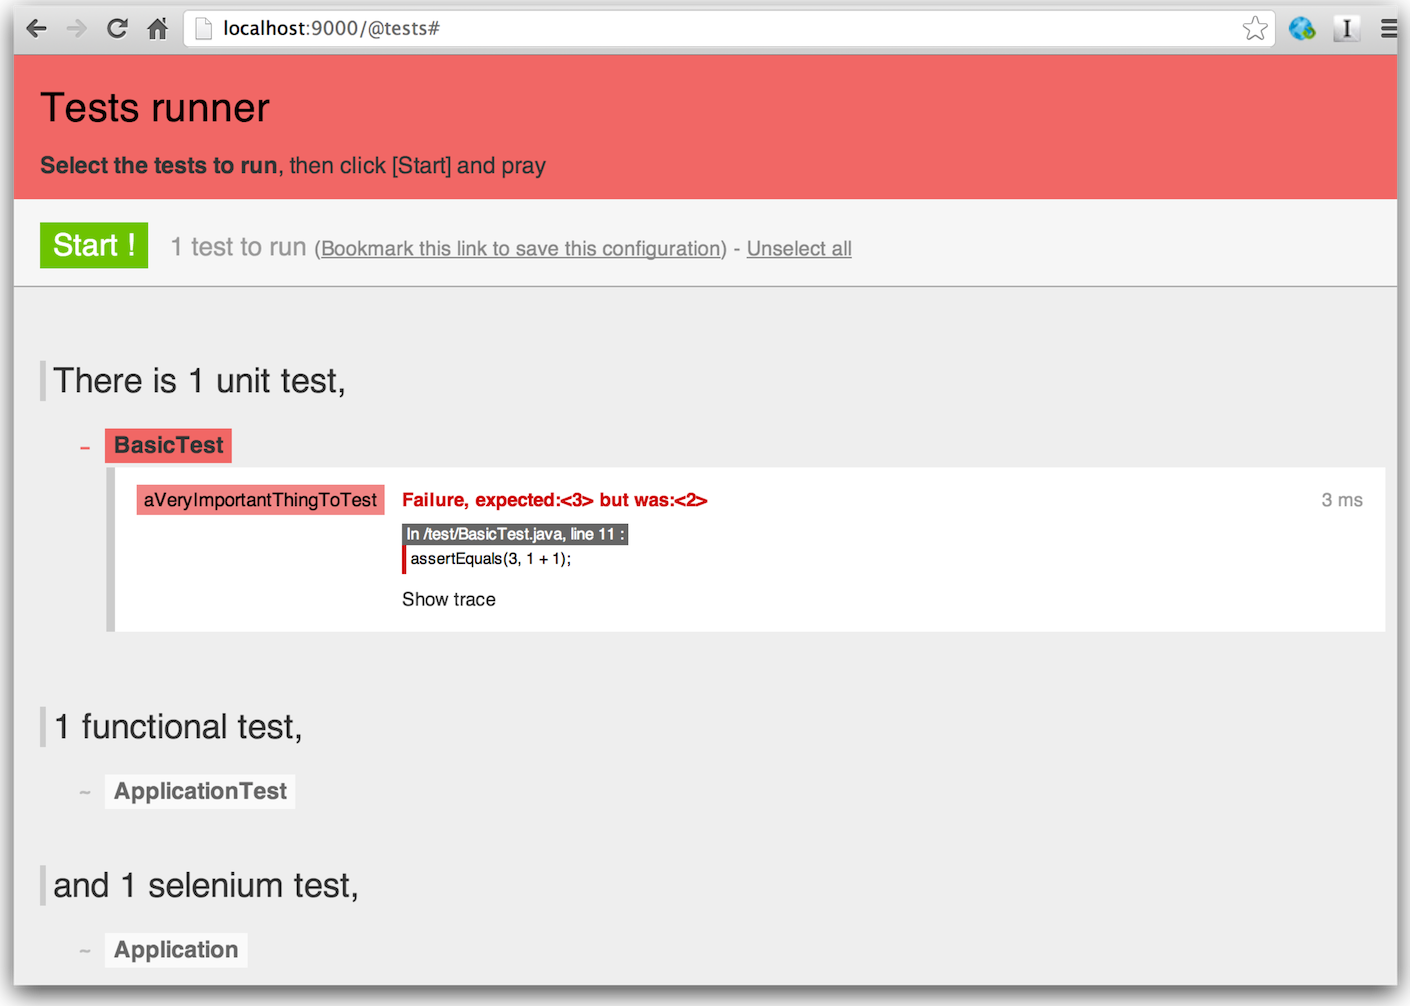
Note carefully the error report.
Users Test
Lets write some test for the classes we already have working. Before we do so, there is an occasional anomaly in play that can cause some confusion. So, open 'app/default package/BootStrap.java' and comment out the following:
public class Bootstrap extends Job
{
  public void doJob()
  {
    if (User.count() == 0)
    {
     // Fixtures.deleteDatabase();
     // Fixtures.loadModels("data.yml");
    }
  }
}
We are removing the objects loaded from the yaml file for the moment. Remember to put this back in when you are finished testing.
Now introduce the following test into the BasicTest class:
public class BasicTest extends UnitTest
{
  @Test
  public void aVeryImportantThingToTest()
  {
    assertEquals(2, 1 + 1);
  }

  @Test
  public void testCreateUser()
  {
    User bob = new User("bob", "jones", "bob@jones.com", "secret", 20, "irish");
    bob.save();

    User testUser = User.findByEmail("bob@jones.com");
    assertNotNull (testUser);
  }
}
Look carefully at the 'testCreateUser()' test. In it we are creating a new user, saving it, and then seeing if we can find the user by the email address. Save and run this test.
It should succeed. Now, make a deliberate mistake in the test - try find 'alice' instead of 'bob' by making the following adjustment:
  @Test
  public void testCreateUser()
  {
    User bob = new User("bob", "jones", 20, "irish", "bob@jones.com", "secret");
    bob.save();

    User testUser = User.findByEmail("alice@jones.com");
    assertNotNull (testUser);
  }
Run tests again, you should see something like this:

Change it back to 'bob' and confirm that the error is now gone.
More User Tests
You may be surprised that, even if we are running in test mode, the 'db' interface is still visible:
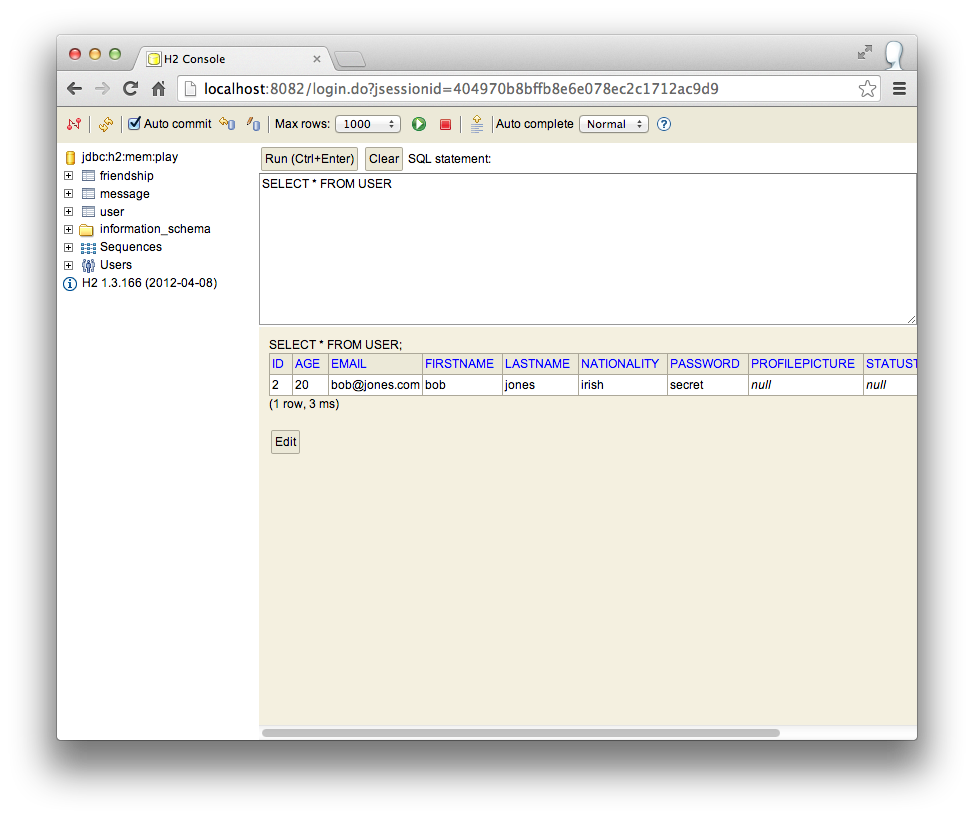
Explore the user objects now. If you run the test a few times, you may notice that we seem to have more than one user called bob?
This is clearly an anomaly, and is the result of running the tests repeatedly - and having leftover values as a result. This should be corrected immediately as it is very important that the tests are not influenced by whatever may be in the database.
Introduce the following method into BasicTest:
  @BeforeClass
  public static void loadDB()
  {
    Fixtures.deleteAllModels();
  }
Now run the tests a few times - and keep an eye on the number of Users via the db interface. There should always be only one.
Introduce the following test:
  @Test
  public void testFindUser()
  {
    User jim = new User("jim", "smith", "jim@smith.com", "secret", 20, "irish");
    jim.save();

    User test = User.findByEmail("jim@smith.com");
    assertNotNull (test);

    User alice = User.findByEmail("alice@jones.com");
    assertNull (alice);
  }
This is an example of a 'negative' test. We are deliberately looking for a user (alice) who we know to be not there. Run it and make sure it passes.
Try to make the test deliberately fail?
Message Tests
We have another model object called Messages already defined in our project:
public class Message extends Model
{
  public String messageText;

  @ManyToOne
  public User from;

  @ManyToOne
  public User to;

  public Message(User from, User to, String messageText)
  {
    this.from = from;
    this.to = to;
    this.messageText = messageText;
  }
}
We can write some tests to see if this model is set up correctly:
  @Test
  public void testCreateMessage()
  {
    User mary = new User("mary", "colllins", "mary@collins.com", "secret", 20, "irish");
    mary.save();

    User joan = new User("joan", "colllins","joan@collins.com", "secret",  20, "irish");
    joan.save();

    Message msg = new Message (mary, joan, "Hi there - how are you");
    msg.save();

    List<Message> joansMessages = Message.find("byTo", joan).fetch();
    assertEquals (joansMessages.size(), 1);
  }
Look carefully at the above test. It is structured as follows:
- Create a mary user object, and save it to the database
- Create a joan user object, and save it to the database
- Create a message object for a message from mary to joan
- Retrieve all of the messages for joan
- See if there is exactly one message
Run this test now and see if it passes. We can extend the test to see if we also get back the correct text. Put these two lines at the end of the test:
    Message message = joansMessages.get(0);
    assertEquals(message.messageText, "Hi there - how are you");
Run it again and confirm it still passes. Just to confirm that everything is operating ok with the test harness, change a single character in the message, and make sure the test fails. Then change it back so that is passes again.
To conclude, we bring in some more tests to:
- test for the case when there are no message for a given user
- test for the case when there are more than one message for a given user
Here are the tests - bring these directly into your class:
  @Test
  public void testNoMessagese()
  {
    User mary = new User("mary", "colllins", "mary@collins.com", "secret",  20, "irish");
    mary.save();

    List<Message> joansMessages = Message.find("byTo", mary).fetch();
    assertEquals (joansMessages.size(), 0);
  }

  @Test
  public void testMultipleMessages()
  {
    User mary = new User("mary", "colllins", "mary@collins.com", "secret", 20, "irish");
    mary.save();

    User joan = new User("joan", "colllins", "joan@collins.com", "secret", 20, "irish");
    joan.save();

    Message msg1 = new Message (mary, joan, "Hi there - how are you");
    msg1.save();
    Message msg2 = new Message (mary, joan, "Where are you now?");
    msg2.save();

    List<Message> joansMessages = Message.find("byTo", joan).fetch();
    assertEquals (joansMessages.size(), 2);
    Message message1 = joansMessages.get(0);
    assertEquals(message1.messageText, "Hi there - how are you");
    Message message2 = joansMessages.get(1);
    assertEquals(message2.messageText, "Where are you now?");
  }
Read the tests and absorb what they are testing. These tests should all pass
Class Specific Tests
Our complete test case now looks like this:
import org.junit.*;
import java.util.*;
import play.test.*;
import models.*;

public class BasicTest extends UnitTest
{
  @BeforeClass
  public static void loadDB()
  {
    Fixtures.deleteAllModels();
  }

  @Test
  public void testCreateUser()
  {
    User bob = new User("bob", "jones", "bob@jones.com", "secret", 20, "irish");
    bob.save();

    User testUser = User.findByEmail("bob@jones.com");
    assertNotNull (testUser);
  }

  @Test
  public void testFindUser()
  {
    User jim = new User("jim", "smith", "jim@smith.com", "secret", 20, "irish");
    jim.save();

    User test = User.findByEmail("jim@smith.com");
    assertNotNull (test);

    User alice = User.findByEmail("alice@jones.com");
    assertNull (alice);
  }

  @Test
  public void testCreateMessage()
  {
    User mary = new User("mary", "colllins", "mary@collins.com", "secret", 20, "irish");
    mary.save();

    User joan = new User("joan", "colllins","joan@collins.com", "secret",  20, "irish");
    joan.save();

    Message msg = new Message (mary, joan, "Hi there - how are you");
    msg.save();

    List<Message> joansMessages = Message.find("byTo", joan).fetch();
    assertEquals (joansMessages.size(), 1);
  }


  @Test
  public void testNoMessagese()
  {
    User mary = new User("mary", "colllins", "mary@collins.com", "secret",  20, "irish");
    mary.save();

    List<Message> joansMessages = Message.find("byTo", mary).fetch();
    assertEquals (joansMessages.size(), 0);
  }

  @Test
  public void testMultipleMessages()
  {
    User mary = new User("mary", "colllins", "mary@collins.com", "secret", 20, "irish");
    mary.save();

    User joan = new User("joan", "colllins", "joan@collins.com", "secret", 20, "irish");
    joan.save();

    Message msg1 = new Message (mary, joan, "Hi there - how are you");
    msg1.save();
    Message msg2 = new Message (mary, joan, "Where are you now?");
    msg2.save();

    List<Message> joansMessages = Message.find("byTo", joan).fetch();
    assertEquals (joansMessages.size(), 2);
    Message message1 = joansMessages.get(0);
    assertEquals(message1.messageText, "Hi there - how are you");
    Message message2 = joansMessages.get(1);
    assertEquals(message2.messageText, "Where are you now?");
  }
}
This mixes in User and Message tests. We can factor these out into classes of their own. In the same package, create a class call UserTest containing the following:
import models.User;
import org.junit.BeforeClass;
import org.junit.Test;
import play.test.Fixtures;
import play.test.UnitTest;


public class UserTest extends UnitTest
{
  @BeforeClass
  public static void loadDB()
  {
    Fixtures.deleteAllModels();
  }

  @Test
  public void testCreateUser()
  {
    User bob = new User("bob", "jones", "bob@jones.com", "secret", 20, "irish");
    bob.save();

    User testUser = User.findByEmail("bob@jones.com");
    assertNotNull (testUser);
  }

  @Test
  public void testFindUser()
  {
    User jim = new User("jim", "smith", "jim@smith.com", "secret", 20, "irish");
    jim.save();

    User test = User.findByEmail("jim@smith.com");
    assertNotNull (test);

    User alice = User.findByEmail("alice@jones.com");
    assertNull (alice);
  }
}
and a MessageTest class:
import java.util.List;
import models.Message;
import models.User;
import org.junit.BeforeClass;
import org.junit.Test;
import play.test.Fixtures;
import play.test.UnitTest;


public class MessageTest extends UnitTest
{
  @BeforeClass
  public static void loadDB()
  {
    Fixtures.deleteAllModels();
  }

  @Test
  public void testCreateMessage()
  {
    User mary = new User("mary", "colllins", "mary@collins.com", "secret", 20, "irish");
    mary.save();

    User joan = new User("joan", "colllins","joan@collins.com", "secret",  20, "irish");
    joan.save();

    Message msg = new Message (mary, joan, "Hi there - how are you");
    msg.save();

    List<Message> joansMessages = Message.find("byTo", joan).fetch();
    assertEquals (joansMessages.size(), 1);
  }


  @Test
  public void testNoMessagese()
  {
    User mary = new User("mary", "colllins", "mary@collins.com", "secret",  20, "irish");
    mary.save();

    List<Message> joansMessages = Message.find("byTo", mary).fetch();
    assertEquals (joansMessages.size(), 0);
  }

  @Test
  public void testMultipleMessages()
  {
    User mary = new User("mary", "colllins", "mary@collins.com", "secret", 20, "irish");
    mary.save();

    User joan = new User("joan", "colllins", "joan@collins.com", "secret", 20, "irish");
    joan.save();

    Message msg1 = new Message (mary, joan, "Hi there - how are you");
    msg1.save();
    Message msg2 = new Message (mary, joan, "Where are you now?");
    msg2.save();

    List<Message> joansMessages = Message.find("byTo", joan).fetch();
    assertEquals (joansMessages.size(), 2);
    Message message1 = joansMessages.get(0);
    assertEquals(message1.messageText, "Hi there - how are you");
    Message message2 = joansMessages.get(1);
    assertEquals(message2.messageText, "Where are you now?");
  }
}
Each of these classes is just focused primarily on one of the model classes. You can delete the BasicTest, so your project should look like this:
And refreshing the test runner site:

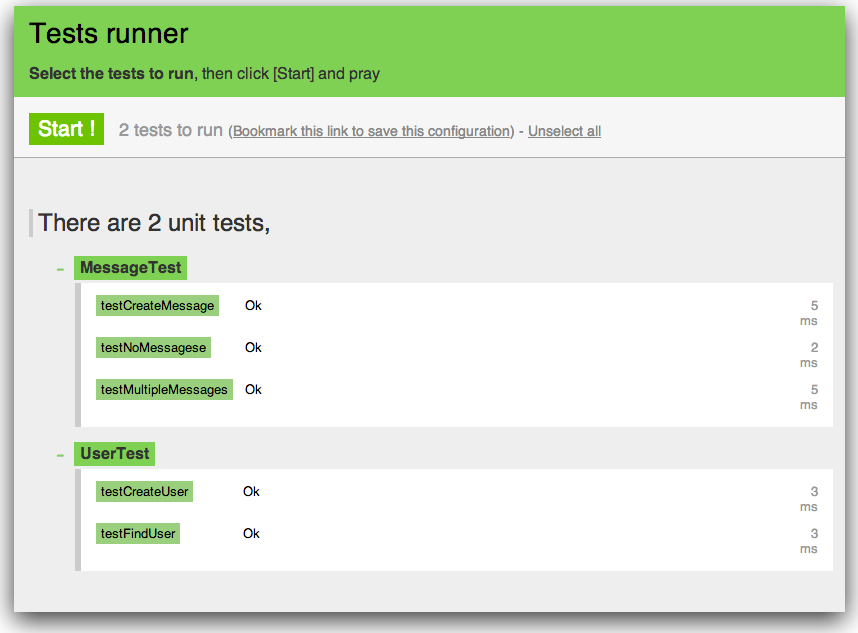
Finally, if we select and run the tests - we can see an individual breakdown of each test:
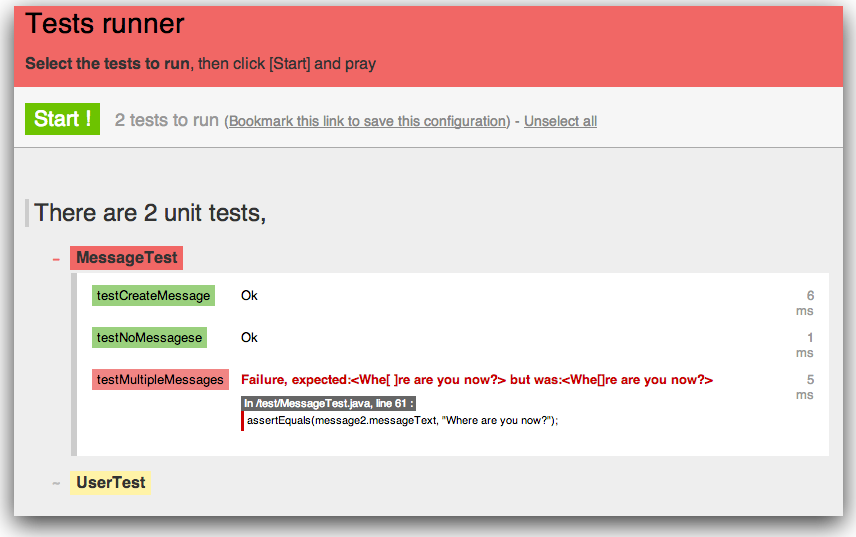
Just to confirm that everything is going ok - deliberately break one of the test to see the type of report:
Revert to 'green state' again by making all tests work
Posts
We now have a useful test harness in place. This is particularly useful if we wish to introduce any changes to the model.
In Particular, if we wish to introduce something like a blog, then we should fully exercise the model before experimenting with any Controllers / Views.
First we introduce a 'Post' class, which will represent a specific post to a blog:
package models;
import javax.persistence.Entity;
import javax.persistence.ManyToOne;

import play.db.jpa.Model;

@Entity
public class Post extends Model
{
  public String title;
  public String content;

  public Post(String title, String content)
  {
    this.title = title;
    this.content = content;
  }

  public String toString()
  {
    return title;
  }
}
This class is to be introduced into the Model package. Notice the 'ManyToOne' annotation. This declares that there will be many post objects for each User object.
Next we augment the User class to maintain a list of posts:
  @OneToMany
  public List<Post> posts = new ArrayList<Post>();
The complete User class now looks like this:
package models;

import javax.persistence.CascadeType;
import javax.persistence.Entity;
import javax.persistence.OneToMany;

import java.util.ArrayList;
import java.util.List;

import play.db.jpa.Model;
import play.db.jpa.Blob;

@Entity
public class User extends Model
{
  public String firstName;
  public String lastName;
  public String email;
  public String password;
  public String statusText;
  public Blob   profilePicture;
  public Blob   thumbnailPicture;
  public int    age;
  public String nationality;

  @OneToMany(mappedBy = "sourceUser")
  public List<Friendship> friendships = new ArrayList<Friendship>();

  @OneToMany(mappedBy = "to")
  public List<Message> inbox = new ArrayList<Message>();

  @OneToMany(mappedBy = "from")
  public List<Message> outbox = new ArrayList<Message>();

  @OneToMany
  public List<Post> posts = new ArrayList<Post>();


  public User(String firstName, String lastName, String email, String password, int age, String nationality)
  {
    this.firstName = firstName;
    this.lastName = lastName;
    this.email = email;
    this.password = password;
    this.age = age;
    this.nationality = nationality;
  }

  public static User findByEmail(String email)
  {
    return find("email", email).first();
  }

  public boolean checkPassword(String password)
  {
    return this.password.equals(password);
  }

  public void befriend(User friend)
  {
    Friendship friendship = new Friendship(this, friend);
    friendships.add(friendship);
    friendship.save();
    save();
  }

  public void unfriend(User friend)
  {
    Friendship thisFriendship = null;

    for (Friendship friendship:friendships)
    {
      if (friendship.targetUser== friend)
      {
        thisFriendship = friendship;
      }
    }
    friendships.remove(thisFriendship);
    thisFriendship.delete();
    save();
  }

  public void sendMessage (User to, String messageText)
  {
    Message message = new Message (this, to, messageText);
    outbox.add(message);
    to.inbox.add(message);
    message.save();
  }
}
With these new and modified classes in place, we will write some tests.
Testing Posts
Back in the test package, create a new test case called "BlogTest":
import java.util.ArrayList;
import java.util.List;

import models.Message;
import models.Post;
import models.User;

import org.junit.BeforeClass;
import org.junit.Test;

import play.test.Fixtures;
import play.test.UnitTest;


public class BlogTest  extends UnitTest
{
  @BeforeClass
  public static void loadDB()
  {
    Fixtures.deleteAllModels();
  }
}
It should be alongside the MessageTest and UserTest classes we have already built.
We are now going to test new features we just introduced. Here is the first test:
  @Test
  public void testCreatePost()
  {
    User bob = new User("bob", "jones", "bob@jones.com", "secret",  20, "irish");
    bob.save();

    Post aPost = new Post ("Post Title", "This is the post content");
    aPost.save();
    bob.posts.add(aPost);
    bob.save();

    User user = User.findByEmail("bob@jones.com");
    List<Post> posts = user.posts;
    assertEquals(1, posts.size());
  }
Save and run this test. It should pass. Read it carefully - and note what it is doing. Essentially, we are creating a post and adding it to the user bob. Then we look up bob, and see if the post is in his list of posts.
Extend the test with the following lines to actually see if the post text is correct:
    Post post = posts.get(0);
    assertEquals(post.title, "Post Title");
    assertEquals(post.content, "This is the post content");
Now we try multiple posts:
  @Test
  public void testCreateMultiplePosts()
  {
    User jim = new User("jim", "jones", "jim@jones.com", "secret", 20, "irish");
    jim.save();

    Post post1 = new Post ("Post Title 1", "This is the first post content");
    post1.save();
    Post post2 = new Post ("Post Title 2", "This is the second post content");
    post2.save();
    jim.posts.add(post1);
    jim.posts.add(post2);
    jim.save();

    User user = User.findByEmail("jim@jones.com");
    List<Post> posts = user.posts;
    assertEquals(2, posts.size());
  }
Again - this should pass. And again, we can extend the test to verify the actual text:
    Post posta = posts.get(0);
    assertEquals(posta.title, "Post Title 1");
    assertEquals(posta.content, "This is the first post content");

    Post postb = posts.get(1);
    assertEquals(postb.title, "Post Title 2");
    assertEquals(postb.content, "This is the second post content");
Run again and verify that we are in 'green' state. Deliberately break the tests - but changing some of the message text in one place an not the other. Note the errors - and then change it back again.
We now have the relevant model of our program successfully extended to store blog posts for a given user. The next steps will be to have the User Interface create, list and store the posts.
Route + Blog Controller
The new feature will need to be mapped to a route. Recall, the routes identifies which url patterns match which Java Controller classes/methods.
Open routes and introduce these new routes:
# Blog Controller and View

GET   /blog                                     Blog.index
POST  /blog/newpost                             Blog.newPost
Put them in after the 'Edit' routes.
We need a new controller class to display a users blog:
package controllers;

import java.util.List;

import models.Message;
import models.Post;
import models.User;
import play.Logger;
import play.mvc.Controller;

public class Blog  extends Controller
{
  public static void index()
  {
    User user = Accounts.getLoggedInUser();
    render(user);
  }

  public static void newPost(String title, String content)
  {
    User user = Accounts.getLoggedInUser();
    Logger.info ("title:" + title + " content:" + content);
    index();
  }
}
This will be in the controllers package.
To match this we will need a view - which must be in the 'views/Blog' folder - and called 'index.html':
#{extends 'main.html' /}
#{set title:'Blog' /}

<nav class="ui inverted menu">
  <header class="header item"> Spacebook </header>
  <div class="right menu">
    <a class="item" href="/home">Home</a></li>
    <a class="item" href="/members">Members</a>
    <a class="item" href="/profile">Profile</a>
    <a class="active item" href="/blog">Blog</a>
    <a class="item" href="/logout">Logout</a>
  </div>
</nav>

<h1 class="ui inverted teal block header" >Blog  </h1>
<section class="ui two column grid segment">
  <div class="row">
    <div class="ui column">
      <p> Blog Edit Controls here... </p>
    </div>
    <div class="column">
      <p> Blog Posts here... </p>
    </div>
  </div>
</section>
Note carefully the new entry in the menu bar - we have a new one for blog.
<a class="item" href="/blog">Blog</a>
You will need to bring this into each of the other views: specifically 'Home/index.html', 'HomeProfile/index.html' and 'Members/index.html'
Take this for s spin now. We should have the blog menu working, and it should show the placeholder text for the moment. We will conclude the initial version of the blog in the next step.
Blog Implementation
As we have already tested the post/user extensions in a previous step, the process of finalising the features is relatively straightforward.
In the Blog controller, we can complete the 'newPost' method:
  public static void newPost(String title, String content)
  {
    User user = Accounts.getLoggedInUser();

    Post post = new Post (title, content);
    post.save();
    user.posts.add(post);
    user.save();

    Logger.info ("title:" + title + " content:" + content);
    index();
  }
All we needed to do was just create a post object, save it, add it to the user and then save the user.
In 'view/Blog/index.html', we will include two new component to display blog form and list of posts respectively:
<h1 class="ui inverted teal block header" >Blog  </h1>
<section class="ui two column grid segment">
  <div class="row">
    <div class="ui column">
      #{include "components/createpost.html" /}
    </div>
    <div class="column">
      #{include "components/displayposts.html" /}
    </div>
  </div>
</section>
Note we are including two new components here in place of the text we had in the previous version. We can implement these now:
views/components/createpost.html
<section class="ui form segment">
  <h4 class="ui inverted blue block header">Create a Post</h4>
  <form action="/blog/newpost" method="POST">
    <div class="field">
      <input type="text" name="title" placeholder="Title"></input>
      <textarea name="content" placeholder="Content"></textarea>
    </div>
    <button class="ui button teal submit labeled icon"><i class="icon edit"></i> Create </button>
  </form>
</section>
views/components/displayposts.html
<section class="ui stacked segment">
  <h4 class="ui inverted blue block header">Published Posts</h4>
  #{list items:user.posts, as:'post'}
    <h5 class="ui inverted green block header"> ${post.title}</h5>
    <p>
      ${post.content}:
    </p>
  #{/list}
</section>
Take this for a spin now. It should enable you to create a a post, and it should list posts already created.
You should also be able to log out and back in - and the posts should be remembered.
Exercises
This is a completed version of the app, including new blog feature: