Objectives
- Build a User Interface for the pacemaker-node based on ember.js
Assets & Libraries
Create a new folder in the pacemaker-node project called public. Create 2 subfolders:
Into images, save these two files:
In js bring in these files:
In the semantic folder, first download the Semantic UI archive:
Extract it somewhere, and copy the packaged folder into public, renaming it to semantic.
Your pacemaker-node/public folder should look like this:
├── images
│   ├── favicon.png
│   └── pacemaker.jpg
├── js
│   ├── ember-1.4.0.js
│   ├── handlebars-1.1.2.js
│   ├── jquery-1.10.2.js
│   └── underscore-min.js
└── semantic
    ├── css
    │   ├── semantic.css
    │   └── semantic.min.css
    ├── fonts
    │   ├── basic.icons.eot
    │   ├── basic.icons.svg
    │   ├── basic.icons.ttf
    │   ├── basic.icons.woff
    │   ├── icons.eot
    │   ├── icons.otf
    │   ├── icons.svg
    │   ├── icons.ttf
    │   └── icons.woff
    ├── images
    │   ├── loader-large-inverted.gif
    │   ├── loader-large.gif
    │   ├── loader-medium-inverted.gif
    │   ├── loader-medium.gif
    │   ├── loader-mini-inverted.gif
    │   ├── loader-mini.gif
    │   ├── loader-small-inverted.gif
    │   └── loader-small.gif
    └── javascript
        ├── semantic.js
        └── semantic.min.js
Main Program
In public, create a new file called pacemaker.html
pacemaker.html
<!DOCTYPE html>
<html>
  <head>
  <meta charset="utf-8">
  <title>Pacemaker Ember</title>
    <meta name="viewport" content="width=device-width, initial-scale=1.0, maximum-scale=1.0">
    <link rel="stylesheet" type="text/css" href="/assets/semantic/css/semantic.min.css">
  </head>
  <body>

    <script src="/assets/js/jquery-1.10.2.js"></script>
    <script src="/assets/js/handlebars-1.1.2.js"></script>
    <script src="/assets/js/ember-1.4.0.js"></script>
    <script src="/assets/js/underscore-min.js"></script>

 </body>
</html>
Now run the node application as before (from `./pacemaker-node'):
node app.js
and browse to:
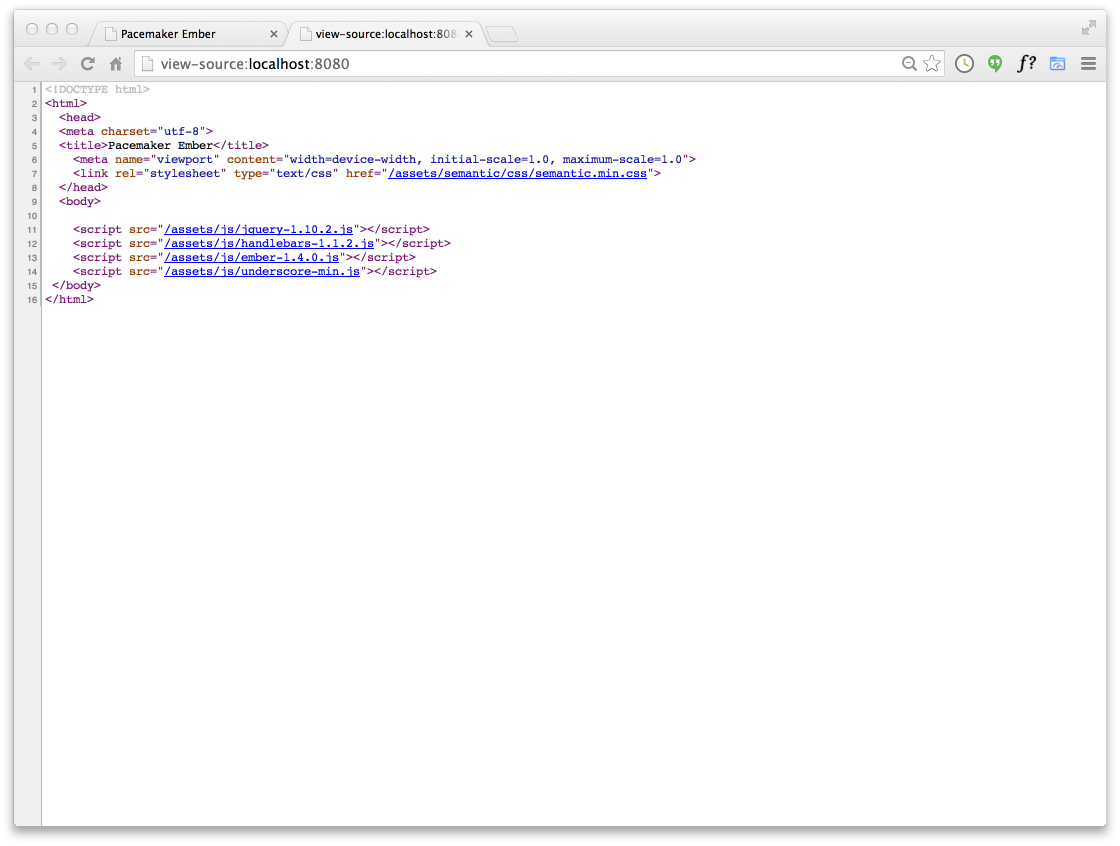
If using chrome, the page should load without errors (using the inspector):

and the source should look as expected:
app.js
Still in public, create a new folder called app, containing the following script:
app.js
var apiUrl = '/api'

App = Ember.Application.create(
{
  currentUser: localStorage['currentUser']
});

App.Router.map(function()
{
  this.resource('start');
  this.resource('signup');
  this.resource('login');
  this.resource('dashboard');
});
In public/app create a folder called routes and introduce this script:
application_routes.js
App.IndexRoute = Ember.Route.extend(
{
  redirect: function()
  {
    this.transitionTo('start');
  }
});
Also in public/app, create a folder called controllers containing the following:
application_controller.js
App.ApplicationController = Ember.Controller.extend(
{
  signedInUser: function()
  {
    return this.store.find('user', localStorage['currentUser']);
  }.property('App.currentUser'),

  userSignedIn: function()
  {
    return localStorage['currentUser'] != null;
  }.property('App.currentUser'),

  actions:
  {
    signout: function()
    {
      delete localStorage['currentUser'];
      App.set('currentUser', undefined);
      this.transitionToRoute("start");
    }
  }
});
We can now bring the application up. Back in pacemaker.html, introduce these two templates just inside the opening <body> tag:
    <script type="text/x-handlebars" data-template-name="application">
      <nav class="ui inverted menu">
      <header class="ui header item"> <a href="/"> Pacemaker Ember </a> </header>
        <div class="right menu">
          {{#if userSignedIn}}
            {{#link-to 'dashboard'   activeClass="active" class='item'}} Dashboard {{/link-to}}
            <a class="ui item" href="#" {{action 'signout'}}> Logout </a>
          {{else}}
            {{#link-to 'signup'  activeClass="active" class='item'}}Signup{{/link-to}}
            {{#link-to 'login'   activeClass="active" class='item'}}Login{{/link-to}}
          {{/if}}
        </div>
      </nav>
      {{outlet}}
    </script>

    <script type="text/x-handlebars" data-template-name="start">
      <section class="ui segment">
        <div class="ui grid">
          <aside class="six wide column">
            <img src="/assets/images/pacemaker.jpg" class="ui medium image">
          </aside>
          <article class="ten wide column">
            <h1 class="ui  header"> Sign up for Pacemaker  </h1>
            <p> No Bitcoins accepted! </p>
          </article>
        </div>
      </section>
    </script>
Finally, just before the closing </body> tag, include the two scripts defined above:
    <script src="/assets/app/app.js"></script>
    <script src="/assets/app/routes/application_routes.js"></script>
    <script src="/assets/app/controllers/application_controller.js"></script>
pacemaker-node/public should be structured as follows:
── app
│   ├── app.js
│   ├── controllers
│   │   └── application_controller.js
│   └── routes
│       └── application_routes.js
├── images
│   ├── favicon.png
│   └── pacemaker.jpg
├── js
│   ├── ember-1.4.0.js
│   ├── handlebars-1.1.2.js
│   ├── jquery-1.10.2.js
│   └── underscore-min.js
├── pacemaker.html
└── semantic
      ...
Browsing to :
should bring up the application:
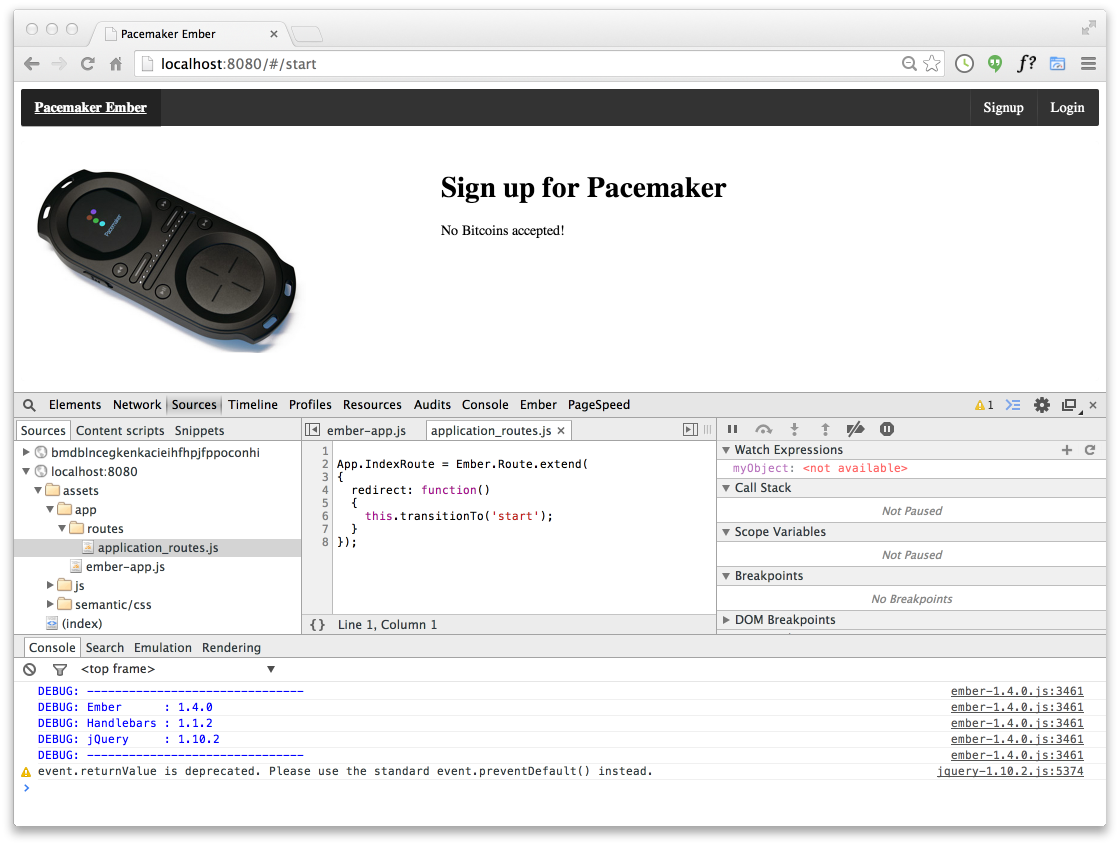
Note that we can set breakpoints, and even debug, the application.
Login
Introduce a login template into pacemaker.html:
    <script type="text/x-handlebars" data-template-name="login">
      <section class="ui  segment">
        <div class="ui grid">
          <aside class="ui six wide column">
           <img src="/assets/images/pacemaker.jpg")" class="ui medium image">
          </aside>
          <div class="ui ten wide column fluid form">
            <div class="ui stacked segment">
              <h3 class="ui header">Log-in</h3>
              <form {{action 'login' on="submit"}}>
                <div class="field">
                  <label>Email</label>
                  {{input id="email" value=email placeholder="Enter your email address"}}
                </div>
                <div class="field">
                  <label>Password</label>
                  {{input id="password" value=password type="password" placeholder="Enter your password"}}
                </div>
                <button class="ui blue button" type="submit"> Sign in </button>
              </form>
            </div>
          </div>
        </div>
      </section>
    </script>
For this template, we need a controller, located in public/app/controllers:
login_controller.js
App.LoginController = Ember.Controller.extend
({
  actions:
  {
    login: function()
    {
      var email      = this.get('email');
      var password   = this.get('password');
      var controller = this;
      $.getJSON(apiUrl + "/users").then(function(users)
      {
        var entry = _.find(users, function(user)
        {
          return user.email == email
        });
        if (entry == null || entry.password != password)
        {
          controller.transitionToRoute("start")
        }
        else
        {
          localStorage['currentUser'] = entry.id;
          App.set('currentUser', entry.id);
          controller.transitionToRoute("dashboard")
        }
      });
    }
  }
});
This script makes use of a helper functions we can define in another script in public/app:
utils.js
function apiDelete(api)
{
  $.ajax(
  {
    url: api,
    contentType: 'application/json',
    type: 'DELETE',
    data: "{}",
    processData: false,
    dataType: 'json'
  })
}

function apiPost(api, object, doneCallback )
{
  $.ajax(
  {
    url: api,
    type: 'POST',
    contentType: 'application/json',
    data: JSON.stringify(object),
    processData: false,
    dataType: 'json'
  }).done (function (data)
  {
    doneCallback(data);
  });
}
Engaging this view now merely including the extra scrips at the end of pacemaker.html:
    <script src="/assets/app/utils.js"></script>
    <script src="/assets/app/controllers/login_controller.js"></script>
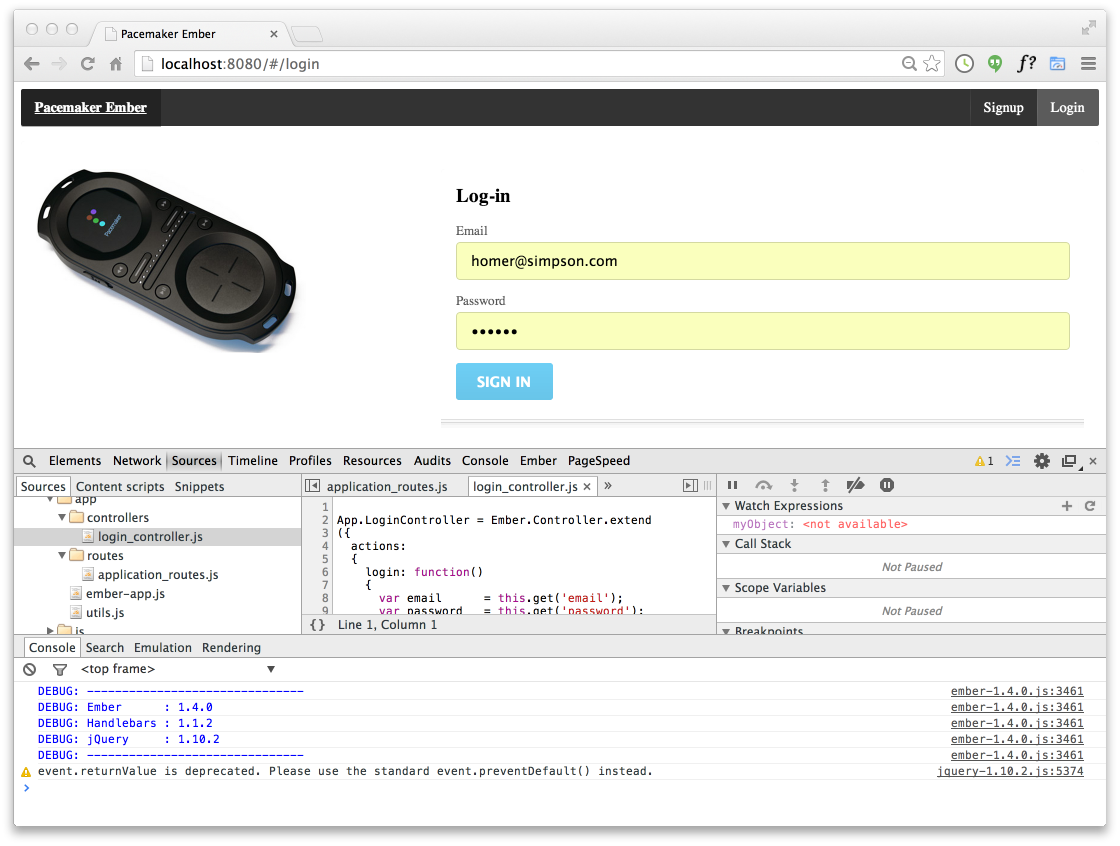
This should enable to 'login' menu option, displaying the login view:
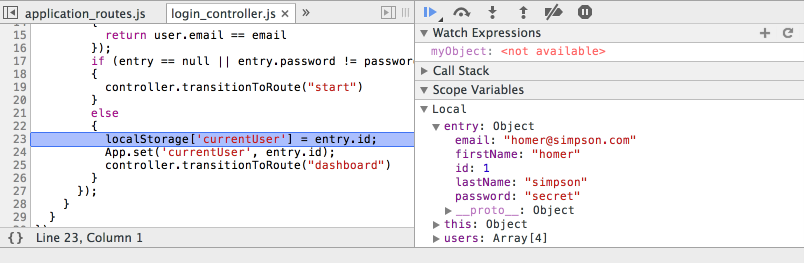
It will be possible to set a breakpoint in the ajax request:

and inspect the returned user objects:
Dashboard
The dashboard, consisting of a list of activities + a simple form to upload them, can be composed using 1 template + 2 partials:
    <script type="text/x-handlebars" data-template-name="dashboard">
      <section class="ui segment">
        <div class="ui two column grid">
          <div class="ui row">
            <div class="ui column">
              {{partial 'activities-list'}}
            </div>
            <div class="ui column">
              {{partial 'upload-activity'}}
            </div>
          </div>
        </div>
      </section>
    </script>

    <script type="text/x-handlebars" data-template-name="upload-activity">
     <section class="ui stacked form segment">
       <h3 class="ui header">Enter Activity Details: </h3>
       <form {{action 'upload' this on="submit"}}>
         <div class="field">
           <label>Type</label>
           {{input valueBinding='kind'  type="text"}}
         </div>
         <div class="field">
           <label>Location</label>
           {{input valueBinding='location'  type="text"}}
         </div>
         <div class="field">
           <label>Distance</label>
           {{input valueBinding='distance'  type="number"}}
         </div>
         <button class="ui blue button"> upload </button>
         <button class="ui red button"  {{action 'clearall' this}}>  clear all </button>
       </form>
     </section>
    </script>

    <script type="text/x-handlebars" data-template-name="activities-list">
      <section class="ui segment">
        <h3 class="ui header"> Activities </h3>
        <table class="ui celled table segment">
          <thead>
            <tr>
              <th>Type</th>
              <th>Location</th>
              <th>Distance</th>
              <th> </th>
            </tr>
          </thead>
          <tbody>
            {{#each model.activities}}
              <tr>
                <td> {{kind}} </td> <td> {{location}} </td> <td> {{distance}} </td>
               <td>   <button class="ui icon button" {{action 'remove' this}}>
                   <i class="remove icon"></i> </button></td>
              </tr>
            {{/each}}
          </tbody>
        </table>
      </section>
    </script>
Place these in pacemaker.html
This will require a matching route in /pacemaker-node/public/app/routes:
dashboard_routes.js
App.DashboardRoute = Ember.Route.extend
({
  model: function(params)
  {
    userid = localStorage['currentUser']
    return $.getJSON(apiUrl + "/users/" + userid).then(function(userDetails)
    {
     return userDetails
    });
  }
});
... and a controller in /pacemaker-node/public/app/controllers:
dashboard_controller.js
App.DashboardController = Ember.ObjectController.extend
({
  actions:
  {
    upload: function(params)
    {
      var controller = this;
      var model = this.get("model");
      var activity = {};
      activity.kind     = model.kind;
      activity.location = model.location;
      activity.distance = model.distance;

      userid = localStorage['currentUser']

      apiPost(apiUrl + "/users/" + userid + "/activities", activity, function done(data)
      {
        console.log ( "activity loaded: " + JSON.stringify(data) );
        model.activities.pushObject(data);
      });
    },

    clearall: function(params)
    {
      apiDelete(apiUrl + "/users/" + params.id + "/activities")
      var model = this.get("model");
      model.activities.clear();
    },

    remove: function(params)
    {
      var model = this.get("model");
      apiDelete(apiUrl + "/users/" + model.id + "/activities/" + params.id)
      var entry = _.find(model.activities, function(obj) { return obj.id == params.id })
      model.activities.removeObject(entry);
    }

  }
});
These will need to be included in pacemaker.html:
    <script src="/assets/app/routes/dashboard_routes.js"></script>
    <script src="/assets/app/controllers/dashboard_controller.js"></script>
Logging in should now display the dashboard:
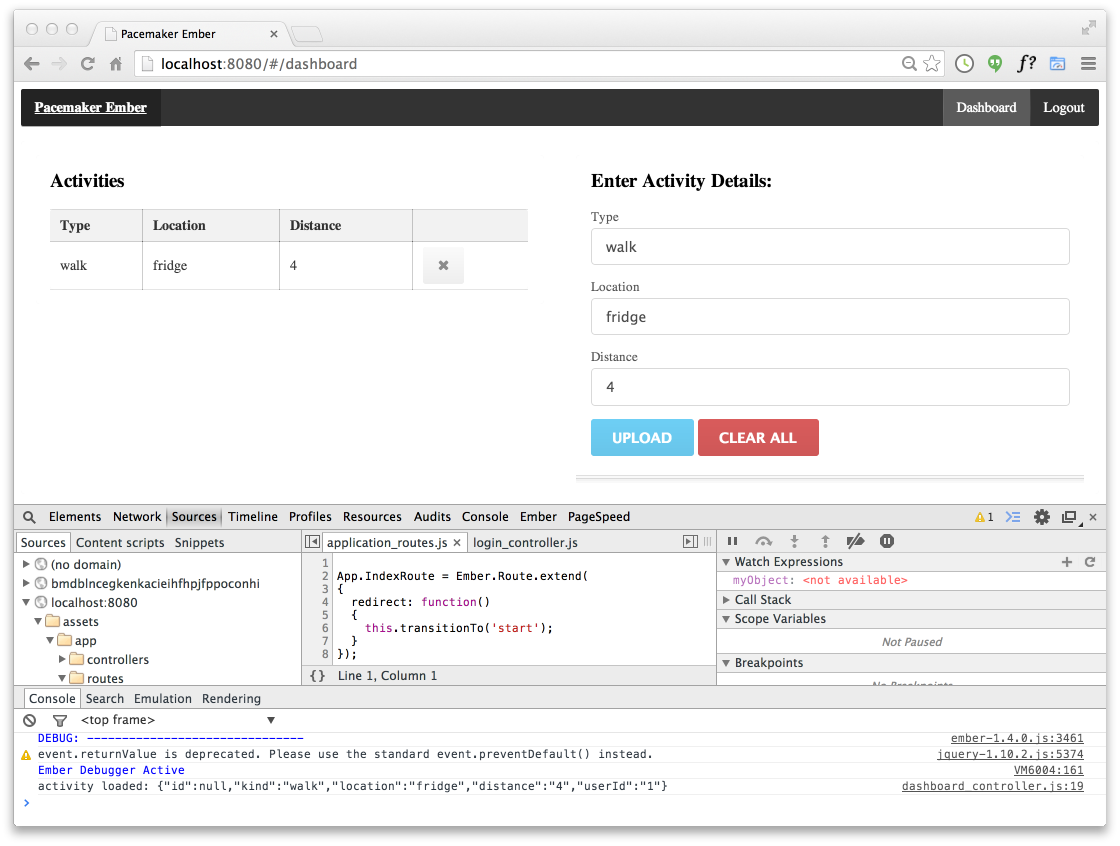
You should be able to upload and delete activities.
Structure
This is the structure of the pacemaker-node at this stage:
├── app.js
├── controllers
│   ├── activities.js
│   └── users.js
├── models
│   ├── activities.js
│   ├── userdata.js
│   └── users.js
├── node_modules
│   ├── body-parser ...
│   ├── express ...
│   ├── sequelize ...
│   └── sqlite3 ...
├── package.json
└── public
    ├── app
    │   ├── app.js
    │   ├── controllers
    │   │   ├── application_controller.js
    │   │   ├── dashboard_controller.js
    │   │   └── login_controller.js
    │   ├── routes
    │   │   ├── application_routes.js
    │   │   └── dashboard_routes.js
    │   └── utils.js
    ├── images
    │   ├── favicon.png
    │   └── pacemaker.jpg
    ├── js
    │   ├── ember-1.4.0.js
    │   ├── handlebars-1.1.2.js
    │   ├── jquery-1.10.2.js
    │   └── underscore-min.js
    ├── pacemaker.html
    └── semantic
        ├── css ...
        ├── fonts ...
        ├── images ...
        └── javascript ...
Exercises
A an archive of the application including the ember UI:
Exercise 1:
Exercise 2: