Objectives
Rebuild the ToDo application from the apple developer documentation:
Built as an exercise to illustrate this talk:
Complete source for the lab here:
Setup
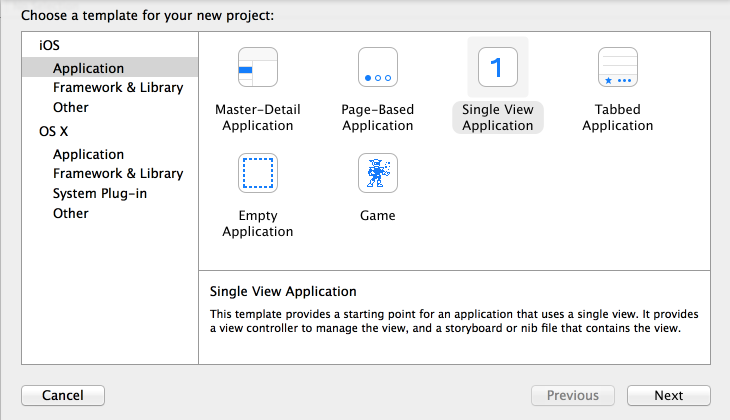
In XCode, create a new IOS 'Single View' Swift application:
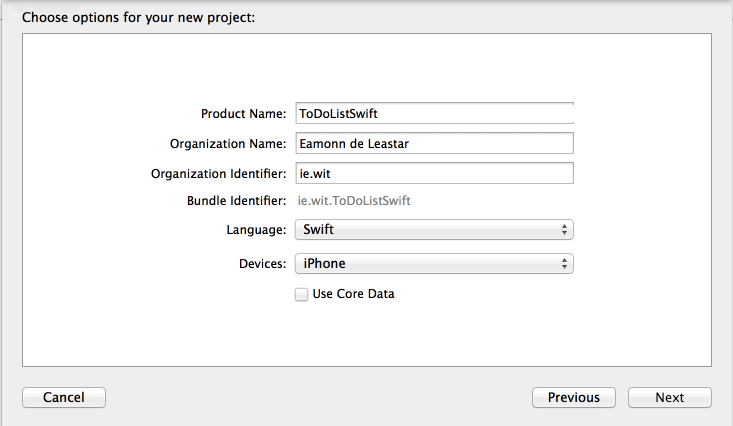
Make sure the app is a Swift application:
Use this .gitignore file:
# Xcode
#
build/
*.pbxuser
!default.pbxuser
*.mode1v3
!default.mode1v3
*.mode2v3
!default.mode2v3
*.perspectivev3
!default.perspectivev3
xcuserdata
*.xccheckout
*.moved-aside
DerivedData
*.hmap
*.ipa
*.xcuserstate
(just copy/paste this into .gitignore in your projects folder)
Commit this to git using your preferred method.
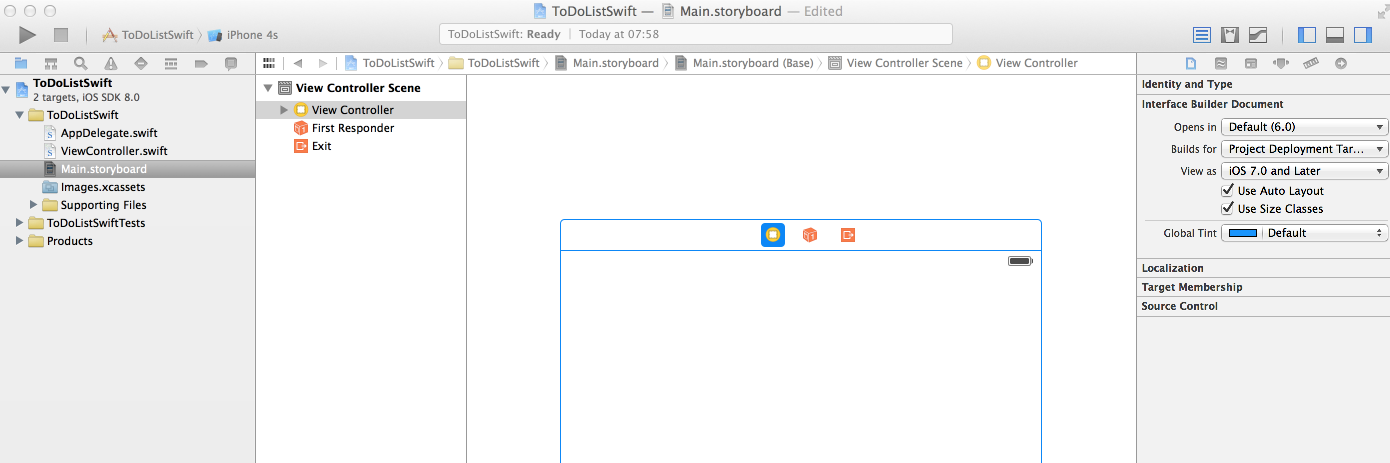
Run the app now using the simulator:
You should have these sources:
AppDelegate
import UIKit

@UIApplicationMain
class AppDelegate: UIResponder, UIApplicationDelegate
{
  var window: UIWindow?

  func application(application: UIApplication, didFinishLaunchingWithOptions launchOptions: NSDictionary?) -> Bool
  {
    return true
  }

  func applicationWillResignActive(application: UIApplication)
  {
  }

  func applicationDidEnterBackground(application: UIApplication)
  {
  }

  func applicationWillEnterForeground(application: UIApplication)
  {
  }

  func applicationDidBecomeActive(application: UIApplication)
  {
  }

  func applicationWillTerminate(application: UIApplication)
  {
  }
}
ViewController:
import UIKit

class ViewController: UIViewController
{
  override func viewDidLoad()
  {
    super.viewDidLoad()
  }

  override func didReceiveMemoryWarning()
  {
    super.didReceiveMemoryWarning()
  }
}
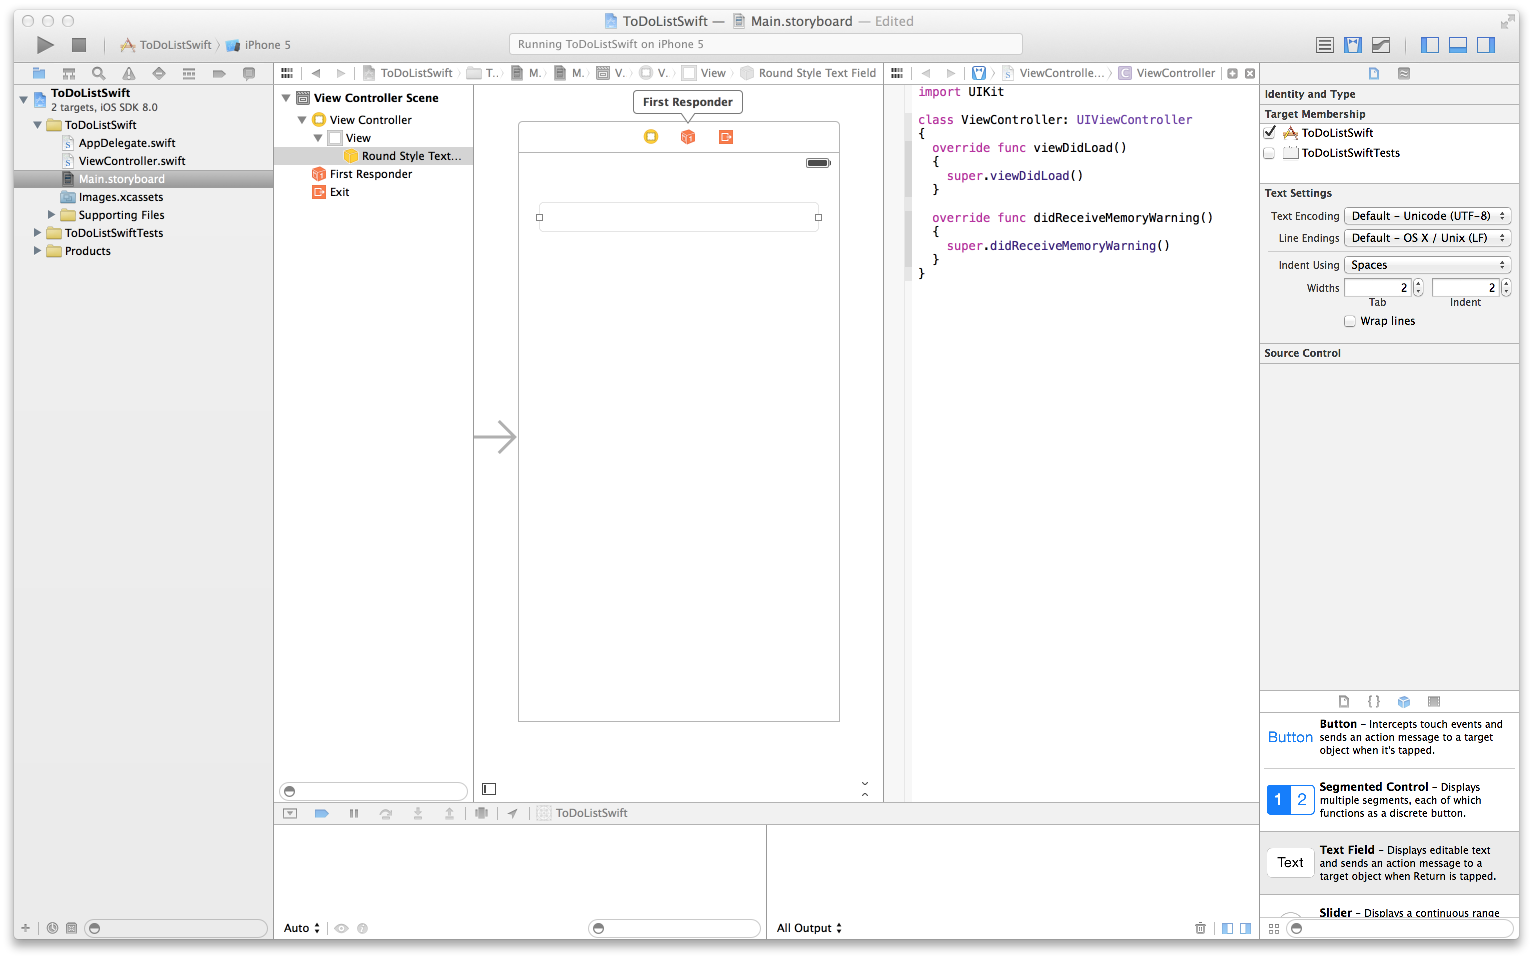
Select the View Controller in the File Inspector:
and disable the use of Auto Layout and size classes. The storyboard scene will be reconfigured to look like this:

Outlets & Delegates
Drag a TextField onto the ViewController scene:

Positioning it as shown.
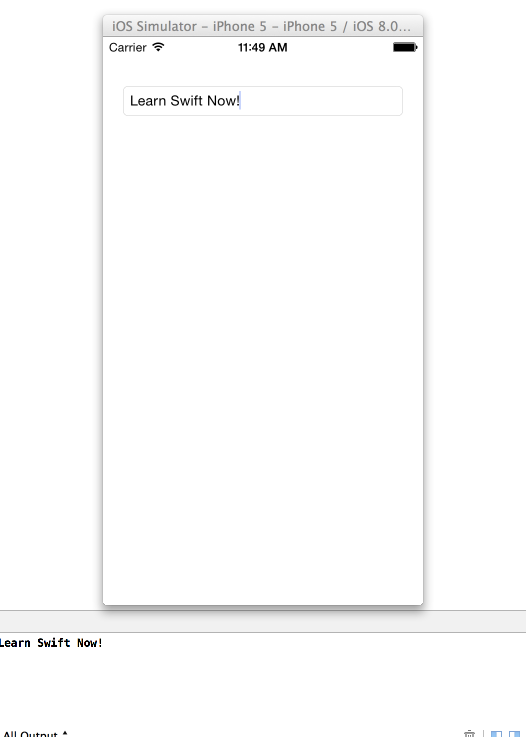
You should now be be able to run the app and enter text:

In the storyboard view, select the View and then View Controller and then select "View->Editors->Show Assistant Editor" from the main menu. This will show the visual and textual representations side-by-side:
Select the EditText control in the view and Ctrl-Drag it to the class. A line appears and try to drop it just inside the opening brace of the class:

In the pop up dialog, enter the name 'toDoItem' as shown and press connect. T The class will look like this:
import UIKit

class ViewController: UIViewController
{
  @IBOutlet var toDoItem: UITextField

  override func viewDidLoad()
  {
    super.viewDidLoad()
  }

  override func didReceiveMemoryWarning()
  {
    super.didReceiveMemoryWarning()
  }
}
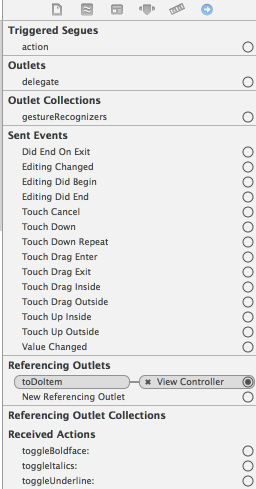
A new attribute has been inserted. See if you can locate a reference to this outlet in the 'Connections Inspector'
We would like to know when the user presses return while entering text. One way of doing this is to implement the this protocol:
Implementing a protocol involves appending the protocol name to the class:
class ViewController: UIViewController, UITextFieldDelegate
.. and then setting the delegate as soon as the object loads:
  override func viewDidLoad()
  {
    super.viewDidLoad()
    toDoItem.delegate = self
  }
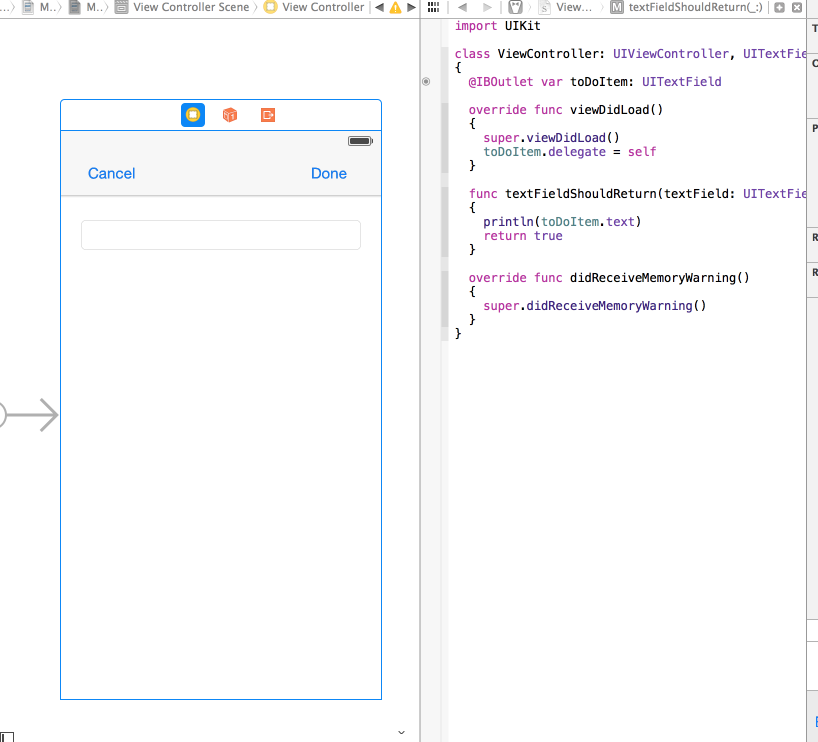
Finally, we need to implement a handler for the event we are interested in:
  func textFieldShouldReturn(textField: UITextField!) -> Bool
  {
    println(toDoItem.text)
    return true
  }
We should be able to run the app now and the text we have typed should appear on the xcode output window:
This is the complete class:
import UIKit

class ViewController: UIViewController, UITextFieldDelegate
{
  @IBOutlet var toDoItem: UITextField

  override func viewDidLoad()
  {
    super.viewDidLoad()
    toDoItem.delegate = self
  }

  func textFieldShouldReturn(textField: UITextField!) -> Bool
  {
    println(toDoItem.text)
    return true
  }

  override func didReceiveMemoryWarning()
  {
    super.didReceiveMemoryWarning()
  }
}
TableView
In the storyboard, introduce a TableViewController, and position it alongside the existing view in the scene as shown:
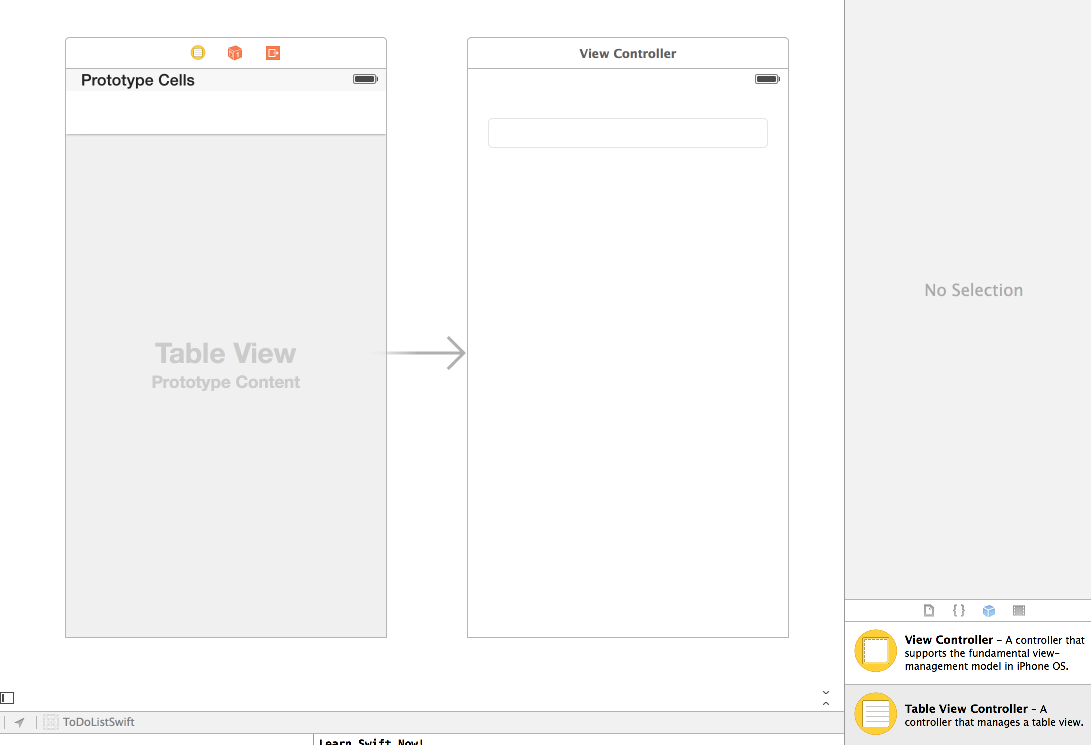
Drag and drop the 'initial scene' arrow from the existing controller to the front of the new controller:

(Note the 'This is the View Controller' will be automatically ticked in the Attributes Inspector on the right)
Run the app again - a different (table) view appears instead.
Connecting Views
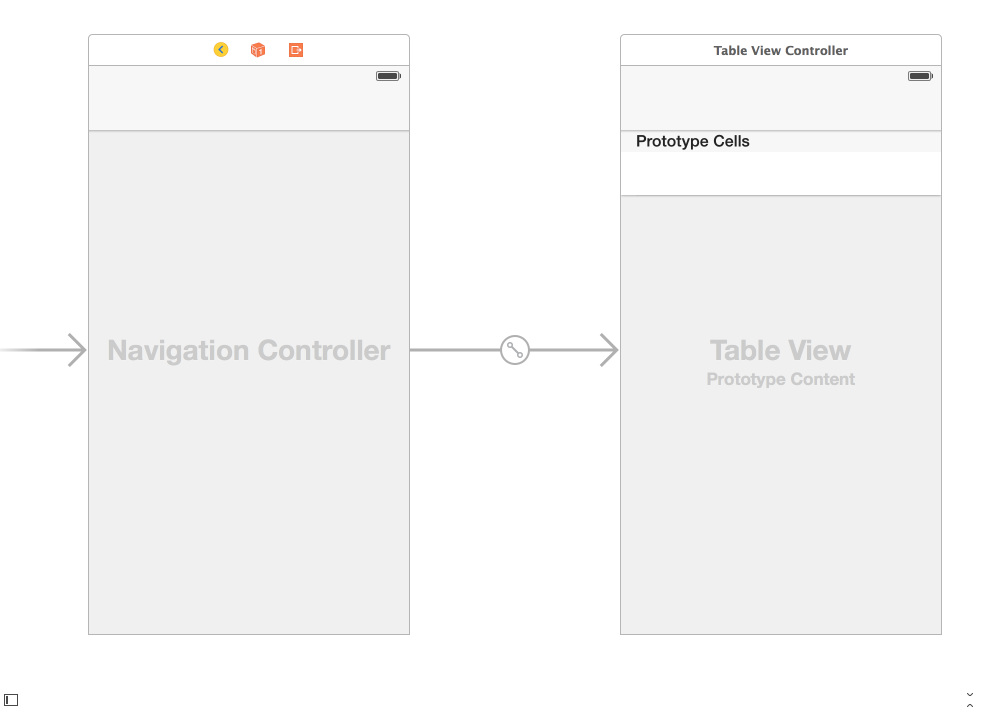
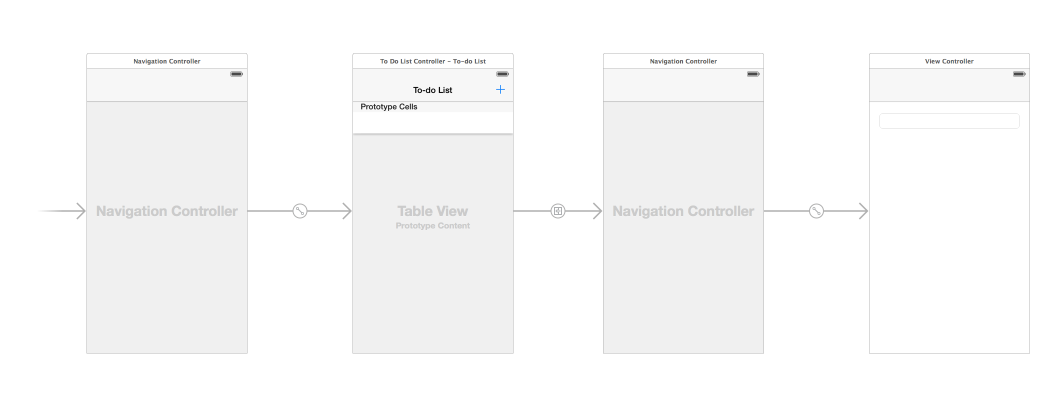
Select the Table View Controller in the storyboard editor, and select 'Editor->Embed in->Navigation Controller. This will reconfigure the layout as follows:
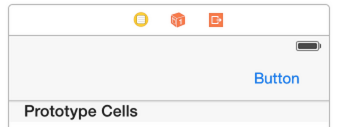
It has created space at the top of the TableView, into which we can now drag and drop a button:

Into the navigation area:
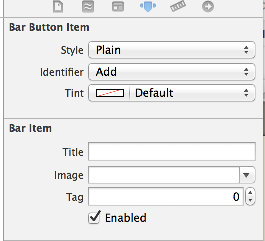
When this is placed, select the 'Bar Button' as it is called in the outline view:
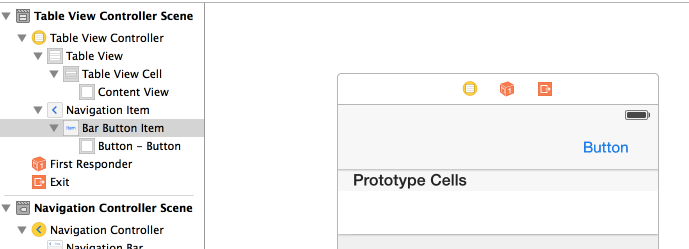
Change its identifier to 'Add' in the attributes inspector:
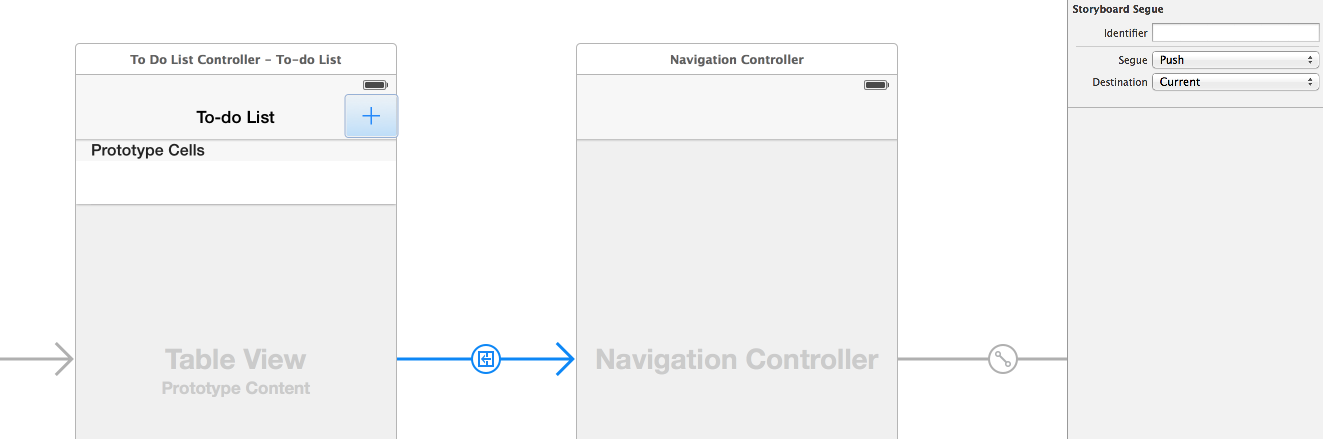
Now Control-Drag the new button to the ViewControler - establishing a new 'segue' in the scene:
When connecting the controller, select 'Push' as the transition type.
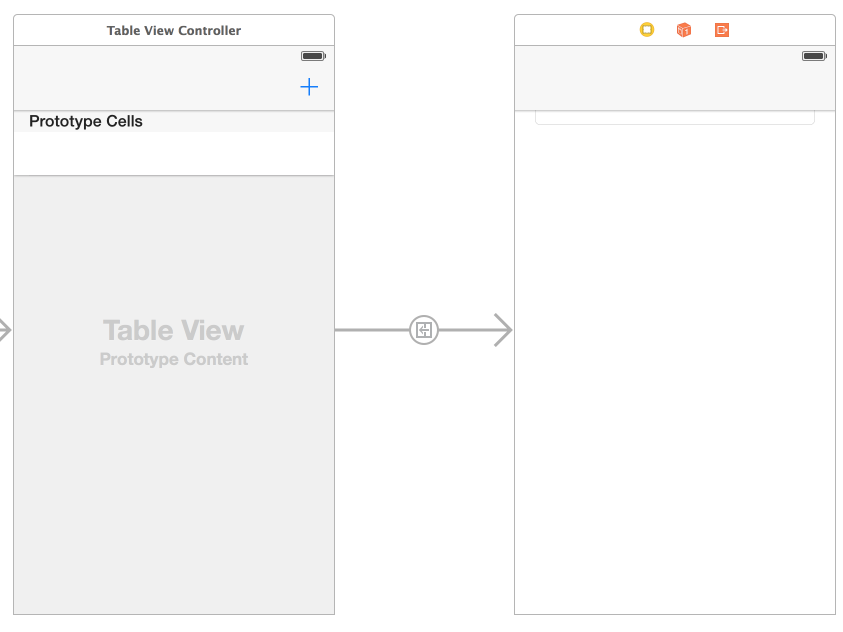
You should now be able to run the app and move from the initial table view to the second view using the '+' button. You should also be able to return to this opening view via an automatically generated 'Back' button
In the storyboard outline view, select 'Navigation Item':
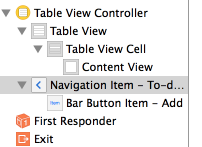
.. and in the Attributes Inspector, enter a title for the Table Controller:
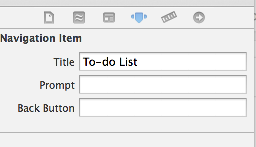
Now try running the app again. Note the changed title in the Item view - from 'Back" to 'To Do List'
Custom Classes
The TableViewController we introduced in the storyboard is currently entirely visual, and without any Swift class associated with it. We can create a class now and establish the connection with the visual representation.
Select the folder containing our classes in the project view, right click and select 'New File' then select 'Cocoa Touch' class:
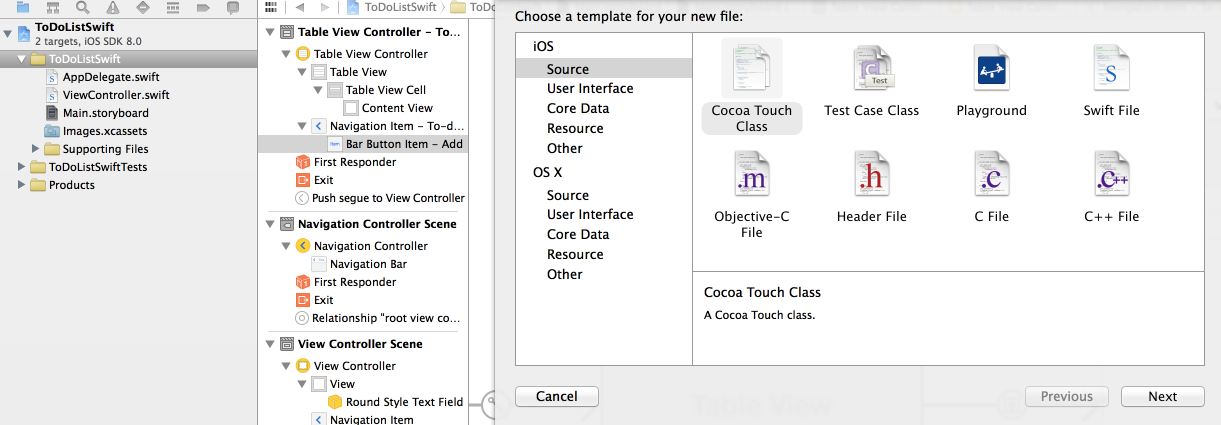
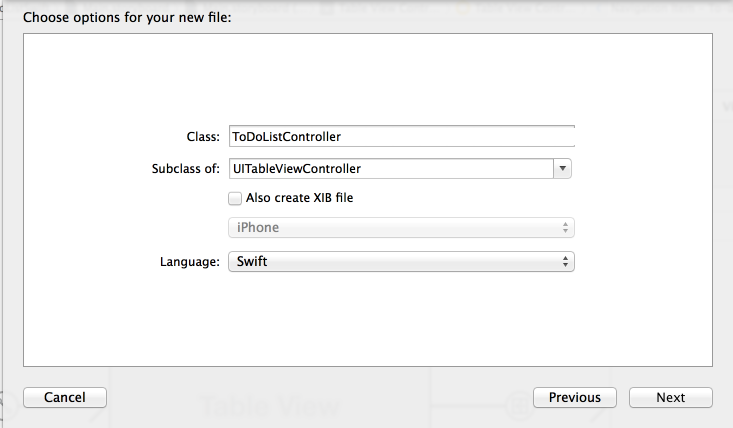
Make sure the class is derived from 'UITableViewController', and call it ToDoListController:
This will generate the following class:
import UIKit

class ToDoListController: UITableViewController
{
  init(style: UITableViewStyle)
  {
    super.init(style: style)
  }

  override func viewDidLoad()
  {
    super.viewDidLoad()
   }

  override func didReceiveMemoryWarning()
  {
    super.didReceiveMemoryWarning()
  }

  // #pragma mark - Table view data source

  override func numberOfSectionsInTableView(tableView: UITableView?) -> Int
  {
    return 0
  }

  override func tableView(tableView: UITableView?, numberOfRowsInSection section: Int) -> Int
  {
    return 0
  }
}
(Comments removed)
We now need to connect this class with the visual version as designed in the storyboard.
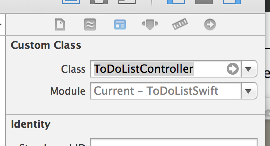
Select the TableView controller in the outline view:

In the Identity Inspector, select the ToDoListContorller class form the 'Class' drop down:
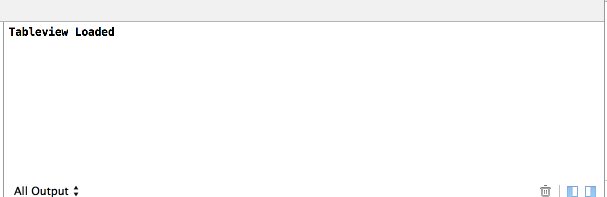
The class is now bound. To verify this, we can place a simple print statement:
  override func viewDidLoad()
  {
    super.viewDidLoad()
    println ("Tableview Loaded")
   }
Run the app now, we get an error message as it is launched:
/Users/edeleastar/repos/projects/ios/ToDoListSwift/ToDoListSwift/ToDoListController.swift: 3: 3: fatal error: use of unimplemented initializer 'init(coder:)' for class 'ToDoListSwift.ToDoListController'
(lldb)
This may be a bug in the xcode beta - include this method in the ToDoListController:
 init(coder aDecoder: NSCoder!)
  {
    super.init(coder: aDecoder)
  }
Finally, run it again and look to the the message appearing in xcode:
Done / Cancel Buttons
Just as we encapsulated the TableView controller in a Navigation Controller earlier - we will now also embed the View controller.
First select the View Controller:
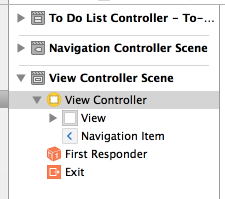
.. and then select "Editor->Embed in->Navigation Controller". This will reconfigure the scenes:
Run the app now - and you will see this error in the console:
2014-06-22 06:25:24.663 ToDoListSwift[33780:955905] *** Terminating app due to uncaught exception 'NSInvalidArgumentException',
reason: 'Pushing a navigation controller is not supported'
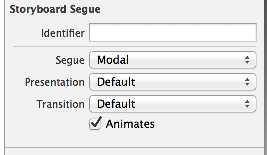
This is because of an incorrect 'seague' form the table to the item controller. Select this segue:
and reset its Segue type to 'modal':
Run the application again. This time it operates correctly, however when we navigate to the item view, we can no longer return to the table view. We will customise this now.
First, drag drop two buttons to the navigation bar of the item view:

We need to connect these buttons somehow to the TableViewController, so that when they are pressed, we can recover the todo text (or otherwise if Cancel is pressed).
Try to Control-Drag the Cancel button to the "Exit"

This will not work, as the "Exit" responder fails to propose any outlets/endpoints. To fix this, introduce the following function into ToDoListController:
  @IBAction func unwindToList (segue: UIStoryboardSegue?)
  {
    println ("seague unwound")
  }
Try the Control-Drag of one of the buttons again - it still will not engage. One last change should fix this. Introduce the following header into the project:
ToDoListController.h
#import <Foundation/Foundation.h>

#import <UIKit/UIKit.h>

class ToDoListController
@interface ToDoListController

- (IBAction)unwindToList: (UIStoryboardSegue *)segue;

@end
This is an Objective-C bridging header for the class ToDoListController. We need to complete the bridge in the ToDoListController swift class:
@objc(ToDoListController)
class ToDoListController: UITableViewController
{
  ...
Make sure you rebuild the app now. The, Control-Drag the buttons to the Exit - and the seague method defined above should appear. Select it for both buttons in turn.
Run the app again. Does it item view return this time? Perhaps not. If the return fails, try the following workaround:
//@objc(ToDoListController)
class ToDoListController: UITableViewController
{
  ...
(Comment out the objc attribute above).
It should work now (hopefully). I.e. 'Done' and 'Cancel' should return to the list view, and the log message should appear in the console.
ToDoItem Class
Introduce the following class:
ToDoItem
class ToDoItem
{
  var completed = false
  var itemName  = ""

  init(completed: Bool = false, itemName:String = "empty")
  {
    self.completed = completed
    self.itemName  = itemName
  }
}
Open the View Controller again on storyboard, and using 'View->Show Assistant Editor', open the source alongside it:
Control Drag each of the buttons into the class, giving the outlet the names 'cancel' and 'done'. We should get the following generated in the ViewController:
  @IBOutlet var cancel   : UIButton
  @IBOutlet var done     : UIButton
(Make sure the type is UIButton, not UIBarButton in the generated code). We can now introduce a property to hold the todo text:
var todo : ToDoItem?
And we can intercept the return from the view in the 'prepareForSeague' override to initialise (and print) this text item
  override func prepareForSegue(segue: UIStoryboardSegue!, sender: AnyObject!)
  {
    if let button = sender as? NSObject
    {
      todo = button == done ? ToDoItem(itemName:toDoItem.text): nil
      println(todo?.itemName)
    }
  }
Look carefully at what we are doing here: determining which button has been pressed, and if it is done, we recover the text from the control.
Run the app now. You should see the todo item printed when 'done' is pressed.
This is the final version of the ViewController class (we have removed one of the method we had earlier):
import UIKit

class ViewController: UIViewController, UITextFieldDelegate
{
  @IBOutlet var toDoItem : UITextField
  @IBOutlet var cancel   : UIButton
  @IBOutlet var done     : UIButton
  var todo               : ToDoItem?

  override func viewDidLoad()
  {
    super.viewDidLoad()
  }

  override func prepareForSegue(segue: UIStoryboardSegue!, sender: AnyObject!)
  {
    if let button = sender as? NSObject
    {
      todo = button == done ? ToDoItem(itemName:toDoItem.text): nil
      println(todo?.itemName)
    }
  }

  override func didReceiveMemoryWarning()
  {
    super.didReceiveMemoryWarning()
  }
}
ToDoListTableView Class
Our final step is to display the item in the TableView.
First introduce an array of ToDoItems in the tableview controller:
var todoItems = ToDoItem[]()
We can refactor the unwind method to retrieve the text:
  @IBAction func unwindToList (segue: UIStoryboardSegue?)
  {
    var controller = segue?.sourceViewController as ViewController
    if controller.todo != nil
    {
      todoItems.append(controller.todo!)
      var str = controller.todo?.itemName
      println ("adding" + str! + " to list")
    }
  }
Run the app now and you should see an appropriate message in the debug console.
This method can be more elegantly written using Optional Chaining as follows:
  @IBAction func unwindToList (segue: UIStoryboardSegue?)
  {
    if let controller = segue?.sourceViewController as? ViewController
    {
      if let toDo = controller.todo
      {
        println ("adding" + toDo.itemName + " to list")
        todoItems.append(toDo)
      }
    }
  }
Our next step is to display this list in the table. First change this method from retuning zero to returning the number of elements in the list:
  override func tableView(tableView: UITableView?, numberOfRowsInSection section: Int) -> Int
  {
    return todoItems.count
  }
Also, change the numberOfSections override to return 1:
  override func numberOfSectionsInTableView(tableView: UITableView?) -> Int
  {
    return 1
  }
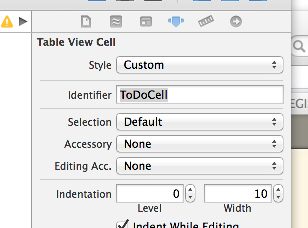
In order to display the todo items, we need one further change to the storyboard. Select the "TableViewCell" in the outline view, and locate the 'ReuseIdentifier' in the Attributes Inspector:
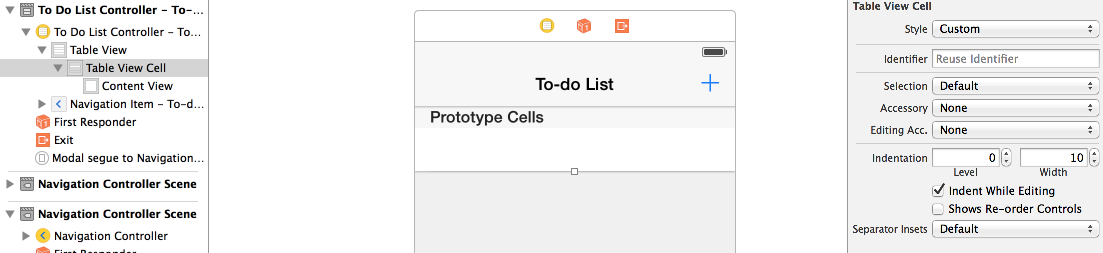
Change this to 'ToDoCell'
We can now proceed to implement the override to display the entry for each cell:
  override func tableView(tableView: UITableView?, cellForRowAtIndexPath : NSIndexPath!) -> UITableViewCell?
  {
    let cell           = UITableViewCell(style: UITableViewCellStyle.Default, reuseIdentifier: "ToDoCell")
    var task           = todoItems[cellForRowAtIndexPath.row]

    cell.text          = task.itemName
    cell.accessoryType = task.completed ? UITableViewCellAccessoryType.Checkmark : UITableViewCellAccessoryType.None

    return cell
  }
Finally, the todoitem will not appear until we reload the data in the unwind:
  @IBAction func unwindToList (segue: UIStoryboardSegue?)
  {
    if let controller = segue?.sourceViewController as? ViewController
    {
      if let toDo = controller.todo
      {
        println ("adding" + toDo.itemName + " to list")
        todoItems.append(toDo)
        self.tableView.reloadData()
      }
    }
  }
(just one extra line here).
The app should now launch and run as expected.
This is the current version of the TableView controller:
import UIKit

//@objc(ToDoListController)
class ToDoListController: UITableViewController
{
  var todoItems = ToDoItem[]()

  init(style: UITableViewStyle)
  {
    super.init(style: style)
  }

  init(coder aDecoder: NSCoder!)
  {
    super.init(coder: aDecoder)
  }

  override func viewDidLoad()
  {
    super.viewDidLoad()
    println ("Tableview Loaded")
   }

  @IBAction func unwindToList (segue: UIStoryboardSegue?)
  {
    if let controller = segue?.sourceViewController as? ViewController
    {
      if let toDo = controller.todo
      {
        println ("adding" + toDo.itemName + " to list")
        todoItems.append(toDo)
        self.tableView.reloadData()
      }
    }
  }

  override func didReceiveMemoryWarning()
  {
    super.didReceiveMemoryWarning()
  }

  // #pragma mark - Table view data source

  override func numberOfSectionsInTableView(tableView: UITableView?) -> Int
  {
    return 1
  }

  override func tableView(tableView: UITableView?, numberOfRowsInSection section: Int) -> Int
  {
    return todoItems.count
  }

  override func tableView(tableView: UITableView?, cellForRowAtIndexPath : NSIndexPath!) -> UITableViewCell?
  {
    let cell  = UITableViewCell(style: UITableViewCellStyle.Default, reuseIdentifier: "ToDoCell")
    var task           = todoItems[cellForRowAtIndexPath.row]

    cell.text          = task.itemName
    cell.accessoryType = task.completed ? UITableViewCellAccessoryType.Checkmark : UITableViewCellAccessoryType.None

    return cell
  }
}
Edit Cells
Finally, we would like the enable checking / unchecking + redordring and deleting of the todo items in the list.
First to support tick/tick items, introduce this override:
  override func tableView(tableView: UITableView!, didSelectRowAtIndexPath : NSIndexPath!)
  {
    tableView.deselectRowAtIndexPath(didSelectRowAtIndexPath, animated: false)
    var task = self.todoItems[didSelectRowAtIndexPath.row] as ToDoItem
    task.completed = !task.completed
    tableView.reloadRowsAtIndexPaths([didSelectRowAtIndexPath], withRowAnimation: UITableViewRowAnimation.None)
  }
Run the app and when you tap on a todo item, at check mark toggles on / off.
To support Edit/Rearrage/Delete, we need a few changes. First, in the viewDidLoad method we enable the 'Edit' button:
  override func viewDidLoad()
  {
    super.viewDidLoad()
    navigationItem.leftBarButtonItem = self.editButtonItem()
    println ("Tableview Loaded")
  }
If you run the app now, the button appears and will seem to have some effect. However to perform the delete we need this override:
  override func tableView(tableView: UITableView?, commitEditingStyle: UITableViewCellEditingStyle, forRowAtIndexPath: NSIndexPath?)
  {
    if commitEditingStyle == .Delete
    {
      if let index = forRowAtIndexPath?.row
      {
        todoItems.removeAtIndex(index)
        tableView?.deleteRowsAtIndexPaths([forRowAtIndexPath!], withRowAnimation: .Fade)
      }
    }
    else if commitEditingStyle == .Insert
    {
    }
  }
This should work now.
In order to enable re-ordering, we need these overrides:
  override func tableView(tableView: UITableView?, moveRowAtIndexPath : NSIndexPath?, toIndexPath: NSIndexPath?)
  {
  }

  override func tableView(tableView: UITableView?, canMoveRowAtIndexPath : NSIndexPath?) -> Bool
  {
    return true
  }
If you run it now, and add more than one item, you will be able to reorder them when editing is enabled.
Finally, you might like to load some data for test purposes on launch:
  override func viewDidLoad()
  {
    super.viewDidLoad()
    navigationItem.leftBarButtonItem = self.editButtonItem()
    todoItems.append(ToDoItem(itemName:"Buy Milk",    completed:false))
    todoItems.append(ToDoItem(itemName:"Buy eggs",    completed:true))
    todoItems.append(ToDoItem(itemName:"Read a book", completed:false))
    println ("Tableview Loaded")
  }