Objectives
Implement three new views, each associated with the same controller. These view provide an 'account management' feature, allowing users to sign up and log in to the spacebook service. Introduce a model class to store information in a database and browse this database locally
Review the project structure
Lab07 Project
You should have a project from last weeks lab. If you dont have the project then this is a version (before the exercises) here
Download and unzip this project - it is called 'spacebook-part-1' - to distinguish it from your project which should be called 'spacebook'. If you wish to just view the source, and run the application - import it into your workspace in eclipse.
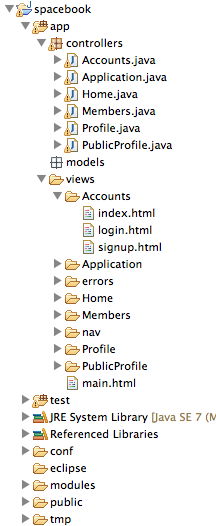
It is important to become extremely familiar with the structure of the project. It can be a little confusing at first, but it is in fact laid out in a very logical manner. At the highest level, the project looks like this:
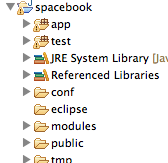
There are three folder in the project we are most interested in.
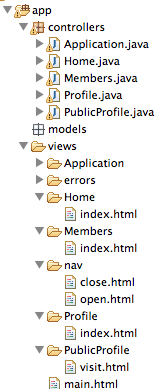
app
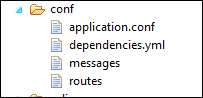
conf
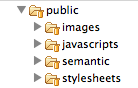
public
Examine these files in your project, and verify that everything is as shown above. We can ignore the others folders for the moment
Signup, Login & Logout Templates
Our application does not currently support certain critical features:
- Signing up to the service
- Logging in with username/password
- Logging out
We might call this feature 'Account Management'. This would support a number of screens:
- A screen to ask the user if they want to sign up or log in
- A sign up screen
- A log in screen
We will provide all of the above via a new class we will call 'Accounts'. In the 'App/controllers' folder, create an empty java class called 'Accounts' - and incorporate the following skeleton:
package controllers;

import play.*;
import play.mvc.*;
import java.util.*;
import models.*;

public class Accounts extends Controller
{

}
We would like to 'render' different views depending on the context. Introduce the following methods inside the class to realise this:
  public static void signup()
  {
    render();
  }

  public static void login()
  {
    render();
  }

  public static void logout()
  {
    index();
  }

  public static void index()
  {
    render();
  }
Look carefully at this simple class. For every call to 'render()', we need a corresponding html file in views named as follows
- views
- class name
- method name.html
- class name
For this example, we thus need
- views
- Accounts
- signup.html
- login.html
- index.html
- Accounts
(we dont need logout.html - as it does not call render(), it calls index() instead). Create these files now, inside a new folder called Accounts in the views folder. Provide some initial content:
index.html
#{extends 'main.html' /}
#{set title:'Welcome to Spacebook' /}

<nav class="ui menu">
  <a class="item" href="/signup"> Signup  </a>
  <a class="item" href="/login">  Login   </a>
</nav>

<section class="ui segment">
  <p> Signup or Log in to the Spacebook Service </p>
</section>
signup.html
#{extends 'main.html' /}
#{set title:'Signup for Spacebook' /}

<nav class="ui menu">
  <a class="active item" href="/signup"> Signup  </a>
  <a class="item" href="/login">  Login   </a>
</nav>

<section class="ui segment">
  <p> Sign up here ... </p>
</section>
login.html
#{extends 'main.html' /}
#{set title:'Login to Spacebook' /}

<nav class="ui menu">
  <a class="item" href="/signup"> Signup  </a>
  <a class="active item" href="/login"> Login  </a>
</nav>

<section class="ui segment">
  <p> Log in here ... </p>
</section>
Your workspace will start to look like this:
Before we can test it out, we need to set up the appropriate routes. Edit 'conf/routes', and introduce the following entries:
# Landing page
GET    /                                        Accounts.index

# Accounts

GET    /signup                                  Accounts.signup
GET    /login                                   Accounts.login
GET    /logout                                  Accounts.logout

# Home page
GET    /home                                    Home.index
Note that we have also changed '/' (Home.index) entry - such that '/home' will now load the home page.
Run play locally now, and browse to the home page
Try the nav bar links, and also each of the following urls directly:
Can you explain what is happening? Essentially, our routes file is intercepting these urls and directing them to the Accounts class - and calling each of the methods above. These methods are in turn rendering different pages, each with a different title.
Also try these links:
Signup, Login & Logout Screens
The accounts pages now need some forms to enable the user to sign up / log in.
The forms can be designed using the Semantic UI styles - as demonstrated here:
Using this as an example, the following forms can be defined:
views/Accounts/login.html
... as before...

<section class="ui form segment">
  <form action="/authenticate" method="POST">
    <div class="field">
      <label> Username: </label>
      <input type="text" name="email">
    </div>
    <div class="field">
      <label>  Password: </label>
      <input type="password" name="password">
    </div>
    <button class="ui blue submit button">Login</button>
  </form>
</section>
Views/Accounts/signup.html
... as before...

<section class="ui form segment">
  <form action="/register" method="POST">
    <div class="two fields">
      <div class="field">
        <label>First Name</label>
        <input placeholder="First Name" type="text" name="firstName">
      </div>
      <div class="field">
        <label>Last Name</label>
        <input placeholder="Last Name" type="text" name="lastName">
      </div>
    </div>
    <div class="field">
      <label>Email</label>
      <input placeholder="Email" type="text" name="email">
    </div>
    <div class="field">
      <label>Password</label>
      <input type="password" name="password">
    </div>
    <button class="ui blue submit button">Submit</button>
  </form>
</section>
Incorporate these into the view and see how they look in the running application. (Note that the buttons will give not found errors)
Responding to forms
When you press signup or login either of these pages:
we get a 'Not Found' error. What should happen should be something like:
- Register: storing the new details somewhere, so when the user logs in subsequently we can see if they are valid users
- Authenticate: check to see if this is a valid user, and let them in to the rest of the app if the are.
A natural place for us to do this processing is to implement suitable methods in the 'Accounts' class:
  public static void register()
  {
  }

  public static void authenticate()
  {
  }
Introduce these functions into Accounts now. What should we do in them? For the moment we do the following:
- Register: Redirect to the start page (where the user can proceed to log in)
- Authenticate: Just redirect to the home controller
These are accomplished by the following:
  public static void register()
  {
    index();
  }

  public static void authenticate()
  {
    Home.index();
  }
However, if you try these links now (login or signup), we still get the not found error.
Introduce these additional into the routes file:
POST   /authenticate                            Accounts.authenticate
POST   /register                                Accounts.register
Note the difference here - the two new routes are 'POST' (not 'GET') routes.
Test the app now, and verify that you are able to navigate as expected. You should be able to visit each page, from the start. Note that any value you enter will be ignored - you will always be able to log in. However, we have the basic nav structure in place which we can build on later.
Form Input
Recall that we have a 'signup' form in 'views/accounts/signup.html':
<section class="ui form segment">
  <form action="/register" method="POST">
    <div class="two fields">
      <div class="field">
        <label>First Name</label>
        <input placeholder="First Name" type="text" name="firstName">
      </div>
      <div class="field">
        <label>Last Name</label>
        <input placeholder="Last Name" type="text" name="lastName">
      </div>
    </div>
    <div class="field">
      <label>Email</label>
      <input placeholder="Email" type="text" name="email">
    </div>
    <div class="field">
      <label>Password</label>
      <input type="password" name="password">
    </div>
    <button class="ui blue submit button">Submit</button>
  </form>
</section>
We would like values entered in this form to me transmitted to the Accounts controller:
public class Accounts extends Controller
{
  public static void signup()
  {
    render();
  }

  public static void login()
  {
    render();
  }

  public static void logout()
  {
    index();
  }

  public static void index()
  {
    render();
  }

  public static void register()
  {
    index();
  }

  public static void authenticate()
  {
    Home.index();
  }
}
Recall that the action /register in the form triggers a call to the register() method in the class (Locate both of these references now). In particular, this code here:
<form action="/register" method="POST">will trigger a lookup of the routes file, locating this entry:
POST /register Accounts.registerNote the "POST" reference in this fragment. We will return to the significance of this later.
This is the current version of the Accounts.register() method:
...
  public static void register()
  {
    index();
  }
...
Modify the register method to accept email and password fields, and log them to the console:
  public static void register(String email, String password)
  {
    Logger.info(email + " " + password);
    index();
  }
Save everything, fill in the email/password fields on the sign up form, and monitor the console. Every time you press "Signup" you should see those values echoed on the console:
09:36:01,793 INFO ~ homer@simpson.com, secretThis is a direct result of the names used below as the 'name' attribute of the <input> tag matches the name of the parameter passed to the java controller:
    <div class="field">
      <label>Email</label>
      <input placeholder="Email" type="text" name="email">
    </div>
    <div class="field">
      <label>Password</label>
      <input type="password" name="password">
    </div>
We can extend the method to accept the other fields:
  public static void register(String firstName, String lastName, String email, String password)
  {
    Logger.info(firstName + " " + lastName + " " + email + " " + password);
    index();
  }
which are also have matching names:
    <div class="two fields">
      <div class="field">
        <label>First Name</label>
        <input placeholder="First Name" type="text" name="firstName">
      </div>
      <div class="field">
        <label>Last Name</label>
        <input placeholder="Last Name" type="text" name="lastName">
      </div>
    </div>
...and should see all of theme echoed to the console.
User Model
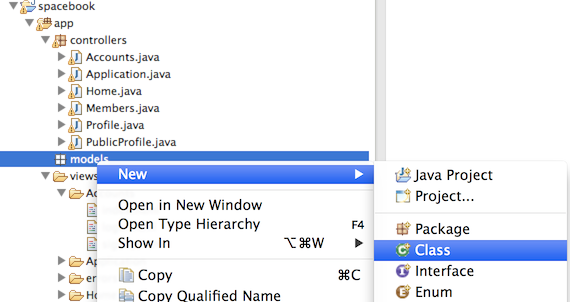
In Eclipse, select the 'models' package (in 'app'), right click, and select 'new->class' as shown here:
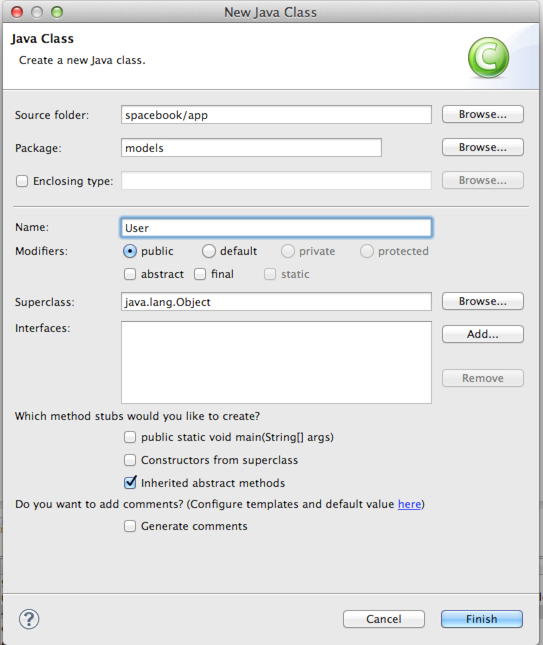
Call the class 'User', and accept the defaults:
Replace the generated stubb class with the following (completely replace all contents):
package models;

import javax.persistence.Entity;

import play.db.jpa.Model;

@Entity
public class User extends Model
{
  public String firstName;
  public String lastName;
  public String email;
  public String password;

  public User(String firstName, String lastName, String email, String password)
  {
    this.firstName = firstName;
    this.lastName  = lastName;
    this.email     = email;
    this.password  = password;
  }
}
This is a 'model' class, which will be used to store information in a database. In order to start using a database, we need to tell our framework what database to use. In eclipse, open the file 'conf/application.conf, and locate the following entries:
# Enable a database engine if needed.
#
# To quickly set up a development database, use either:
#   - mem : for a transient in memory database (H2 in memory)
#   - fs  : for a simple file written database (H2 file stored)
# db.default=mem
#
# T
Uncomment (i.e. remove the leading '#' character) the 'db=mem' line:
db.default=memNow in our Accounts.register() method, do two important things:
- Create a new User object to represent a new user
- Save this object in the database.
This is accomplished as follows:
  public static void register(String firstName, String lastName, String email, String password)
  {
    Logger.info(firstName + " " + lastName + " " + email + " " + password);

    User user = new User (firstName, lastName, email, password);
    user.save();

    index();
  }
Restart the application - this is necessary because we have changed an important database configuration parameter. Browse to the form again and fill in the form. Verify that there are no errors when you press signup.
Database Browsing
From the last step we note that when a someone fills out the form and presses 'sign up' then ultimately this method here is called:
  public static void register(String firstName, String lastName, String email, String password)
  {
    Logger.info(firstName + " " + lastName + " " + email + " " + password);

    User user = new User (firstName, lastName, email, password);
    user.save();

    index();
  }
Where does 'user.save()' put the user details? It goes to a database - and in this step we will take a peak inside the database to have have a look at the entries. This will be useful for debugging, as we would like to be able to verify what is happening with any data we save.
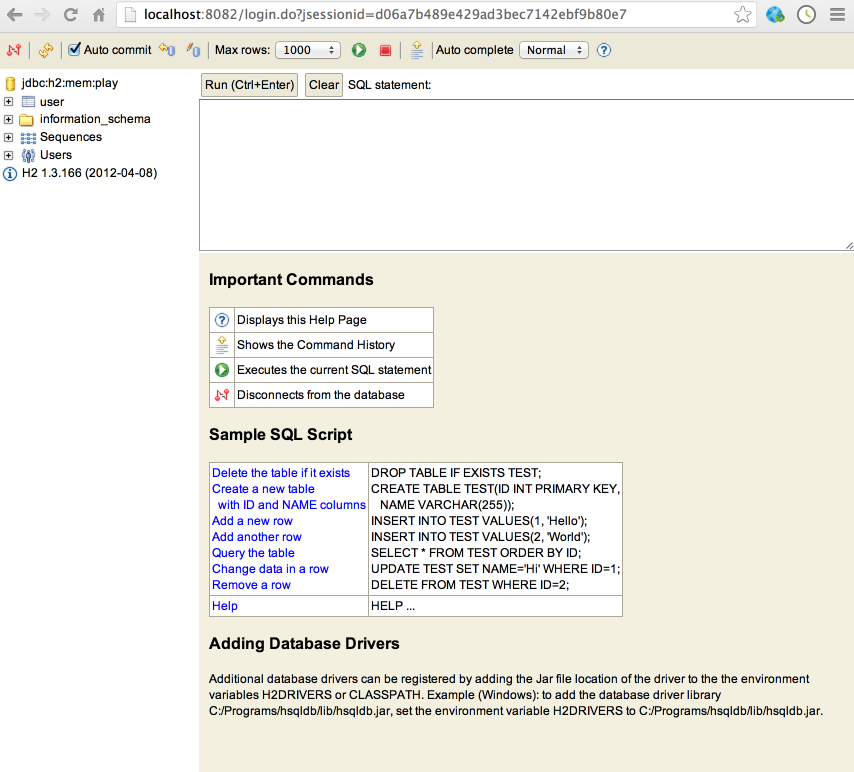
With your application running, browse to this url:
You should see this screen here:
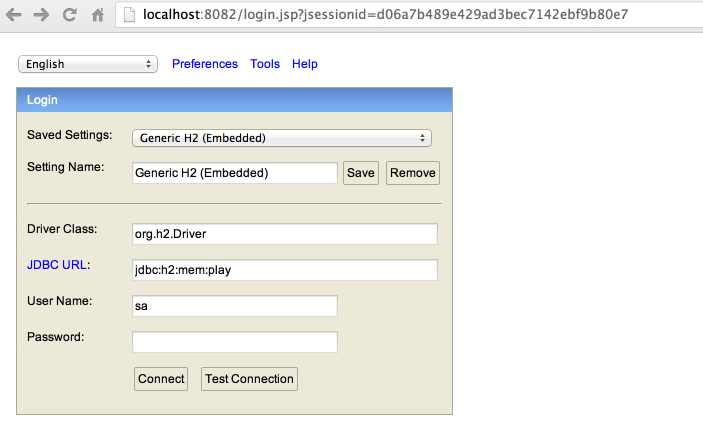
Before pressing 'connect', make sure the 'JDBC URL' field contains the following:
jdbc:h2:mem:playPress 'connect' and you should see this:
This is a peek into the database your application is using. We will look at this occasionally to see what is going on, but it is not part of our applications user interface as such.
You can see our 'user' is already in there. Select it and its structure should be visible:

Press the green 'Run' button:
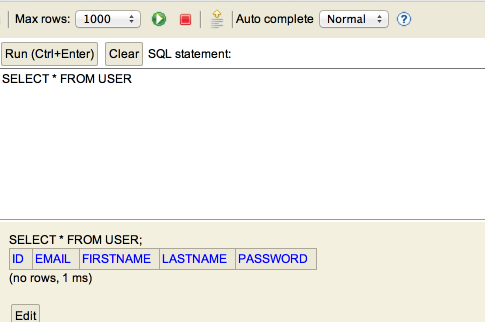
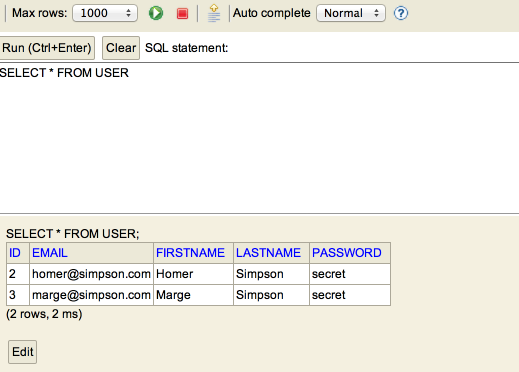
This has executed a query - and the table is shown below. If you have registered someone, it will appear in the report after you have pressed the 'run' button. Register some users now and see if they appear:
Note that by pressing the 'edit' button, we can delete entries:
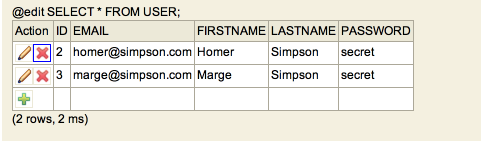
Or add new ones:
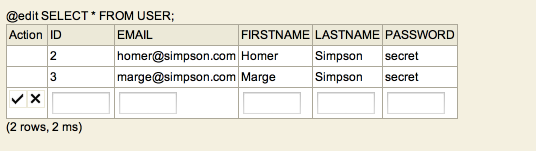
Experiment with adding/removing some entries, using both or application and this console.
Exercises
Archive of lab so far:
Exercise 1:
We need to go back to our login form, which currently looks like this (excluding the header for clarity):
<section class="ui form segment">
  <form action="/authenticate" method="POST">
    <div class="field">
      <label> Username: </label>
      <input type="text" name="email">
    </div>
    <div class="field">
      <label>  Password: </label>
      <input type="password" name="password">
    </div>
    <button class="ui blue submit button">Login</button>
  </form>
</section>
Using step 5 as a guide, introduce the necessary changes to have the email/password transferred from this form to the controller, and logged to the console.
Exercise 2:
What happens when you enter text and press 'Change' on the profile page? (Not found presumably). This is the html for that part of the page:
        <form action="homeprofile/changetext" method="post">
          <h3 class="ui inverted teal block header">Enter Status</h3>
          <textarea class="ui field" name="profiletext"> </textarea>
          <input class="ui blue button" type="submit" name="submit" value="Change" />
        </form>
Again using step 5 of this lab as a guide, can you make the necessary changes such that when the Change button is pressed, a log message is printed on the console?
Remember, to implement complete this exercises you will need to write both a java method and a matching route - as demonstrated in step 5. Also. the 'action' attribute of the form above will need to be completed. Also, note the name on the <textarea> field.