Objectives
Begin a new project which will have CSS stylesheet from the beginning. Explore some of the basic features of CSS, including colours, font and techniques for setting styles across entire sections of a page.
Setup
Projects from Lab01
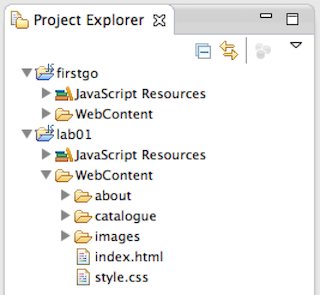
You may have a projects in eclipse called 'fitstgo' and 'lab01' from last week:
However, if you did not save these projects, here are two project archives here of the completed labs:
To open these in eclipse, first extract the archives somewhere on our hard disk. The, in Eclipse, select 'File->Import' menu option, and in the dialog select 'Existing Project into Eclipse'

When you browse to and select the folders to which the project have expanded, you should see this:
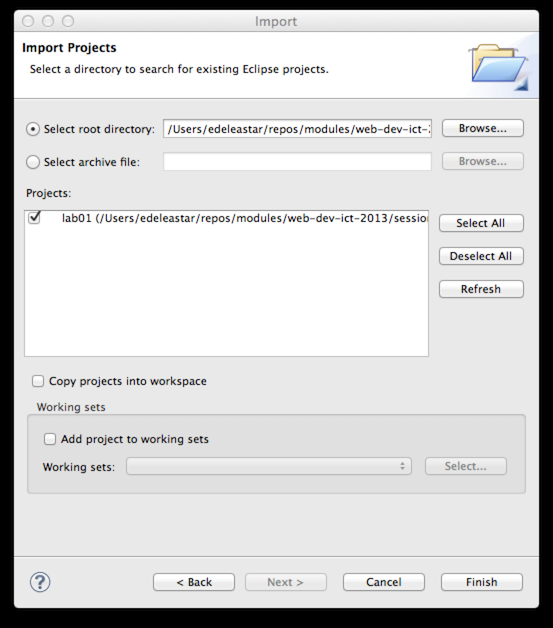
Note carefully the 'Copy Project into Workspace' option. If you select this, then the full project will be copied into your 'workspace' folder. If you leave in unchecked, then it will remain in the folder where you unzipped it, but it will be 'linked to' from your workspace.
This can be a confusion distinction until you get used to it. For the moment, perhaps, the best option is to check the option and copy the project into your workspace folder.
Another complication is that the projects cannot be imported into a workspace what already contains projects with the same name. So you did save the projects, you cannot import these version into the same workspace. If that is the case, you can create a new workspace (File->Switch Workspace) and import these projects there.
Project for Lab02
For some of the labs, we would like to build on a foundation established from the previous weeks work. However, we might find it useful to keep the project separate, so the earlier labs are preserved as we left them (in case we wish to revert to them). Normally this would be the task of a revision control system such as git or subversion. For the moment we will just duplicate the projects
This can be easily accomplished in eclipse. Select the lab01 project, and select 'Edit->Copy'. Then select 'Edit->Paste' - which will suggest a default name/location:

Change the name to lab02 as shown and press ok. The end result might look like this in eclipse:

For the remainder of this lab, you can work in this new project.
Before starting, see if you can locate the actual project files in Explorer/Finder. See if you can open the index.html file using Chrome or some other browser.
CSS Inheritance
Currently our CSS file looks like this:
body
{
  font-family:sans-serif;
}

h1, h2
{
  color: gray
}

h1
{
  border-bottom: 1px solid black;
}
Which produces the following style in the browser:
Note the following text in our page:
This week we recommend <em>the Crazies</em>.
This uses the <em> element, which introduces an emphasis style:
You may be able to see that this text is in italics.
We can introduce the following rule into our stylesheet (style.css) to target this specific element:
em
{
  color:red;
}
Save the stylesheet and refresh the page in the browser. The text 'The Crazies' should be in red.
When experimenting with CSS, we often want to experiment with the effects we are introducing. Specifically, introducing some rules, and then perhaps removing them again to see the difference (if any).
Take the first rule in your stylesheet and 'comment out' the font rule:
body
{
  /*font-family:sans-serif;*/
}
Save and reload. You should be able to notice the difference. This is called 'commenting' and is a common technique in both programming and web development. 'Uncomment' the rule again (remove the /* and */ symbols).
Now introduce the following rule:
p
{
  font-family:serif;
}
Have a close look at the resultant page. What type of font is used by the headings? What type for the paragraphs? Can you explain the difference? Comment out the body font rule again (as we did above). What is the effect?
CSS Classes
Open the newreleases.html file in the editor and browser views.
How would we style each paragraph separately so that each new release had a different colour text? Styling the <p> element means that all <p> elements are styled in the same way. We can define a class of elements, and then apply styles to any element that belongs to that class.
Open up the newreleases.html file and go to the first paragraph. This text we want to display as red. Add an attribute called class, with an id "special" to the <p> element as below:
    <h2>The Hobbit </h2>
    <p class="special">
      <img src="../images/hobbit.jpg">
      he first in a trilogy of films based on the enduring masterpiece The Hobbit by J.R.R. Tolkien,
      The Hobbit: An Unexpected Journey follows title character Bilbo Baggins,
      who along with the Wizard Gandalf and 13 Dwarves, led by Thorin Oakenshield is
      swept into an epic quest to reclaim the lost Dwarf Kingdom of Erebor from the fearsome
      Dragon Smaug.
    </p>
The paragraph above now belongs to the "special" class. We can now apply rules to that class of elements. To select a class in CSS, you write the selector like this:
p.special
{
  color: red;
}
This allows you to select all elements that belong to a particular class. Save your html file and your css file and reload the new releases web page.
At this stage, there appears to be no change. This is because, when we introduced the style.css file, we only linked the index.html to that style sheet:
<link type="text/css" rel="stylesheet" href="style.css" media="screen" />
This linkage must be established in each html file. Introduce this into 'newreleases.html' now, and reload. You should see the class rule we just introduced come into play.
However, if you use the rule as shown above, you will still have a problem - as the 'newreleases.html' file is in a subdirectory of the folder containing the stylesheet. We will need to reflect this in the link element:
<link type="text/css" rel="stylesheet" href="../style.css" media="screen" />
If you also want the heading 2 to be associated with the same paragraph class to be red in colour then you add an extra selector to your css rule
h2.special, p.special
{
  color: red;
}
..and you add the class to the <h2> element in your html file.
<h2 class="special">
If we were to continue adding elements to a class this will get to be a lengthy process so we can write a rule for all the elements in a class:
.special
{
  color: red;
}
This will ensure that all elements of the "special" class are coloured red.
Your CSS might now be:
body
{
  font-family:sans-serif;
}

h1, h2
{
  color: gray
}

h1
{
  border-bottom: 1px solid black;
}

em
{
  color:red;
}

p
{
  font-family:serif;
}

.special
{
  color: red;
}
Fonts
Font families
Each font family contains a set of fonts that share common characteristics. There are five font familys: sans-serif, serif, monospace, cursive, and fantasy. Each family includes a large set of fonts. Fonts are not consistently available from one computer to another. The available fonts depends on the operating system as well as the fonts and applications that a user has installed. Here's a an example of how to use font-family:
body
{
  font-family: Verdana, Helvetica, Arial, sans-serif;
}
The font-family property provides you with a list of preferred fonts. The idea is that most browsers will have your first choice, in this case Verdana, but if none of the specific fonts can be found then the browser uses its default "sans-serif" font. Always put a generic font family name at the end, like "serif" or "sans-serif". Experiment with these in the style.css
Font sizes
Often the default sizes for headings are a bit large to change these defaults, we have four general techniques:
1. Specifying using pixels.
You can specify a font size in pixels, just like the pixel dimensions you used in lab05. When you specify font size in pixels, you are telling the browser how many pixels tall the letters should be.
body
{
font-size: 14px;
}
The px must come directly after the number, there cannot be a space between them.
2. Specifying using percentage.
Unlike pixels, which tell the font exactly how big it should be in pixels, a font size specified as a percentage tells the font how big it should be relative to another font size.
h1
{
  font-size: 150%;
}
This says that the font size should be 150% of another font size. Font-size is a property that is inherited from the parent element, when you specify a % font size it is relative to the parent element. <h1> inherits from body so <h1> headings will be 150% of 14px.
3. Specifying using "em".
This like percentage is another unit of measure. With em you don't specify a percentage, instead you specify a scaling factor.
h2
{
  font-size: 1.2em;
}
If you use this to specify a <h2> heading your <h2> headings will be 1.2 times the font size of the parent element, which in this case is 1.2 times 14px, which is about 17px.
4. Specifying using keywords.
You can specify a font size as xx-small, x-small,small,medium, large, x-large, or xx-large and the browser will translate these keywords into pixel values using defaults that are set in the browser.
body
{
  font-size: small;
}
It is important to note that earlier version of Internet Explorer does not support text scaling when the font size is specified using pixels. Change the font sizes on mydvds web pages. Add in the following rules:
body
{
  font-size: small;
}
h1
{
  font-size: 150%;
}
h2
{
  font-size: 130%;
}
Save your css file and reload the home page. Take a look at the change in sizes.
Font Weight
The font weight property allows you to control how bold the text looks. Bold text looks darker than normal text and tends to be a bit fatter too. You can make any element use bold text by setting the font-weight property to bold.
p
{
  font-weight: bold;
}
You can also do it the other way, if you have an element that is set to bold by default, or is inheriting bold from a parent, then you can remove the bold.
h1
{
  font-weight: normal;
}
Experiment with changing the headings for your mydvds web site so that the default bold is changed to normal weight. Add the rule to your CSS file and reload the web site. Once you have seen the difference in the headings, change it back to bold.
Colours
Web colours are specified in terms of how much red, green, and blue make up the colour. You specify the amount of each colour from 0 to 100% and then add them all together to arrive at a final colour.
You can use the names of colours, but CSS defines the names of only 17 colours. That number limits the expressiveness of your pages. By specifying colours in red, green and blue, you can have access to sixteen million colours.
Specifying Colour using colour names
The most straightforward way to describe a colour in CSS is just to use its name. For example to specify "silver" as the background colour of a body element:
body
{
  background-color: silver;
}
CSS colour names are case-insensitive, so you can type silver, Silver, or SILVER and all of them will work.
Specify in red, green and blue values.
If you want to specify an orange colour which consists of 80% red, 40% green and 0% blue:
body
{
  background-color: rgb(80%, 40%, 0%);
}
or you can specify it as numeric values between 0 and 255. So 80% of 255 is 204, 40% of 255 is 102, and 0% of 255 is 0.
body
{
  background-color: rgb(204, 102, 0);
}
Specify colour using hex codes.
Each set of two digits of a hex code represents the red, green and blue of the colour. The first two represent red, the second two green and the last two blue.
body
{
  background-color:  #cc6600;
}
Font & Colour CSS
In your current style.css project, change your CSS file so it now contains the following:
body
{
  font-family: Verdana, Helvetica, Arial, sans-serif;
  font-size:small;
}

h1, h2
{
  color: #007e7e;
}

h1
{
  font-size: 150%;
}

h2
{
  font-size: 130%;
}

p
{
 color: maroon;
}
The default font family is sans-serif, this is last in the list, the others are alternatives. Save the file and load the home web page in your browser. The headings should now be in sans-serif and an aquamarine colour. The paragraph text is also sans-serif as all elements inherit the <body>s font-family property.
Do these styles show up in the newreleases and directions html files? They require that the appropriate link element appear in the head element of each page. This was part the exercise from last weeks lab - complete this now if not already done, so that each page is linked to the same style sheet.
We now want to adjust the line height of the text on the entire page so that there's more vertical space between each line. To do that we add a line-height property in the body rule.
body
{
  /* as before */
  line-height: 1.6em;
}
This property allows us to specify the line height between each line. Like other font-related properties, you can specify the height in pixels, or using an em or percentage value that's relative to the font size. Save your CSS file and reload your index and newreleases web pages to see the change.
Try a few different line heights like 200%, .5em, and 20px to see the effect. Change the height back to 1.6em when you are finished.
More Content
We will rework the index.html home page with some more content to illustrate some interesting CSS rules. Replace the first paragraph with the following content:
<p>
We have the biggest selection of DVDs and Games in Ireland.
Check out our <a href="catalogue/newreleases.html">new releases</a>,
This week we recommend <em>the Crazies</em>.
From our extensive catalog of DVDs and Games you choose and priortise the DVDs
you most want to see or Games you want to play. We have an advanced search facility
available for our users to search through our huge catalog of stock.
We stock a wide variety for movies from <em>Manga to Music and Comedy to Childrens,
Games from Puzzles to Beat'em Up and Party to Action/Adventure</em> as well as all the
latest new releases.
</p>
<p>
We endeavour to give you your most wanted DVD and/or Game from your rental
queue depending on our stock situation. All DVDs and Games are posted out at noon
FIRST CLASS, and should be at your doorstep by the next morning.
When we dispatch your DVD/Game we'll send you an e-mail to advise you on which
DVD/Game was dispatched to you. There are no late fees so you can watch or play at your leisure
</p>
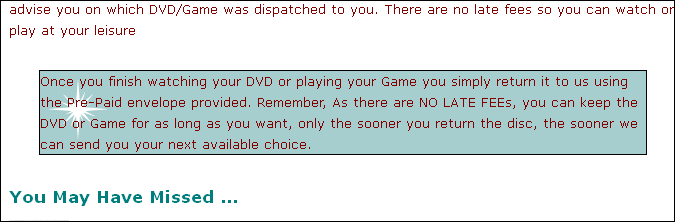
<p>
Once you finish watching your DVD or playing your Game you simply return it to us
using the Pre-Paid envelope provided.
Remember, As there are NO LATE FEEs, you can keep the DVD or Game for as long as you want,
only the sooner you return the disc, the sooner we can send you your next available choice.
</p>
<h2>You May Have Missed ...</h2>
<p>
<img src="./images/argo.jpg">
</p>
<h3>Argo</h3>
<p>
<img src="images/star45.gif" alt="4.5 stars">
</p>
<p>
Based on real events, the dramatic thriller "Argo" chronicles the life-or-death covert operation
to rescue six Americans, which unfolded behind the scenes of the Iran hostage crisis,
focusing on the little-known role that the CIA and Hollywood played-information that was not
declassified until many years after the event.
</p>
<p>
<img src="./images/skyfall.jpg">
</p>
<h3>Skyfall</h3>
<p>
<img src="images/star45.gif" alt="4.5 stars">
</p>
<p>
Bond's loyalty to M is tested as her past comes back to haunt her. As MI6 comes under attack,
007 must track down and destroy the threat, no matter how personal the cost.
</p>
The above content relies on a number of image files:


Save these three files to your computer. To do this, right click on each one in turn and select save as. Then you can drag and drop them directly into the images folder in your eclipse project.
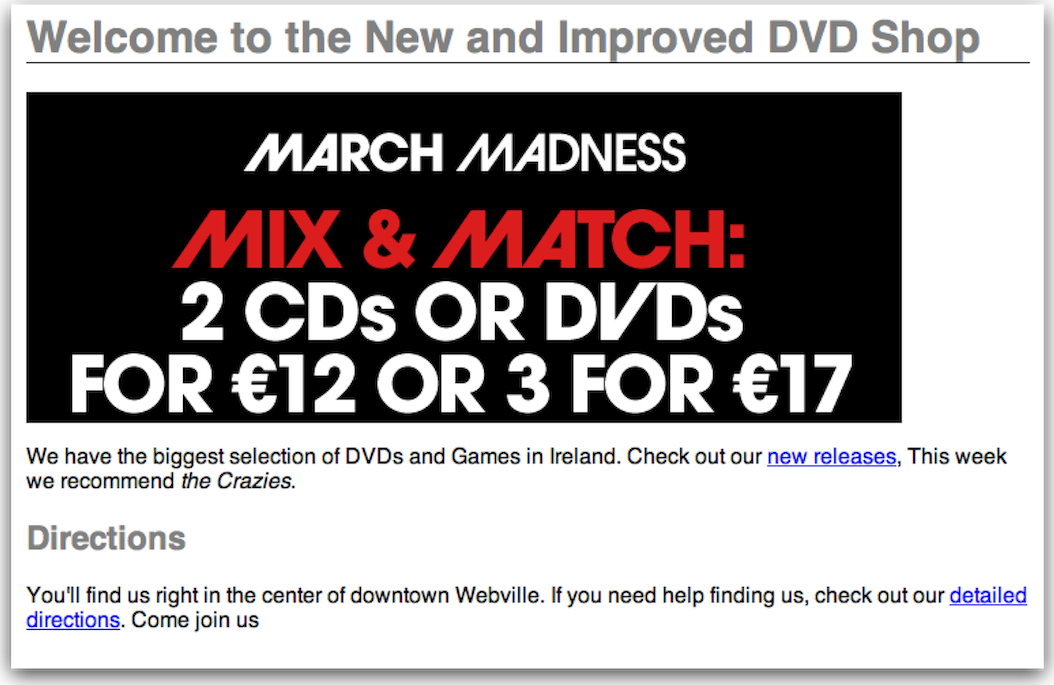
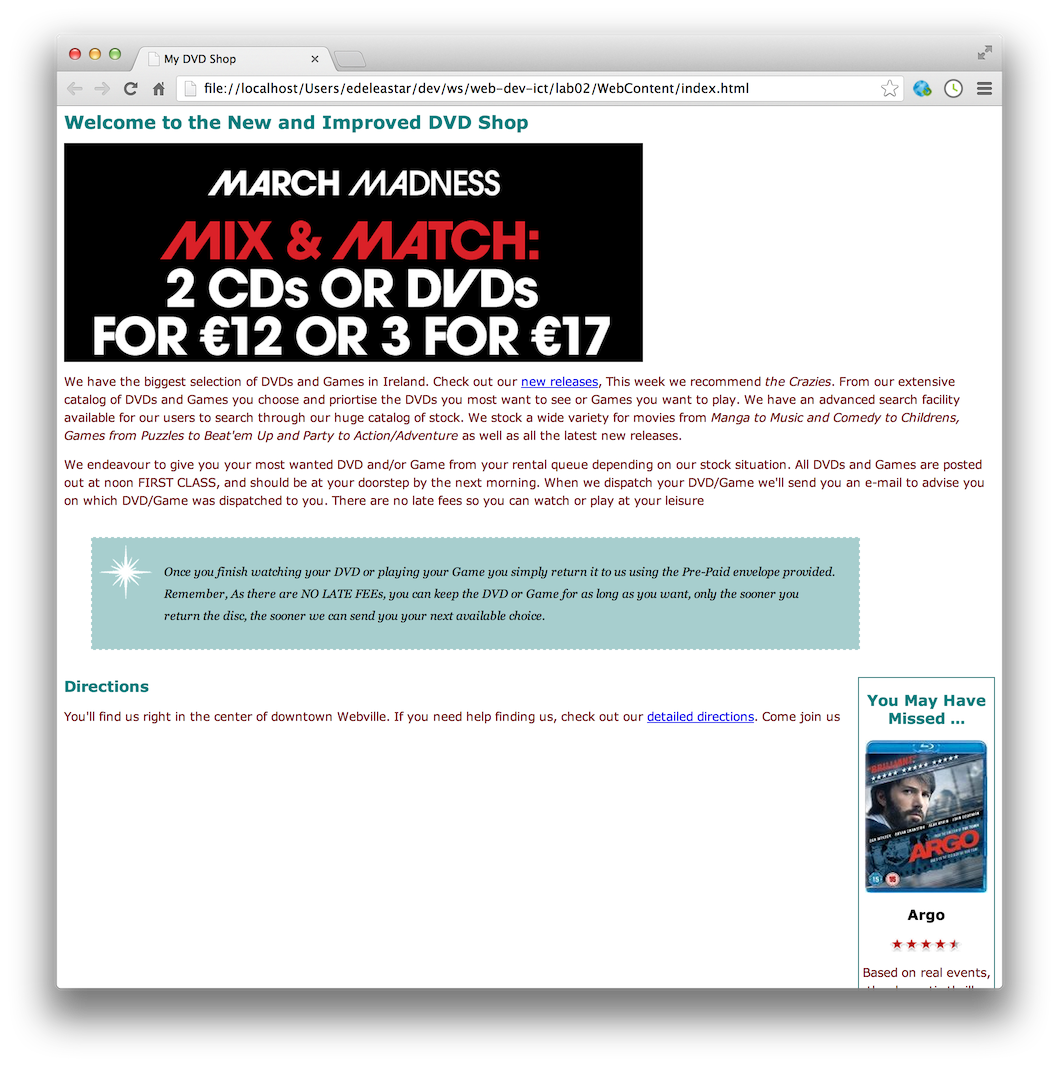
If all this goes according to plan, index page should now look something like this:

Returns Paragraph
Locate the 'returns' paragraph in the home page (the third paragraph):
  <p>
    Once you finish watching your DVD or playing your Game you simply return it to us
    using the Pre-Paid envelope provided.
    Remember, As there are NO LATE FEEs, you can keep the DVD or Game for as long as you want,
    only the sooner you return the disc, the sooner we can send you your next available choice.
  </p>
We would like to target this specific paragraph with some custom styles. To this end, we nominate it to a 'class' called 'returns':
  <p class="returns">
    Once you finish watching your DVD or playing your Game you simply return it to us
    using the Pre-Paid envelope provided.
    Remember, As there are NO LATE FEEs, you can keep the DVD or Game for as long as you want,
    only the sooner you return the disc, the sooner we can send you your next available choice.
  </p>
In our stylesheet, we can devise a rule just for this paragraph:
.returns
{
  border-color: black;
  border-width: 1px;
  border-style: solid;
  background-color: #a7cece;
}
Reload and review the paragraph:

We can see evidence of our targeted styles.
We can add a little margin:
.returns
{
  /* as before */
  margin: 30px;
}
Reload the page:

Next, the background image. Save this image here to your images folder:

...and we can extend the returns rule with this property here:
background-image: url(images/background.gif) ;
This seems to yield a repeated pattern:
Some further refinements can put a single image in the top right:
  background-repeat: no-repeat;
  background-position: top-left;
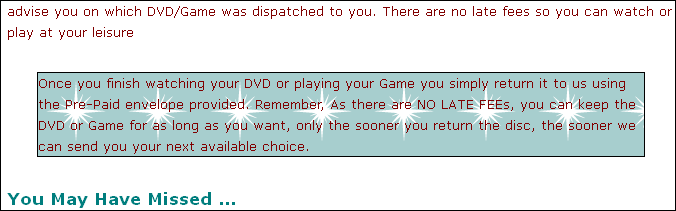
Reloading again:
And we can also further refine the padding:
  padding: 25px;
  padding-left: 80px;
  margin-right: 150px;
Looks like this:

Our full rule for returns now looks like this:
.returns
{
  border-color: black;
  border-width: 1px;
  border-style: solid;
  background-color: #a7cece;

  margin: 30px;
  padding: 25px;
  padding-left: 80px;
  margin-right: 150px;

  background-image: url(./images/background.gif);

  background-repeat: no-repeat;
  background-position: top-left;
}
Some further adjustments to the text itself:
  line-height: 1.9em;
  font-style: italic;
  font-family: Georgia, "Times New Roman", Times, serif;
  color: black;
-

Finally, we might adjust the border itself again:
  border-color: white;
  border-width: 1px;
  border-style: dashed;
Which turns out as:

Regrouping the properties, this is the complete rule:
.returns
{
  border-color: white;
  border-width: 1px;
  border-style: dashed;

  margin: 30px;
  padding: 25px;
  padding-left: 80px;
  margin-right: 150px;

  background-color: #a7cece;
  background-image: url(./images/background.gif);
  background-repeat: no-repeat;
  background-position: top-left;

  line-height: 1.9em;
  font-style: italic;
  font-family: Georgia, "Times New Roman", Times, serif;
  color: black;
}
Configuring Eclipse
Our challenge now is to make adjustments to move and entire set of content into its own 'panel', which we wish to move to the right hand side of our page. Achieving this effect here:

This will involve more significant surgery on the page itself in particular we will need to superimpose a structure on the page, grouping a whole set of elements into a new section.
This section we call a 'Division' facilitated by the <div> tag.
Before we introduce this, however, we should carefully inspect our html and verify that we are laying it out correctly, and in particular that we are obeying consistent indentation rules in the structure of the html itself.
Indentation is simply a consistent placement of spaces before each element, such that it flows in an ordered manner reflecting the opening/closing of tags. We prefer to use 2 spaces for each 'level'.
Example Inconsistent indentation:
    <p>
    We have the biggest selection of DVDs and Games in Ireland.
    Check out our <a href="catalogue/newreleases.html">new releases</a>,
    This week we reccomend <em>the Crazies</em>.  </p>
<h2>Directions</h2>
  <p>     You'll find us right in the center
      of downtown Webville. If you need help finding
      us, check out our
      <a href="about/directions.html">detailed directions</a>.
      Come join us
 </p>
Example Correct indentation
    <p>
      We have the biggest selection of DVDs and Games in Ireland.
      Check out our <a href="catalogue/newreleases.html">new releases</a>,
      This week we reccomend <em>the Crazies</em>.
    </p>
    <h2>Directions</h2>
    <p>
      You'll find us right in the center
      of downtown Webville. If you need help finding
      us, check out our
      <a href="about/directions.html">detailed directions</a>.
      Come join us
    </p>
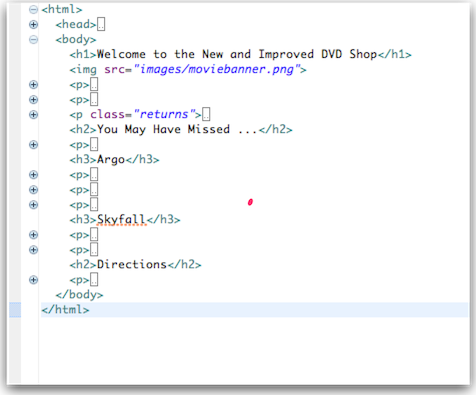
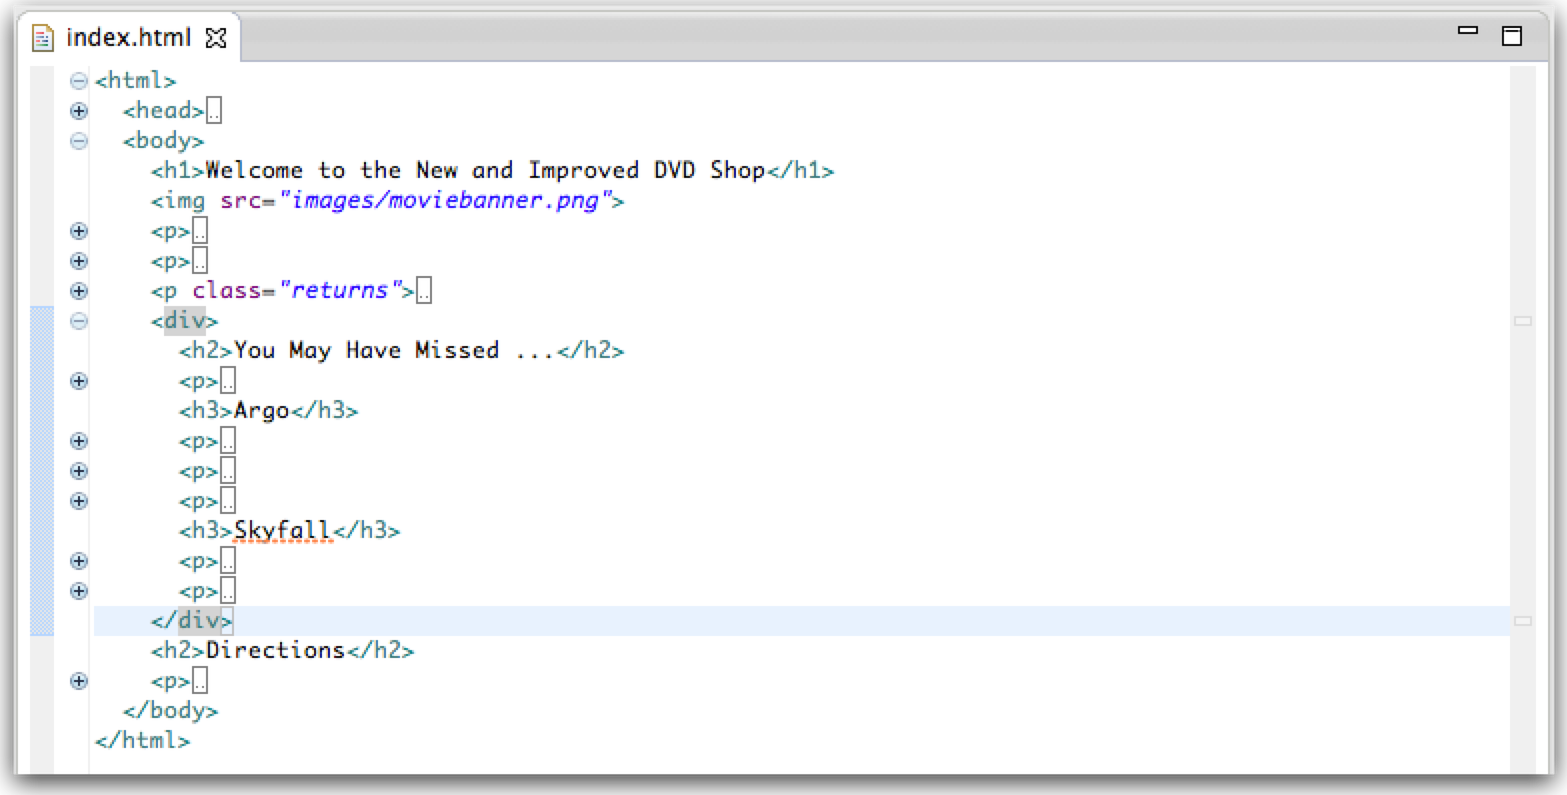
Review your index.html file not and ensure that it is correctly indented. One quick way to determine this is to 'fold' all the elements in the editor. To do this, right click in the left hand margin of the html editor and select 'Folding->Collapse All':

This will reduce your editing view to this:

and by selectively expanding elements, you should be able to generate a view like this:
It is likely that your indentation will not look like the above, so take the opportunity now to line up all elements consistently. This can be tedious, and there are tools to do this automatically, but do it manually for the moment.
This mode of editing will allow us to clearly mark a 'division', indent it, and encapsulate it in the <div> tag. Once completed, we can give this division an ID, and target it with a rule to style just this panel appropriately.
Before making this adjustment, however, we need to make one small change to the default Eclipse settings. By default, eclipse uses 'tabs' for indentation. We would like to change this to spaces 2 per indentation level.
Select 'Window->Preferences' and change the setting under 'Web->HTML Files->Editor' as shown here:
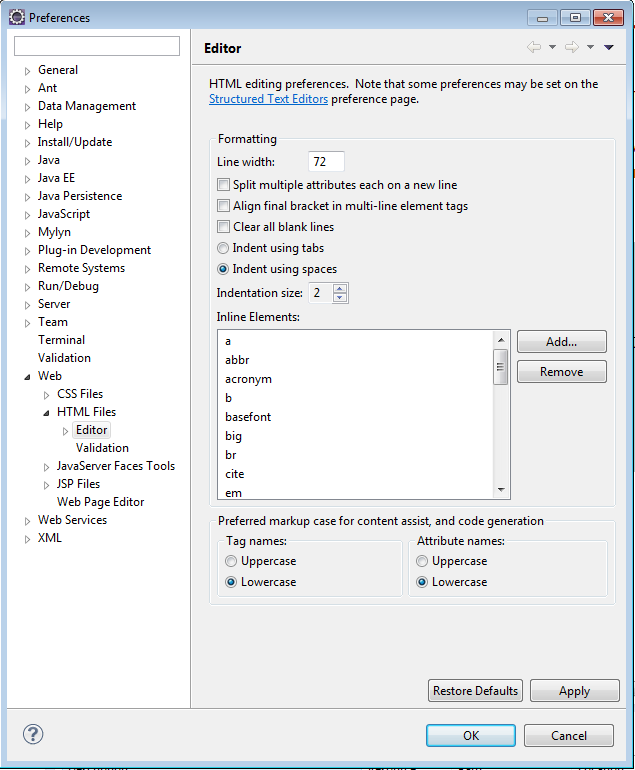
This adjustment make the task of introducing our <div> significantly easier, all the time maintaining our correct indentation level.
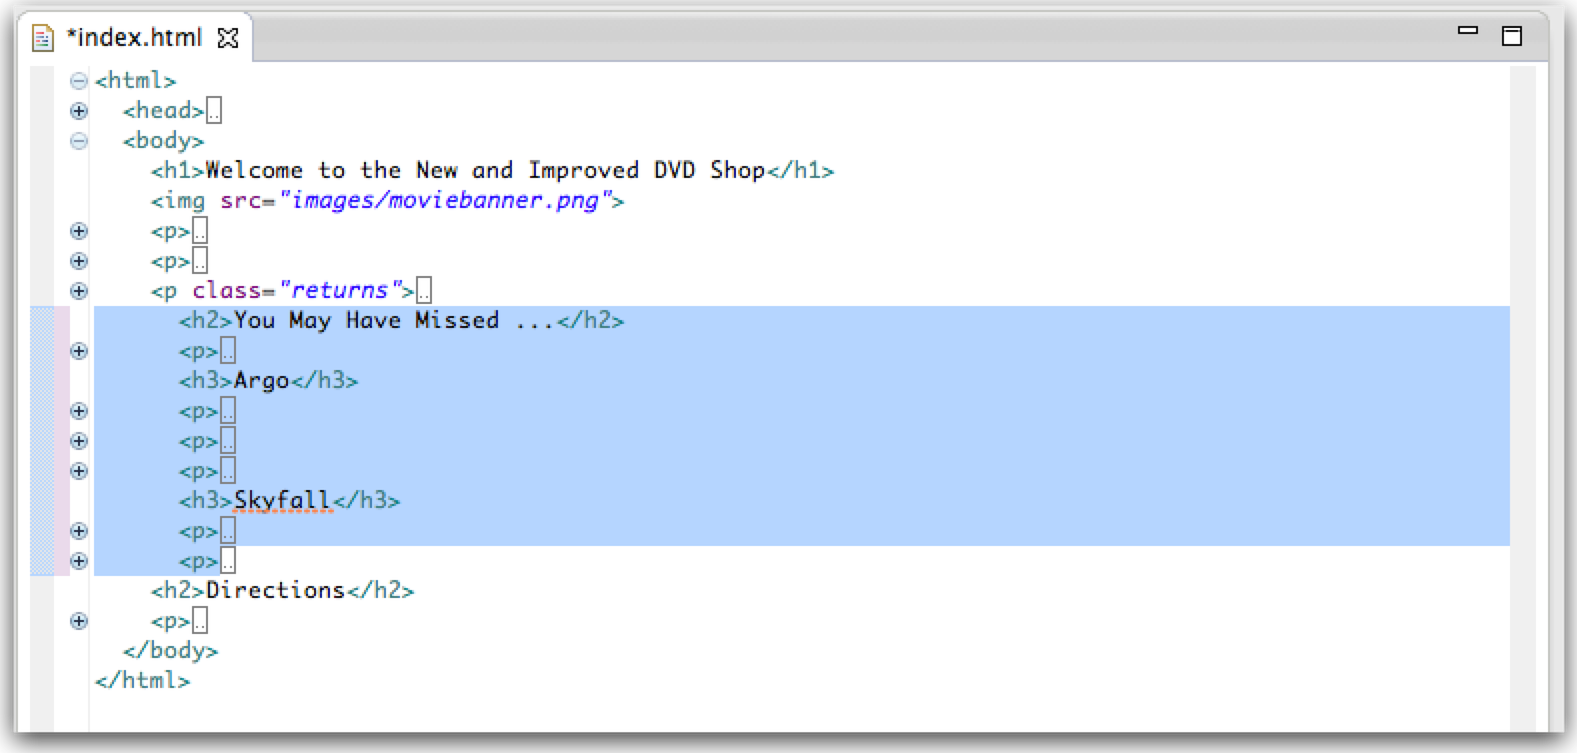
Now, select the "You may have missed" section:

... and press 'tab' once. This should indent this region by 2 spaces:
Now insert the new <div> element to encapsulate this region:
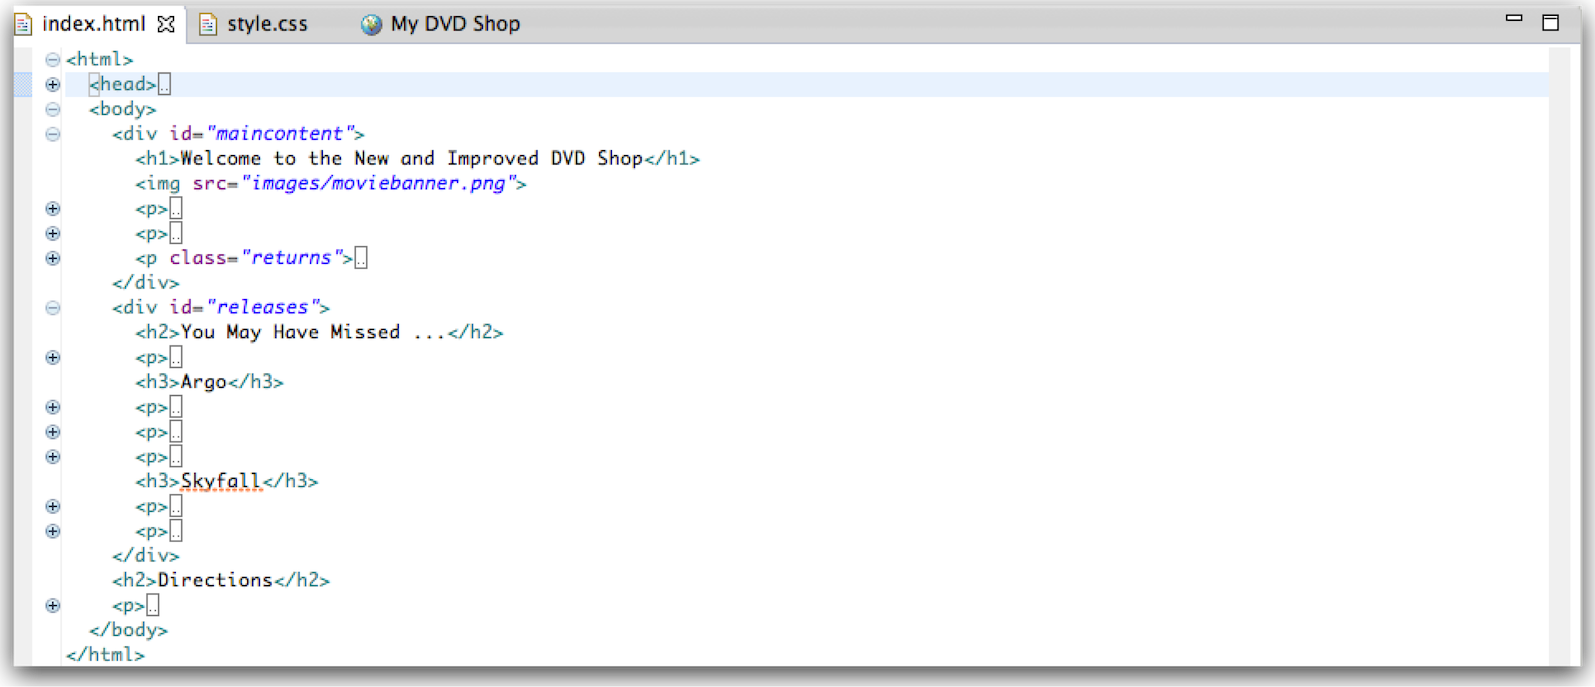
No give the <div> you have just introduced an id:
    <div id="releases">
      <h2>You May Have Missed ...</h2>
      ...
the folding editor is a little temperamental, and can loose structural information easily. So, to restore reliably restore a correct view, close and reopen the editor (making sure to save the file), and you should be able to generate a consistent view.
Sidebar
We can now target this division directly with the following rule in the CSS:
#releases
{
  border-width: thin;
  border-style: solid;
  border-color: #007e7e;
}
This establishes a suitable border (reload to see the effect). Now lets set the width:
width: 15,0px;
And lets further set the general dimensions:
  padding-right: 20px;
  padding-left: 20px;
  padding-bottom 20px;
Set a margin:
margin-left: 20px;
and set the text more apropriately centered:
text-align: center;
Our full rule is now:
#releases
{
  border-width: thin;
  border-style: solid;
  border-color: #007e7e;

  width: 150px;
  padding-right: 20px;
  padding-left: 20px;
  padding-bottom 20px;
  margin-left: 20px;

  text-align: center;
}
CSS enable us to shorten the structure somewhat, particularly when setting related properties. So we can replace:
  padding-right: 20px;
  padding-left: 20px;
  padding-bottom 20px;
with
padding: 0px 20px 30px 10px
Now add one more property to the same rule:
float: right;
Reload in browser view. This time something interesting happens the entire panel may 'float' to the right of the browser window:
The actual appearance may vary depending on the browser window size.
Although this is promising, it is not quite what we were expecting. The 'releases' panel has floated left of the 'Directions' area, but is still below the main content of the home page. However, some small adjustments can realign the entire page.
First, we introduce a new division to encapsulate the main content of the home page:
it is called 'maincontent'. Then we introduce a rule in the CSS to target this area:
#maincontent
{
  float:left;
  width:800px;
}
Although by no means complete yet with the 'directions' still liable to 'pop-out' unpredictably, it is possible that the page might look like this:
This is the complete stylesheet:
body
{
  font-family: Verdana, Helvetica, Arial, sans-serif;
  font-size:small;
  line-height: 1.6em;
}

h1, h2
{
  color: #007e7e;
}

h1
{
  font-size: 150%;
}

h2
{
  font-size: 130%;
}

p
{
 color: maroon;
}

.returns
{
  border-color: white;
  border-width: 1px;
  border-style: dashed;

  margin: 30px;
  padding: 25px;
  padding-left: 80px;
  margin-right: 150px;

  background-color: #a7cece;
  background-image: url(./images/background.gif);
  background-repeat: no-repeat;
  background-position: top-left;

  line-height: 1.9em;
  font-style: italic;
  font-family: Georgia, "Times New Roman", Times, serif;
  color: black;
}

#releases
{
  border-width: thin;
  border-style: solid;
  border-color: #007e7e;

  width: 150px;
  padding: 0px 20px 30px 10px
  margin-left: 20px;

  text-align: center;

  float:right;
}

#maincontent
{
  float:left;
  width:800px;
}
...and this is the complete index.html:
<html>
  <head>
    <title>My DVD Shop</title>
        <link type="text/css" rel="stylesheet" href="style.css" media="screen" />
  </head>
  <body>
    <div id="maincontent">
      <h1>Welcome to the New and Improved DVD Shop</h1>
      <img src="images/moviebanner.png">
      <p>
        We have the biggest selection of DVDs and Games in Ireland.
        Check out our <a href="catalogue/newreleases.html">new releases</a>,
        This week we recommend <em>the Crazies</em>.
        From our extensive catalog of DVDs and Games you choose and priortise the DVDs
        you most want to see or Games you want to play. We have an advanced search facility
        available for our users to search through our huge catalog of stock.
        We stock a wide variety for movies from <em>Manga to Music and Comedy to Childrens,
        Games from Puzzles to Beat'em Up and Party to Action/Adventure</em> as well as all the
        latest new releases.
      </p>
      <p>
        We endeavour to give you your most wanted DVD and/or Game from your rental
        queue depending on our stock situation. All DVDs and Games are posted out at noon
        FIRST CLASS, and should be at your doorstep by the next morning.
        When we dispatch your DVD/Game we'll send you an e-mail to advise you on which
        DVD/Game was dispatched to you. There are no late fees so you can watch or play at your leisure
      </p>
      <p class="returns">
      Once you finish watching your DVD or playing your Game you simply return it to us
      using the Pre-Paid envelope provided.
      Remember, As there are NO LATE FEEs, you can keep the DVD or Game for as long as you want,
      only the sooner you return the disc, the sooner we can send you your next available choice.
    </p>
    </div>
    <div id="releases">
      <h2>You May Have Missed ...</h2>
      <p>
        <img src="./images/argo.jpg">
      </p>
      <h3>Argo</h3>
      <p>
        <img src="images/star45.gif" alt="4.5 stars">
      </p>
      <p>
        Based on real events, the dramatic thriller "Argo" chronicles the life-or-death covert operation
        to rescue six Americans, which unfolded behind the scenes of the Iran hostage crisis,
        focusing on the little-known role that the CIA and Hollywood played-information that was not
        declassified until many years after the event.
      </p>
      <p>
        <img src="./images/skyfall.jpg">
      </p>
      <h3>Skyfall</h3>
      <p>
        <img src="images/star45.gif" alt="4.5 stars">
      </p>
      <p>
      Bond's loyalty to M is tested as her past comes back to haunt her. As MI6 comes under attack,
      007 must track down and destroy the threat, no matter how personal the cost.
    </p>
    </div>
    <h2>Directions</h2>
    <p>
      You'll find us right in the center
      of downtown Webville. If you need help finding
      us, check out our
      <a href="about/directions.html">detailed directions</a>.
      Come join us
    </p>
  </body>
</html>
Exercises
Solution
This is a solution to the lab:
Exercise 1
In this lab you have experimented with classes:
Classes are one type of selector, with others listed here:
- http://reference.sitepoint.com/css (middle column)
Review the description of classes, and then have a look at Id selectors:
Where you are using Classes in this lab, try switching to using IDs
Exercise 2
You might consider improving the look at feed of the directions page using the CSS features we have just covered. For instance:
-
Use and unordered list (
<ol>) instead of a series of paragraphs for each of the directions. -
Wrap this entire list is a
<div>and style it somewhat similarly to the returns paragraph we just styled -
Find an image to represent the shop, and see if you can mimic the CSS rules we just deployed to move the image into a right hand column as we have with the sidebar.