Camera
Make use of the device camera to take a photo go display as thumbnail a single-photo gallery. Also, support saving the photo
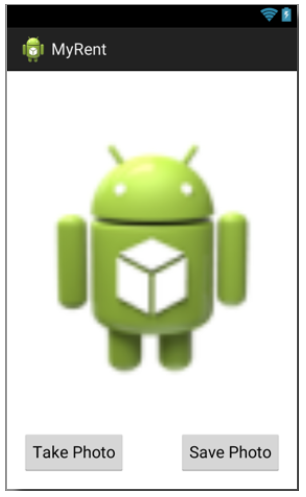
Preview
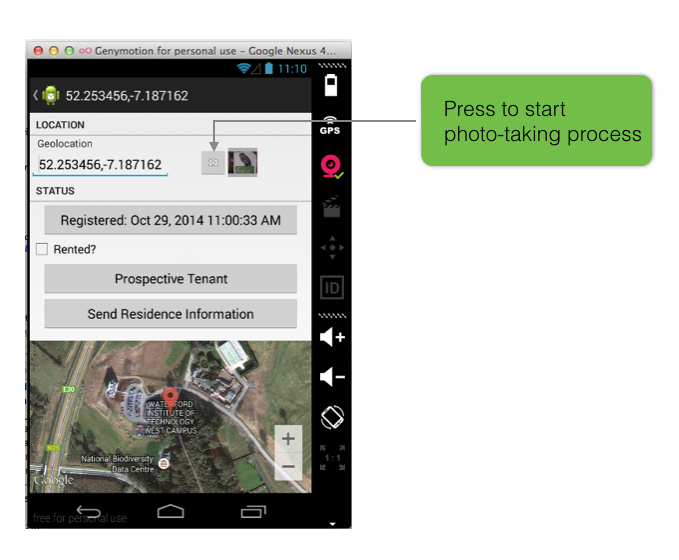
In this lab you will use the device camera to take a photo.
- The photo may be saved to a file
- It will appear as a thumbnail in the residence details view
- An enlarged image will be viewable in a one-photo gallery
The following figures provide an outline.

Resources
We will add two activities:
- ResidenceCameraActivity
- Manages the taking of a photo
- ResidenceGalleryActivity
- Allows the display of the photo in a single-photo gallery.
Modify manifest file: add following snippets.
    <activity
        android:name=".activities.ResidenceCameraActivity"
        android:label="@string/app_name">

        <meta-data android:name="android.support.PARENT_ACTIVITY"
                   android:value=".activities.ResidencePagerActivity"/>
    </activity>
    <activity
        android:name=".activities.ResidenceGalleryActivity"
        android:label="@string/app_name">

        <meta-data android:name="android.support.PARENT_ACTIVITY"
                   android:value=".activities.ResidencePagerActivity"/>
    </activity>
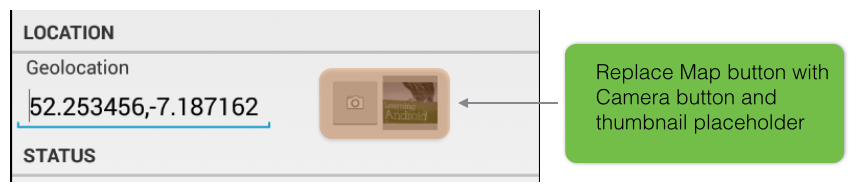
It is necessary to modify the layout file by replacing the legacy Map button with a Camera button and a thumnail placeholder.
Here is the replacement code:
           <!-- Show Map Button -->
           <LinearLayout
             android:layout_width="0dp"
             android:layout_height="match_parent"
             android:layout_weight="40"
             android:orientation="horizontal" >
             <ImageButton
                android:id="@+id/camera_button"
                android:layout_width="40dp"
                android:layout_height="40dp"
                android:scaleType="centerInside"
                android:layout_marginTop="16dp"
                android:src="@android:drawable/ic_menu_camera"/>
              <ImageView
                android:id="@+id/myrent_imageView"
                android:layout_width="40dp"
                android:layout_height="40dp"
                android:scaleType="centerInside"
                android:background="@android:color/darker_gray"
                android:cropToPadding="true"
                android:layout_marginTop="16dp"/>
            </LinearLayout>
As you can see, the code is located immediately following the Show Map Button comment.
- Once you have inserted the replacement code and and are happy with the change, you could modify to comment appropriately: for example to :
<!--- Camera button and thumbnail placeholder -->
Note that the two new widgets are wrapped in a LinearLayout with horizontal orientation.
Next we add a layout for the Camera activity:
File: /res/layout/residence_photo.xml
<RelativeLayout xmlns:android="http://schemas.android.com/apk/res/android"
    xmlns:tools="http://schemas.android.com/tools"
    android:layout_width="match_parent"
    android:layout_height="match_parent"
    android:paddingBottom="@dimen/activity_vertical_margin"
    android:paddingLeft="@dimen/activity_horizontal_margin"
    android:paddingRight="@dimen/activity_horizontal_margin"
    android:paddingTop="@dimen/activity_vertical_margin"
    tools:context="org.wit.myrent.ResidenceCameraActivity" >

    <ImageView
        android:id="@+id/residenceImage"
        android:layout_width="match_parent"
        android:layout_height="wrap_content"
        android:layout_above="@+id/takePhoto"
        android:layout_alignLeft="@+id/residenceImage"
        android:layout_alignParentRight="true"
        android:layout_alignParentTop="true"
        android:src="@drawable/ic_launcher" />

    <Button
        android:id="@+id/takePhoto"
        android:layout_width="wrap_content"
        android:layout_height="wrap_content"
        android:layout_alignLeft="@+id/residenceImage"
        android:layout_alignParentBottom="true"
        android:text="@string/take_photo" />

    <Button
        android:id="@+id/savePhoto"
        android:layout_width="wrap_content"
        android:layout_height="wrap_content"
        android:layout_alignBottom="@+id/takePhoto"
        android:layout_alignRight="@+id/residenceImage"
        android:layout_alignTop="@+id/takePhoto"
        android:text="@string/save_photo" />

</RelativeLayout>
Model
The model Residence class requires a new field to represent the photo filename:
- Add this field and its json counterpart:
public String photo;
private static final String JSON_PHOTO = "photo";
Initialize the new Photo field in the constructors:
Default:
public Residence()
{
  ...
  photo = "photo";
}

public Residence(JSONObject json) throws JSONException
{
  ...
  photo = json.getString(JSON_PHOTO);
}
Add the following statement to the method toJSON:
public JSONObject toJSON() throws JSONException
{
  ...
  json.put(JSON_PHOTO , photo);
}
Helpers
We will now add a helper class, CameraHelper.
- This class has 2 methods:
- showPhoto
- displays the photo
- getScaledDrawable
- scales photo to fit in the application's imageview
- showPhoto
These methods have been obtained from Android Programming by Hardy & Phillips.
File: org.wit.android.helpers.CameraHelper.java
package org.wit.android.helpers;

import java.util.List;

import org.wit.myrent.models.Residence;

import android.app.Activity;
import android.graphics.Bitmap;
import android.graphics.BitmapFactory;
import android.graphics.drawable.BitmapDrawable;
import android.hardware.Camera.Size;
import android.view.Display;
import android.widget.ImageView;

public class CameraHelper
{

  /**
   * Render the photo on the ImageView
   */
  public static void showPhoto(Activity activity, Residence res, ImageView photoView)
  {
    String path = activity.getFileStreamPath(res.photo).getAbsolutePath();
    BitmapDrawable b = getScaledDrawable(activity, path);
    if (b != null)
      photoView.setImageDrawable(b);
  }

  /**
   * Get a BitmapDrawable from a local file that is scaled down to fit the
   * current Window size.
   */
  @SuppressWarnings("deprecation")
  public static BitmapDrawable getScaledDrawable(Activity a, String path)
  {
    Display display = a.getWindowManager().getDefaultDisplay();
    float destWidth = display.getWidth();
    float destHeight = display.getHeight();

    // read in the dimensions of the image on disk
    BitmapFactory.Options options = new BitmapFactory.Options();
    options.inJustDecodeBounds = true;
    BitmapFactory.decodeFile(path, options);

    float srcWidth = options.outWidth;
    float srcHeight = options.outHeight;

    int inSampleSize = 1;
    if (srcHeight > destHeight || srcWidth > destWidth)
    {
      if (srcWidth > srcHeight)
      {
        inSampleSize = Math.round((float) srcHeight / (float) destHeight);
      }
      else
      {
        inSampleSize = Math.round((float) srcWidth / (float) destWidth);
      }
    }

    options = new BitmapFactory.Options();
    options.inSampleSize = inSampleSize;

    Bitmap bitmap = BitmapFactory.decodeFile(path, options);
    return new BitmapDrawable(a.getResources(), bitmap);
  }

}
Camera Activity
Create a new activity ResidenceCameraActivity in the package org.wit.myrent.activities.
package org.wit.myrent.activities;

import org.wit.myrent.R;
import android.app.Activity;
import android.os.Bundle;

public class ResidenceCameraActivity extends Activity
{

  @Override
  protected void onCreate(Bundle savedInstanceState)
  {
    super.onCreate(savedInstanceState);
    setContentView(R.layout.residence_photo);
  }

}
Introduce and wire up the Up button so that it behaves similarly to the back button. We can do this by invoking Activity.onBackPressed
- Display and enable the Up button by adding this statement to the onCreate method following setContentView:
getActionBar().setDisplayHomeAsUpEnabled(true);
- Override onOptionsItemSelected to act on pressing the Up button:
  @Override
  public boolean onOptionsItemSelected(MenuItem item)
  {
    switch (item.getItemId())
    {
    case android.R.id.home  : onBackPressed();
                              return true;
    default                 : return super.onOptionsItemSelected(item);
    }
  }
Add an import statement for MenuItem:
import android.view.MenuItem;
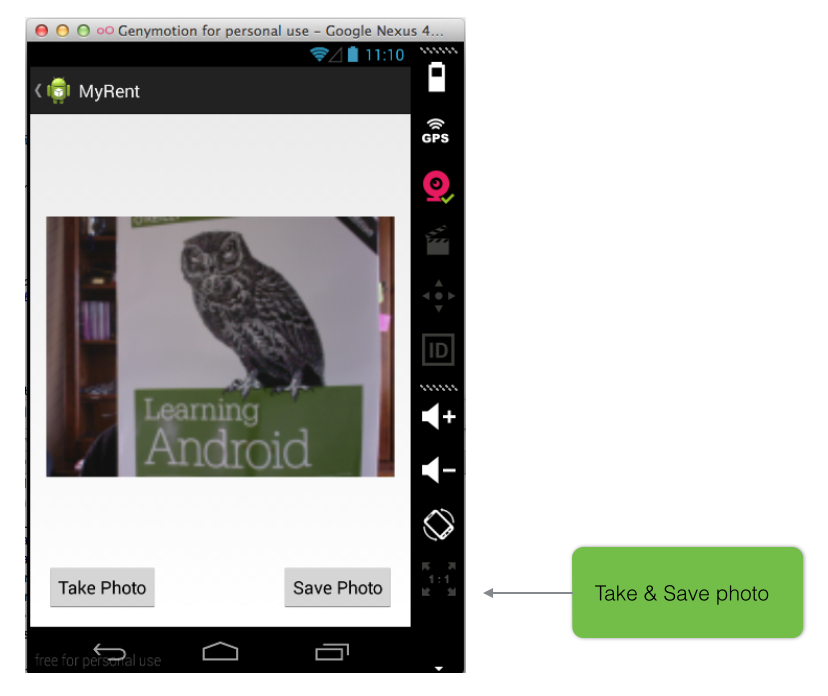
There are two buttons in the view: Take Photo and Save Photo.
- Add fields for these
  private Button    savePhoto;
  private Button    takePhoto;
Import the Button class:
import android.widget.Button;
Add an ImageView field in which the photo will be displayed.
private ImageView residenceImage;
Import the ImageView class:
import android.widget.ImageView;
Bind the widget instances to their respective layout elements. The following code which should be added to onCreate does this:
    residenceImage  = (ImageView) findViewById(R.id.residenceImage);
    savePhoto       = (Button)findViewById(R.id.savePhoto);
    takePhoto       = (Button)findViewById(R.id.takePhoto);
Set the default state of the save photo button to disabled. We will only enable this once a photo has been taken.
savePhoto.setEnabled(false);
Implement an OnClickListener interface:
public class ResidenceCameraActivity extends Activity implements OnClickListener
Import the listener interface:
import android.view.View.OnClickListener;
Add the listener method skeleton:
  @Override
  public void onClick(View v)
  {
    // TODO Auto-generated method stub

  }
Register listeners to respond to clicking the buttons:
    savePhoto.setOnClickListener(this);
    takePhoto.setOnClickListener(this);
In onClick method respond to clicking the buttons. For convenience we will locate most of the necessary code, as shown below, in two private methods:
- onTakePhotoClicked
- onPictureTaken
  @Override
  public void onClick(View v)
  {
    switch(v.getId())
    {
    case R.id.takePhoto     : onTakePhotoClicked(v);
                              break;

    case R.id.savePhoto     : onPictureTaken(residencePhoto);
                              break;
    }
  }
The approach we adopt is to use an implicit Intent to make use of the device camera (which we assume is available). Here is the implementation of onTakePhotoClicked:
  public void onTakePhotoClicked(View v)
  {
    Intent cameraIntent = new Intent(android.provider.MediaStore.ACTION_IMAGE_CAPTURE);
    startActivityForResult(cameraIntent,CAMERA_RESULT);
    savePhoto.setEnabled(true);
  }
This requires an import statement for the Intent class:
import android.content.Intent;
Also necessary is a definition of the constant CAMERA_RESULT. The value 5 has been chosen arbitrarily.
private static final int CAMERA_RESULT = 5;
Next we define the method onPictureTaken. We are chosing the png format as this is the only format acceptable to the helper method writeBitMap.
private void onPictureTaken(Bitmap data)
  {
    String filename = UUID.randomUUID().toString() + ".png";
    if(writeBitmap(this, filename, data) == true)
    {
      Intent intent = new Intent();
      intent.putExtra(EXTRA_PHOTO_FILENAME, filename);
      setResult(Activity.RESULT_OK, intent);
    }
    else
    {
      setResult(Activity.RESULT_CANCELED);
    }
    finish();
  }
This requires these import statements:
import android.graphics.Bitmap;
import java.util.UUID;
import static org.wit.android.helpers.FileIOHelper.writeBitmap;
We must also define the string EXTRA_PHOTO_FILENAME. Note that the arguments in Intent.putExtra comprise key-value pairs, the first argument always being a String.
public static final String EXTRA_PHOTO_FILENAME = "org.wit.myrent.photo.filename";
A further instance variable is required to hold the picture in bitmap form:
private Bitmap residencePhoto;
We retrieve the photo taken by the device camera in the onActivityResult method:
  @Override
  protected void onActivityResult(int requestCode, int resultCode, Intent data)
  {
    super.onActivityResult(requestCode, resultCode, data);
    switch (requestCode)
    {
    case ResidenceCameraActivity.CAMERA_RESULT    : processImage(data);
                                                    break;
    }
  }
For convenience, we have located the code in a private method, processImage:
  private void processImage(Intent data)
  {
    residencePhoto = (Bitmap) data.getExtras().get("data");
    if(residencePhoto == null)
    {
      Toast.makeText(this, "Attempt to take photo did not succeed", Toast.LENGTH_SHORT).show();
    }
    residenceImage.setImageBitmap(residencePhoto);
  }
Import the Toast class:
import android.widget.Toast;
Fragments
Integrate camera module into ResidenceFragment.
Add imports:
import static org.wit.android.helpers.CameraHelper.showPhoto;
import android.widget.ImageView;
Add a static constant to represent the photo:
private static final int REQUEST_PHOTO = 0;
Create instance variables:
private ImageView cameraButton;
private ImageView photoView;
Invoke the showPhoto method in onStart.
- Its purpose is to display the photo in the thumbnail if a photo exists.
showPhoto(getActivity(), residence, photoView);
Here, for reference, is the refactored onStart method:
  @Override
  public void onStart()
  {
    super.onStart();
    //render google map and set map change listener
    renderMap(MapHelper.latLng(getActivity(), residence.geolocation));
    gmap.setOnCameraChangeListener(this);
    //display thumbnail photo
    showPhoto(getActivity(), residence, photoView);
  }
In addListeners:
- Bind the camera button and thumbnail placeholder to their respective layouts:
    cameraButton  = (ImageView) v.findViewById(R.id.camera_button);
    photoView     = (ImageView) v.findViewById(R.id.myrent_imageView);
- Register listener for camera button:
cameraButton.setOnClickListener(this);
In onActivityResult introduce code to capture the photo filename, save this to the model and invoke a method to display the photo in a thumbnail:
    case REQUEST_PHOTO:
      String filename = data.getStringExtra(ResidenceCameraActivity.EXTRA_PHOTO_FILENAME);
      if (filename != null)
      {
        residence.photo = filename;
        showPhoto(getActivity(), residence, photoView );
      }
      break;
Respond to camera button click: add this code to onClick:
    case R.id.camera_button:           Intent ic = new Intent(getActivity(), ResidenceCameraActivity.class);
                                       startActivityForResult(ic, REQUEST_PHOTO);
                                       break;
Gallery
Add a new layout file for the gallery:
File: res/layout/residence_gallery.xml
<FrameLayout xmlns:android="http://schemas.android.com/apk/res/android"
    xmlns:tools="http://schemas.android.com/tools"
    android:id="@+id/FrameLayout1"
    android:layout_width="match_parent"
    android:layout_height="match_parent"
    android:paddingBottom="@dimen/activity_vertical_margin"
    android:paddingLeft="@dimen/activity_horizontal_margin"
    android:paddingRight="@dimen/activity_horizontal_margin"
    android:paddingTop="@dimen/activity_vertical_margin"
    tools:context="org.wit.myrent.ResidenceCameraActivity" >

    <ImageView
        android:id="@+id/residenceGalleryImage"
        android:layout_width="match_parent"
        android:layout_height="426dp"
        android:src="@drawable/ic_launcher" />

</FrameLayout>
Here is the activity code:
File: org.wit.myrent.activities/ResidenceGalleryActivity.java
package org.wit.myrent.activities;

import java.util.UUID;
import org.wit.myrent.R;
import org.wit.myrent.app.MyRentApp;
import org.wit.myrent.models.Portfolio;
import org.wit.myrent.models.Residence;
import android.app.Activity;
import android.os.Bundle;
import android.view.MenuItem;
import android.widget.ImageView;
import static org.wit.android.helpers.CameraHelper.showPhoto;

public class ResidenceGalleryActivity extends Activity
{

  public static   final String  EXTRA_PHOTO_FILENAME = "org.wit.myrent.photo.filename";
  private ImageView photoView;

  @Override
  protected void onCreate(Bundle savedInstanceState)
  {
    super.onCreate(savedInstanceState);
    setContentView(R.layout.residence_gallery);
    photoView = (ImageView) findViewById(R.id.residenceGalleryImage);
    getActionBar().setDisplayHomeAsUpEnabled(true);
    showPicture();
  }

  @Override
  public boolean onOptionsItemSelected(MenuItem item)
  {
    switch (item.getItemId())
    {
    case android.R.id.home  : onBackPressed();
                              return true;
    default                 : return super.onOptionsItemSelected(item);
    }
  }

  private void showPicture()
  {
    UUID resId = (UUID)getIntent().getSerializableExtra(ResidenceFragment.EXTRA_RESIDENCE_ID);
    MyRentApp app = (MyRentApp) getApplication();
    Portfolio portfolio = app.portfolio;
    Residence residence = portfolio.getResidence(resId);
    showPhoto(this, residence,  photoView);
  }
}
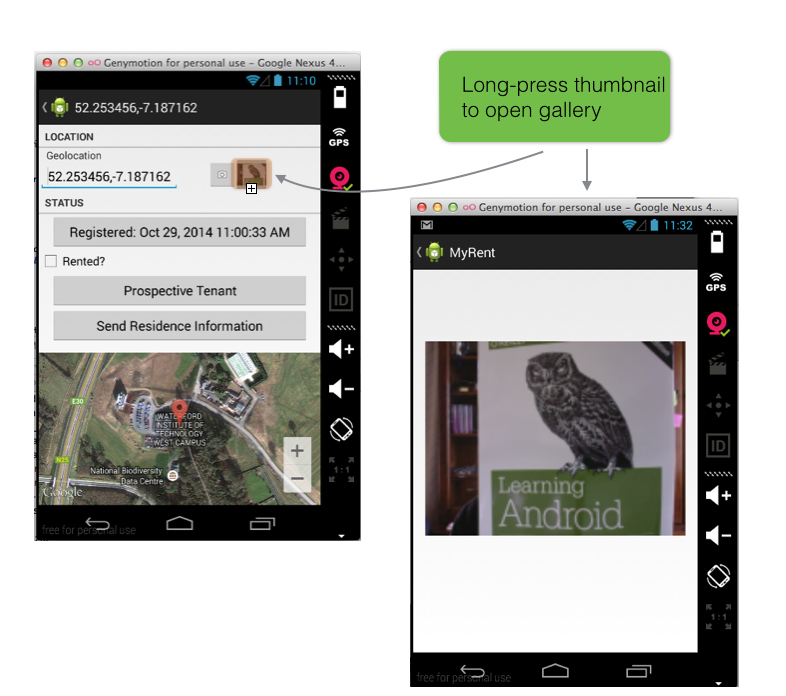
The gallery activity is started by a long-press of the thumbnail in the residence fragment. Here are the necessary changes to ResidenceFragment:
- Add an interface to those already implemented, the purpose being to listen for a long-press of the thumbnail.
public class ResidenceFragment extends SupportMapFragment implements  TextWatcher,
                                                                      OnCheckedChangeListener,
                                                                      OnClickListener,
                                                                      DatePickerDialog.OnDateSetListener,
                                                                      GoogleMap.OnMarkerDragListener,
                                                                      GoogleMap.OnCameraChangeListener,
                                                                      View.OnLongClickListener
- Register the listener in the addListeners method:
photoView.setOnLongClickListener(this);
- Implement the long-press listener method:
  /* ====================== longpress thumbnail ===================================*/
  /*
   * Long press the bitmap image to view photo in single-photo gallery
   */
  @Override
  public boolean onLongClick(View v)
  {
    Intent i = new Intent(getActivity(), ResidenceGalleryActivity.class);
    i.putExtra(EXTRA_RESIDENCE_ID, residence.id);
    startActivity(i);
    return true;
  }
Test
Test the app as follows:
- Build and install on device or emulator
- Create a new residence
- Click the photo button
- Take a photo
- Save the photo
- Verify the photo in thumbnail in details view
- Long-press the thumbnail: does photo display in gallery?
- Return from gallery to details view using up button.
- Switch to landscape and back to portrait.
- Switch to residence list and back to details view: is picture still displayed?
- Shutdown the app and relaunch: is picture still displayed in thumbnail?